|
Insert the following sample model files: ATOMIZER.model,
BODY1.model, BODY2.model, LOCK.model, NOZZLE1.model, NOZZLE2.model,
REGULATION_COMMAND.model, REGULATOR.model, TRIGGER.model and VALVE.model.
They are to be found in the online documentation filetree in the common
functionalities sample folder cfysm/samples.
Switch to Design Mode (Edit > Representations > Design Mode). |

|
-
(Optional) To enable a finer analysis at
element level, ensure that the detailed
computation mode is set to Element level. To do so, select the Tools
> Options..., Digital Mockup command (DMU Space Analysis > DMU
Clash Detailed Computation tab).
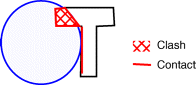
 |
Element level: is the
default detailed computation mode.
Triangles identifying contacts and clearances, intersection curves
identifying clashes and the penetration depth or minimum distance are
computed and displayed. |
 |
Note: The graphics display and storage of
the triangular representation is costly and may adversely affect
performance. |
-
Select Insert > Clash from the menu bar or
click Clash
 in the DMU Space Analysis toolbar to
run a check of type Clearance (3mm) + Contact + Clash between the
valve and all the other products in the document (Selection against all).
in the DMU Space Analysis toolbar to
run a check of type Clearance (3mm) + Contact + Clash between the
valve and all the other products in the document (Selection against all).
-
Click Apply
|
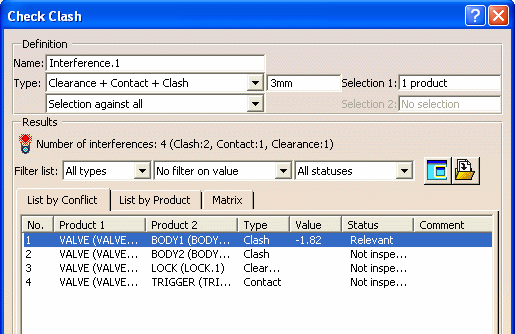
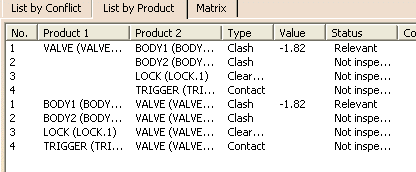
The Check Clash dialog box expands to show
the results of the initial computation.
The number of interferences detected along with the type is indicated
in the dialog box: 4 interferences have been detected. |
|
 |
|
|
Note: The results given in the various
tabs of the dialog box correspond to the worst case. |
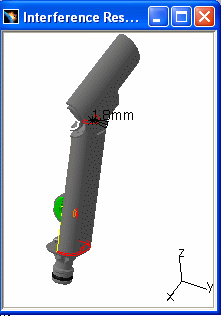
-
Close the Preview window and click
Results Window
 in the Check Clash dialog box to view the selected
interference in a dedicated viewer. The
Interference Results window appears displaying the products in
conflict only.
in the Check Clash dialog box to view the selected
interference in a dedicated viewer. The
Interference Results window appears displaying the products in
conflict only.
|
 |
 |
To open the Preview window again, click Results
window
a second time. The Results Window is closed and the
Preview window is restored.
If however, you close the Results Window (using the
Close button in the title bar), the Preview window will
not be restored. |
-
Click the List by Product tab to display
conflicts associated with products.
|
Results are organized by product in the List by
Product tab. There may be more than one conflict per product.
 |
|
 |
-
Select the product Valve.1, then More>> for a finer
analysis. The dialog box expands to include Detailed Results and
Visualization boxes.
-
Click Product in the Visualization box to obtain an
analysis by individual product.
|
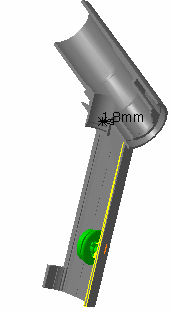
The first conflict (a clash) between the valve.1 and
body1.1 is identified in the Detailed Results box and is visible in
the Results window.
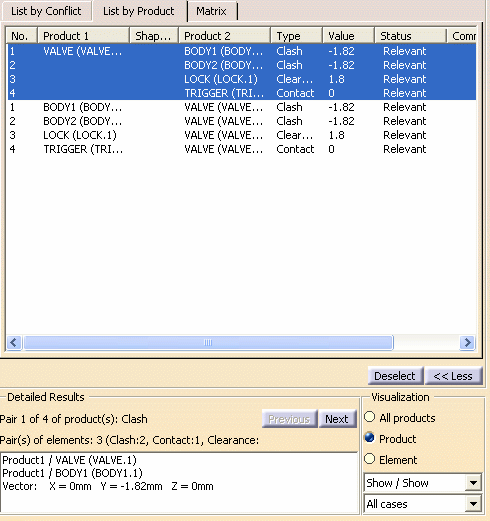 |
|
X,Y,Z coordinates
of the penetration vector are given.
Note that this vector may sometimes be located
outside selected products.
|
|
|
If an intersection volume is requested (Tools >
Options..., Digital Mockup > DMU Space Analysis, DMU
Clash - Detailed Computation tab), the volume is also given
with its inertial box. |
|
The valve product is in conflict with four other
products (body1, body2, the lock and trigger). Previous and next
icons in the Detailed Results box let you browse through them.
The detailed computation has also identified three
different pairs of elements within the first pair of products (valve
and body1). |
-
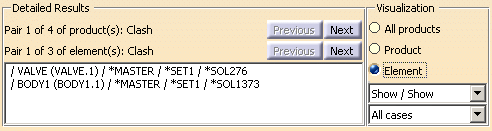
Click Element in the Visualization box to
obtain an analysis at element level. The Detailed Results box
is updated and identifies the elements involved in the conflict. In our
example, elements *SOL276 (Valve) and *SOL1373 (Body1).
-
Click Next to view detailed results for other
pairs of elements in the same two products. You will notice that a
Contact interference is detected for the second pair of elements.
-
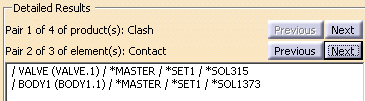
Browse through other pairs of elements in other pairs of
products using Next and Previous.
-
(Optional) export as clash results in the desired format
from the following list:
-
(Optional) Publish your clash result in
HTML
-
Click OK to exit when done. The interference
definition and results are kept as specification tree features.
|
|
Notes:
-
The numeric
value (minimum distance or penetration depth) of the current result
is kept when you exit the command. If you edit the results, the
system re-displays the last current result analyzed.
-
Clicking Deselect in the Check Clash dialog box
removes the current results from the selection.
|
Using Visualization Filters
|
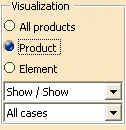 |
-
All products: displays all products
selected in the list.
-
Product: displays products involved in
the current conflict.
-
Element: displays elements involved in
the current conflict. Pairs of elements are listed in the Detailed
Results box and can be browsed using the Next and Previous options.
Note:
The Element option is only available if the detailed
computation mode is set to Element level. This option is particularly
useful when in Design mode. |
-
Show
/ Show drop-down box: a variety of combinations lets you show,
hide or place in low light the geometries of the two products
involved in the conflict. This option has no effect in the Preview
window.
-
All cases drop-down box: lets you select the
graphics representation you want to see displayed (All cases, None
or Worst cases). If Element is selected, the Worst case option is
not available.
Note: The effects of all
options, except the Show / Show drop-down box, can be seen in the
Preview window. |
|