Customizing Queries

Integration Rules Setup
Custom Queries

Integration Rules Setup

This task shows you how to customize query operations. Customizing queries consists of choosing the query criteria which best meet your needs.

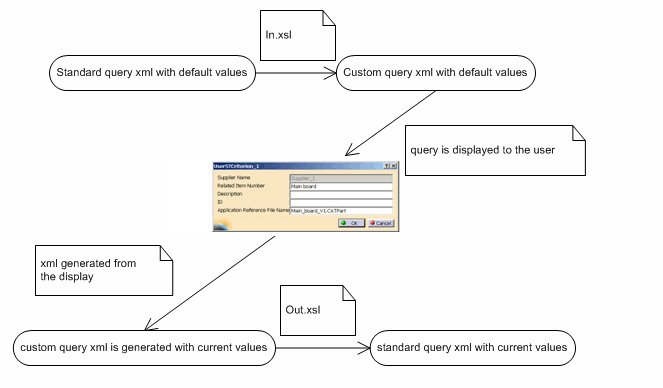
The procedure described here applies to both query types, that is to queries by latest revisions only and to interactive queries. This means that once you have followed the steps as explained here, both query types are affected by your customization.

For reference information about queries, see Identifying SmarTeam Documents.

  1. Launch the Integration Tools Setup utility as explained in the SmarTeam documentation.

  2. From the Integration Tool Setup window, expand the CATIA category.

  3. In the CATIA  category, right-click Mapping Group Types and select Add mapping group type.
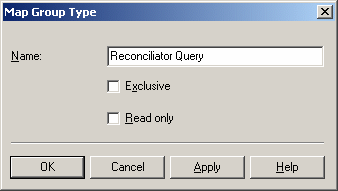
    The Mapping Group Type dialog box is displayed.

  4. Enter Reconciliator Query in the Name field of the Mapping Group Type dialog box.

  5. Click OK to confirm.

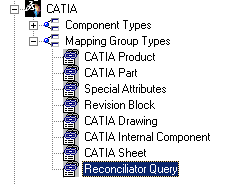
    The new group type Reconciliator Query is now displayed in the Mapping Group Types list.

  6. Right-click Reconciliator Query and select Open groups tree.
    The Mapping Groups Tree dialog box is displayed.

  7. Right-click Reconciliator Query and select Add.

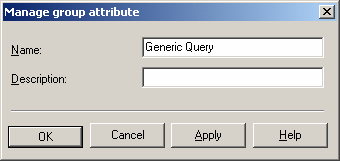
  8. Enter Generic Query in the Name field of the Manage group attribute dialog box that appears.

  9. Click OK to confirm.
    The Mapping Groups Tree dialog box looks like this:

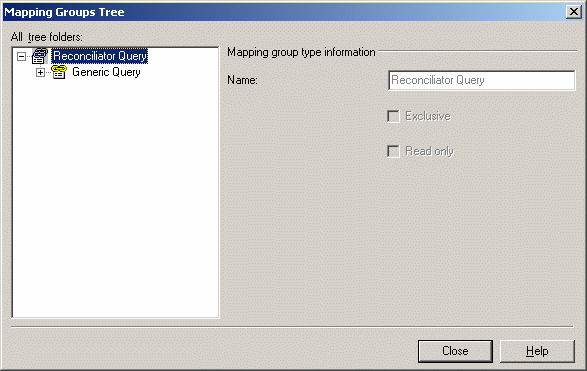
  10. Right-click Generic Query and select Add.
    The Attribute properties dialog box is displayed.

  11. In this dialog box, you need to enter property names as they appear in CATIA. See Properties and Related Attributes for the complete list of all properties which can be added.

    For the purposes of our example, enter CN_REC_FILE_NAME as property name in the Name field.

    Note

    If you select Enable updating of property, the application automatically provides default values for properties.
    We recommend you activate this option if the OEM or supplier exchanges CATIA files with the same file name as the ones in SmarTeam. Conversely, this option should be disabled when exchanging CATIA data with an ENOVIA OEM (file name is not stable in ENOVIA revision mechanism).

  12. Click OK to confirm.
    CN_REC_FILE_NAME is now displayed in the Reconciliator Query tree of the Mapping Groups Tree dialog box.

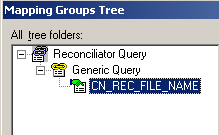
  13. Right-click CN_REC_FILE_NAME and select Add.

  14. In the Attribute mapping dialog box that is displayed, click to the right of the Class name field to access the list of classes which are available for the CN_REC_FILE_NAME property.

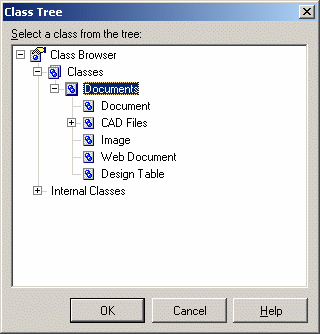
  15. From the Class Tree dialog box which appears, select Documents as the class you want.

  16. Click OK to confirm.
    The Attribute mapping dialog box now looks like this:

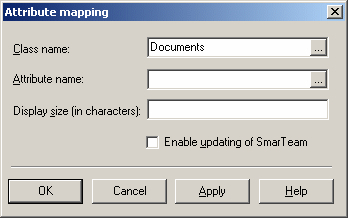
  17. From the Attribute mapping dialog box, click to the right of the Attribute name field to access the list of attributes which are available for the CN_REC_FILE_NAME property.

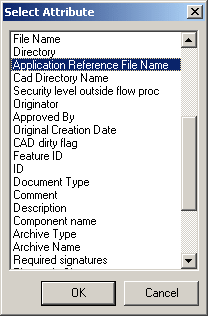
  18. From the Select Attribute dialog box which appears, select Application Reference File Name as the attribute you want to assign.

    Note that you need to select Application Reference File Name, not File Name.


  19. Click OK to confirm.
    The Attribute mapping dialog box now displays Application Reference File Name in the Attribute name field.

  20. Click OK to confirm and close this dialog box.
    The Reconciliator Query list now looks like this in the Mapping Groups Tree dialog box:

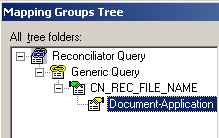
  21. Click OK to confirm your customization and close the Mapping Groups Tree dialog box.

  22. Click Close to close the Integration Tools Setup utility.

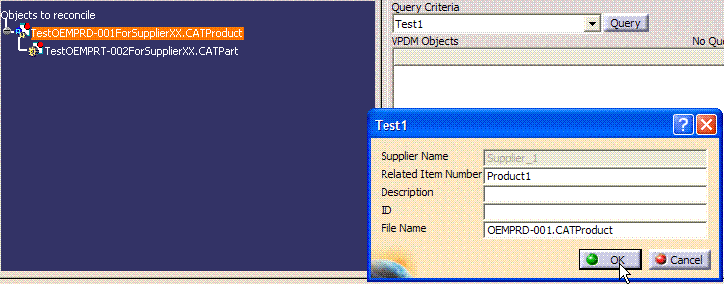
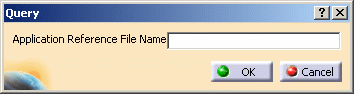
    Both query types you can perform in the Reconcile Window are affected by your customization. Launching an interactive query reflects that CN_REC_FILE_NAME is the only property which you have defined in this scenario.

Properties and Related Attributes

The table below provides a list of all the properties and related attributes which you can set for customizing queries:

Property Name in CATIA Attribute class in SmarTeam Attribute Name in SmarTeam database Attribute Display Name in SmarTeam Mapping Direction
CN_PART_NUMBER Documents CN_PART_NUMBER Part Number CATIA->Database
CN_DESCRIPTIONREF Documents TDM_DESCRIPTION Description CATIA->Database
CN_REC_DocumentID Documents TDM_ID ID None
CN_REC_FILE_NAME Documents CAD_REF_FILE_NAME Application Reference File Name CATIA->Database

Notes

  • CN_PART_NUMBER
    Check that the display size for the Part number is set to 255 characters at least.
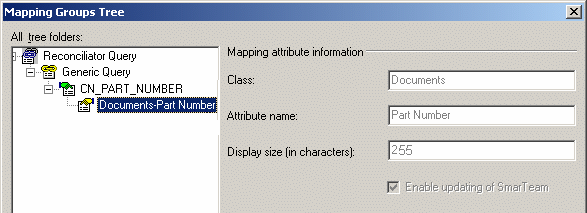
  • CN_REC_FILE_NAME
    We recommend you set this option to NONE when exchanging CATIA data with an ENOVIA OEM (file name is not stable in ENOVIA revision mechanism).

For reference information about the Integration Tools Setup Utility, see the SmarTeam documentation.

Custom Queries

How to Define Custom Queries

All custom queries are added to a single xml file, CATReconcileCustomize.xml

 <?xml version="1.0" encoding="UTF-8"?>
<configuration classpath="c:\java\xslutil.jar;c:\java\V5JSystem.jar;c:\java\xmltools.jar;c:\java\xmlapi.jar">
<criterionList>
<criterion name="Test1" environment="TeamPDM" father="Interactive-Latest available revision" order="1" In="c:\tmp\Test1_in.xsl" Out="c:\tmp\Test1_out.xsl" />
</criterionList>
</configuration>
 

The environment variable CATReconcilePath specifies the path where the CATReconcileCustomize.xml file is located.  The following command can be used to set your environment:
chcatenv -e $CATDefaultEnvironment -a user -var "CATReconcilePath=../ReconciliatorCustom
F
or more information on setting your environment please refer to the CATIA Installation and Deployment Guide> Customizing your Environment on Windows. 

Queries are used to map objects loaded in CATIA to objects existing in the SmarTeam database.  The SmarTeam reconciliator provides one query, Latest available revision, which can be launched without an interface or interactively.  Custom queries can be defined based on any of the standard (base DS) queries.  Custom queries can define the parameters that make up the query and/or supply default values for the query parameters.  Only parameters defined in the Integration Rules Setup are available for custom queries. The following steps summarize how the custom query works:


  • The In.xsl file converts the standard query xml to the custom query xml

  • The query panel is displayed based on the parameters specified in the custom query xml.

  • The user establishes their query criteria in the query panel and clicks the Ok button of the query panel.

  • The custom query xml stream is generated by the system based on the query panel.

  • The Out.xsl file converts the custom query xml to the standard query xml which can be read by the system to return the desired query results.

To produce a custom query you will need to:

  • Understand the xml for the standard query you want to customize.

  • Create the In xslt file

  • Create the Out xslt file

  • Define the custom query name


In the CATReconcileCustomize.xml file, each custom query will define, at a minimum, the query name, the standard query on which it is based and the xslt (Extensible Stylesheet Language Transformations) files (In/Out).

Example of a Custom Query definition

This sample CATReconcileCustomize.xml file defines two custom queries:  UserCriterion_1 and UserCriterion_2.  Both are based on the Interactive-Latest Available Revision standard query.  All specify the same In/Out xslt files:  UserCriterionIn.xsl and UserCriterionOut.xsl.

<?xml version="1.0" encoding="UTF-8"?>

<configuration classpath="xslutil.jar;V5JSystem.jar;xmltools.jar;xmlapi.jar">
<criterionList>
<criterion name="UserCriterion_1" environment="TEAMPDM" father="Interactive-Latest available revision" order="1" In="c:\tmp\UserCriterionIn.xsl" Out="c:\tmp\UserCriterionOut.xsl"/>
<criterion name="UserCriterion_2" environment="TEAMPDM" father="Interactive-Latest available revision" order="2" In="c:\tmp\UserCriterionIn.xsl" Out="c:\tmp\UserCriterionOut.xsl"/>
</criterionList>

</configuration>


 The following table details the structure of the query definition in the  CATReconcileCustomize xml file:

XML Node Attribute Definition
configuration classpath Specifies the java $CLASSPATH for the xslt conversion.  The absolute path must be specified (or libraries should be local).
criterionList    

criterion

name The name of the custom query


environment VPDM environment applicable for this query.  Setting this value will automatically set the correct VPDM when this query is chosen.  Value for SmarTeam:  TEAMPDM.
  father Name of the query on which the custom query is based.  Values for SmarTeam: Latest available revision, Interactive-Latest available revision


order Enables the criteria to be displayed in the specified order in the user interface.
  In Name of the xslt file used to transform the standard (father) query's xml file into a new xml that describes the customized query.  Only the transformed xml file can be used to display the query in the list of queries.  The absolute path must be specified.


Out

Name of the xslt file used after the user inputs their search criteria and executes the search. The Out xslt file is used to transform the customized query into one that can be used by the query.  The absolute path must be specified.


How to Use a Custom Query in the Global Query/ Global Set

The custom queries you develop can be incorporated in the Global Query and/or Automatic Preselection Global Set by editing the xml that describes the parameters of this global set.  To do this, modify the following file located in:

  UNIX:  <unload_dir>/<os>_a/reffiles/SuppChain

  MS-Windows:  <unload_dir>\<os>_a\reffiles\SuppChain

For Global Query:  CATPDMAutoRulesValuator_GlobalQueryXMLForm_TeamPDM.xml

For Automatic Preselection:  CATPDMAutoRulesValuator_AutoPreselectionXMLForm_TeamPDM.xml

Add a line for each custom query in the queryName section of the xml definition as follows (in this example, the custom query UserCriterion_1 is added to the list of standard queries of Automatic Preselection Global Set):

<ParametersList>
<Parameter Name="queryName" Type="String"
Alias="%CATPDMReconcileAutoRules:queryName%" Mandatory="Yes">
<DefaultValuesList>
<DefaultValue>%STIPDMCriterion:STI.ByLastRevision%</DefaultValue>
<DefaultValue>UserCriterion_1</DefaultValue>
</DefaultValuesList>
<CurrentValue>%STIPDMCriterion:STI.ByLastRevision%</CurrentValue>
</Parameter>
...
</ParametersList>


Defining the In/Out XSLT Files

Each of the standard queries is defined by an xml file which describes all the available attributes for the query. When you are mapping objects in the reconciliator and you select a particular query the xml file defining all the attributes is used to create the query displayed.

To assist you in defining your own custom queries, the environment variable REC_Display_CustomCriterion=1 can be set to display (in standard output) the xml for any query in the reconciliator.

 The following table details the structure of the query xml file

XML Node Attribute Definition
Parameter List   Root of the xml document
Parameter Name Query parameter identifier


Type Attribute type (i.e. String)


Alias Query parameter display name
  Shown Indicates if the query parameter is to be displayed.  Values: Yes/No


Mandatory Indicates if the query parameter must be defined. Values:  Yes/No
  Sensitive Indicates if updating the query parameter will result in the check process.  Values:  Yes/No


AccessMode

Indicates how the values can be accessed. Values: ReadWrite/ReadOnly

  Template Values:  Yes/No


AccessMode

Indicates how the values can be accessed. Values: ReadWrite/Read

  Multi-valuated Indicates if the query parameter allows multiple values.  Values:  Yes/No


DefaultListExtensible

Indicates if the query parameter has authorized values (i.e. a drop-down list of possible values is shown). If yes then the DefaultValuesList is used to populate the the list of authorized values). Values:  Yes/No

DefaultValuesList   Used to define a list of authorized values

DefaultValue


Authorized value for a parameter

CurrentValue   Current value for the parameter

To create a custom query, you will need to create two xslt files

  • The In xslt file transforms the standard query xml into a new custom query xml. The new custom query xml file is used to display the custom query when it has been chosen by the user.
    Example:  The In xslt file Test1_in.xsl,  can be used to produce the following customized query, Test1

    The standard query has been customized in the following ways:

    • Supplier Name is a new read only field that contains the default value: Supplier_1.

    • File Name  has been modified by suppressing the four first characters and limiting the name to ten characters (in the example above TestOEMPRT-002ForSupplierXX.CATPart is modified by removing the first four characters ("Test") and then only taking the next ten characters (eliminating "ForSupplierXX").

  • The Out xslt file is used (after the user inputs their criteria into the query dialog and applies the query) to transform the custom query xml into the xml file of the chosen standard query so it can be used by the system to retrieve the query results.
    Example:  The Out xslt file, Test1_out.xsl, transforms the custom query back into the standard one which can be used by the sytem to execute the query.