|
This task shows you how to create a curve that is
parallel to a reference curve. |
") |
Open the
ParallelCurves1.CATPart
document. |

|
-
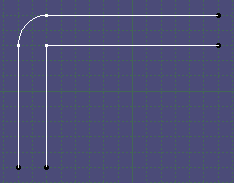
Click Parallel Curve
 . .
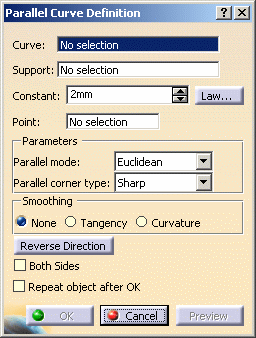
| The Parallel Curve Definition dialog box appears. |
 |
-
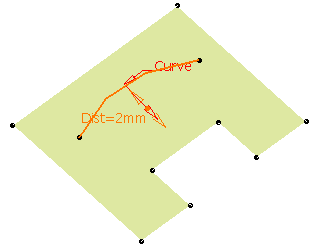
Select the reference Curve to be offset.
-
Select the Support plane or surface on which
the reference curve lies.
-
Specify the offset of the parallel curve either by:
- entering a value or using the graphic manipulator in the
Constant field.
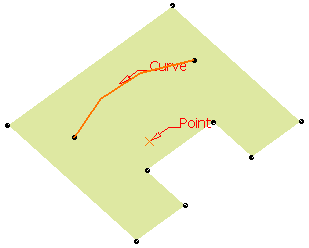
- selecting a point in the Point field (in both
Geodesic and Euclidean mode)
| In that case, Constant is grayed. |
 |
|
-
Choose the parallelism mode
to create the parallel curve.
- Euclidean: the distance between both curves will be
the shortest possible one, regardless of the support.
| If you select this mode, you can choose to
offset the curve at a constant distance from the initial
element, or according to a law. In
this case, you need to select a law as defined in
Creating Laws. |
 |
The law can be negative,
providing the curves are curvature continuous. |
 |
-
it is advised to
use curvature continuous laws,
-
it is possible to
create a parallel curve with a law that reverses (which means
becoming either positive or negative) only on a curve
that is tangency continuous.
|
|
- Click Law... to
display the Law Definition dialog box. In this case, you need to
select a law as defined in Creating Laws.
| The 2D viewer enables you to preview the law evolution
before applying it. |
 |
The Law Viewer allows you to:
- visualize the law evolution and the maximum and minimum
values,
- navigate into the viewer by panning and zooming (using to
the mouse),
- trace the law coordinates by using the manipulator,
- change the viewer size by changing the panel size
- reframe on by using the viewer contextual menu
- change the law evaluation step by using the viewer
contextual menu (from 0.1 (10 evaluations) to 0.001 (1000
evaluations)).
|
-
Enter Start and
End values.
- Choose the law type.
Four law types are available:
- Constant: a regular law, only one value is
needed.
- Linear: a linear progression law between the
Start and End indicated values
- S type: an S-shaped law between the two
indicated values
- Advanced: allowing to select a Law element as
defined in Creating Laws.
|
| For the S type, you need to define a second value. The
distance will vary between these two values. |
-
Check Inverse law to reverse the law as
defined using the above options.
-
Click OK to return
to the Parallel Curve Definition dialog box.
|
- Geodesic: the distance between both curves will be
the shortest possible one, taking the support curvature into
account.
|
|
In this case, the offset always is constant in every points
of the curves and you do not need to select a corner type. |
|
-
Select corner type
(useful for curves presenting sharp angles):
- Sharp: the parallel curve takes into account the
angle in the initial curve
- Round: the parallel curve is rounded off as in a
corner
 |
| |
|
|
This
type is only effective with acute angles, not with obtuse or
re-entrant angles. It corresponds to the trace left by a ball
rolling on a profile. |
|
-
Click Preview.
| The parallel curve is displayed on the support surface and normal
to the reference curve. |
-
Click OK to create the parallel curve.
| The curve (identified as Parallel.xxx) is added to
the specification tree. |
| |
 |
 |
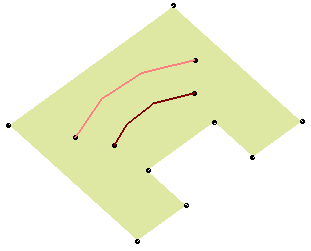
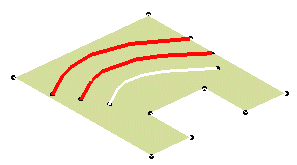
| Parallel curve defined by an constant offset value |
Parallel curve defined by a passing point |
| |
|
 |
Parameters can be edited in the 3D
geometry. To have further information, please refer to the
Editing Parameters chapter. |
|
| |
Optional Parameters
|
| |
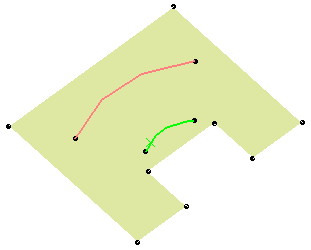
- You can click Reverse Direction to display the parallel
curve on the other side of the reference curve or click the arrow
directly on the geometry.
- When the selected curve is a planar curve, its plane is selected by
default. However, you can explicitly select any support.
- when you modify an input value through the
dialog box, such as the offset value or the direction, the result is
computed only when you click Preview or OK.
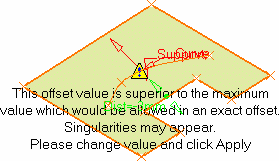
- Would the value be inconsistent with the selected geometry, a warning
message is displayed, along with a warning sign onto the geometry. If you
move the pointer over this sign, a longer message is displayed to help
you continue with the operation.
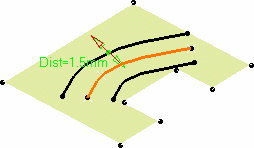
- Check Both Sides to create two parallel curves,
symmetrically in relation to the selected curve, and provided it is
compatible with the initial curve's curvature radius.
| The second parallel curve has the same
offset value as the first parallel curve. In that case it appears as
aggregated under the first element. |
| Therefore both parallel curves can only be edited together and
the aggregated element alone cannot be deleted. |
| If you use the
Datum
mode, the second parallel is not aggregated under the first one, but
two datum elements are created. |
 |
- Click Repeat object after OK to create several parallel
curves, each separated from the initial curve by a multiple of the
offset value.
| Simply indicate in the Object Repetition dialog box the number of
instances that should be created and click OK. |
 |
|
|
|
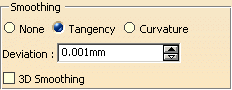
Smoothing
|
| |
You can smooth the curve by checking either: |
| |
|
| |
- None: deactivates the smoothing result
|
| |
With a support surface:
- Tangency: enhances the current
continuity to tangent continuity
- Curvature: enhances the current continuity to curvature
continuity
You can specify the maximum
deviation for G1 or G2 smoothing by entering a value or using the
spinners.
In the case of an Euclidian parallel
curve, only small discontinuities are smoothed, especially discontinuities
that are introduced during the parallel operation.
Moreover, a topology simplification
is automatically performed for G2 vertices: cells with a curvature
continuity are merged. |
| |
Without support surface:
- 3D Smoothing: the smoothing is
performed without specifying any support surface.
As a consequence, the resulting smoothed curve has a better continuity
quality and is not exactly laid down on the surface.
As a consequence, you may need to activate the Tolerant laydown
option. Refer to the
Customizing General Settings chapter.
This option is available if you previously select the Tangency or
Curvature smoothing type.
Open the
ParallelCurves2.CATPart document.
 |
|
 |
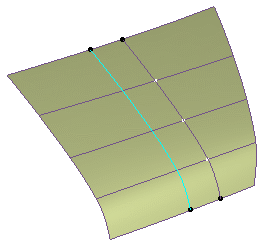
| With 3D smoothing option checked |
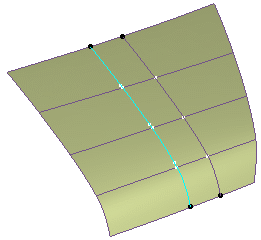
With 3D smoothing option unchecked |
|
|

|