|
This task shows you how to
change the context of a part in an existing assembly and how to make it
contextual or not (and make it depend or not on another document). This
documentation is divided into 3 scenarios:
|
 |
See also next task
Defining Contextual Links: Editing and Replacing Commands. |
| |
Defining Contextual Links Between 2 Instances of The Same Part
|
 |
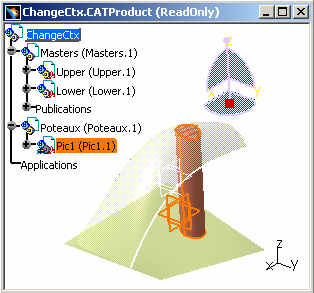
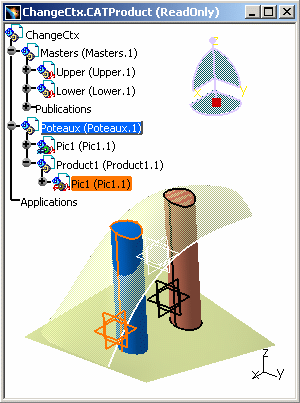
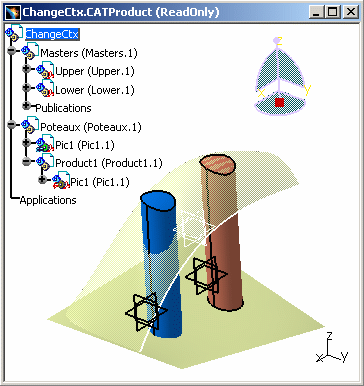
Open the ChangeCtx.CATProduct
document.
|
 |
-
Copy Pic1.CATPart and paste it in Poteaux.CATProduct.
-
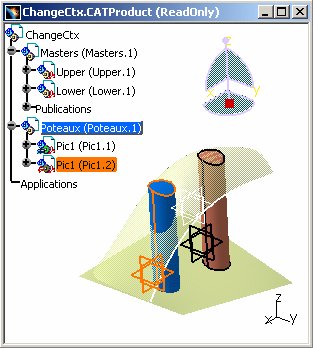
Because it is a copy of Pic1 (Pic1.1), Pic1 (Pic1.2)
remains
hidden behind Pic1 (1.1) in the Geometry space. Before moving Pic1
(Pic1.2), you need to double-click Poteaux (Poteaux.1) to make it
active, then select Pic1 (Pic1.2) - Poteaux becomes UI active (blue) -
and you can drag and drop the compass on Pic1 (Pic1.2) to move it.
-
So that you can more easily recognize both Parts, give
Pic1 (Pic1.2) the blue color via the Properties contextual
command). Pic1 (Pic1.1) is the pink cylinder and Pic1 (Pic1.2) is the
blue one.
Pic1.CATPart is a Contextual Part.
Pic1 (Pic1.1) is a contextual instance
 . .
Pic1 (Pic1.2)
 is the second or subsequent
instance of this contextual Part. is the second or subsequent
instance of this contextual Part.
|
|
|
If you want to be more familiar
with the compass manipulation, you can read
Manipulating Objects Using the Mouse and the Compass in CATIA -
Infrastructure User's Guide. This tutorial will show you how to
move and rotate viewpoints and non-constrained objects. |
|
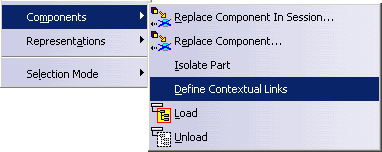
-
Double-click ChangeCtx so that it is UI-active (in
blue) and in the contextual menu of Pic1 (Pic1.2), select
Components > Define Contextual Links.
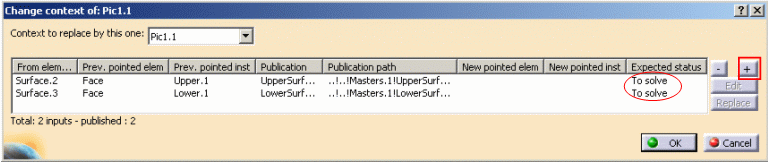
The following dialog box is displayed:
-
Click OK. For more information about this
window, please refer to the Change Context window described
below.
With this command, Define Contextual Links, the user can
specify the Contextual Instance.
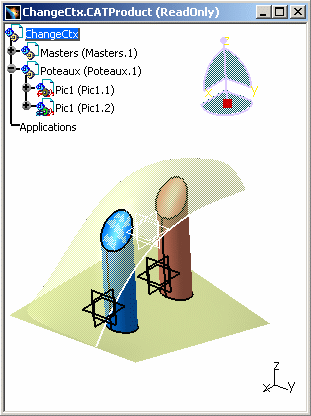
Pic1 (Pic1.1) is no longer a Contextual Part, it is a "regular"
instance, its icon changes into: .
As a consequence, Pic1 (Pic1.2) is now the Contextual Instance, its
icon becomes: .
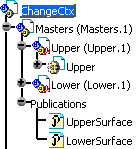
The Contextual Part Pic1 has to be updated because
the Contextual Instance has been changed.
-
Select the Update command in the Edit
menu and you obtain:
There is only one Contextual Instance (a Contextual Instance for
a Reference). The Define Contextual Links functionality
replaces the former Contextual Part.
Only Pic1 (Pic1.2) is set between the Upper and Lower surfaces, it
keeps link with the Surfaces whereas Pic1 (Pic1.1) is no longer in
contact with the Surface because it is no longer the Contextual
Instance (its property has changed).
|
 |
Defining Contextual Links Between 2 Separate
Instances (with no dependences)
|
-
The first demonstration is finished, close
ChangeCtx.CATProduct without
saving and reopen it.
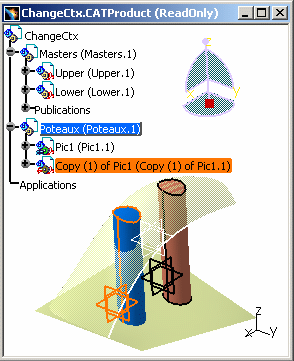
-
Copy Pic1 (Pic1.1), select
Poteaux.CATProduct and the command Edit > Paste
Special. The Paste Special dialog box is displayed:
select Break link and click on OK.
-
Copy (1) of Pic1 is hidden behind Pic1 (1.1) in the
Geometry space, therefore double-click Poteaux so that it is UI-active
(in blue) and drag and drop the compass on Copy (1) of Pic1 to move it.
-
So that you can more easily recognize both Parts, give
Copy (1) of Pic1 the blue color via the Properties
contextual command). Pic1 (Pic1.1) is the pink cylinder and Copy (1) of
Pic1 is the blue one.
-
Double-click ChangeCtx so that it is UI-active (in
blue) and in the contextual menu of Copy (1) of Pic 1 (Copy (1) of
Pic1.1), select Component > Define Contextual Links:
Pic1.1 remains the Contextual Instance of the
Contextual Part Copy (1) of Pic1. Its symbol is
.
-
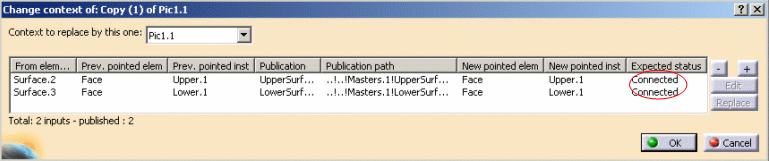
Click OK and you obtain:
Copy (1) of Pic1.1 is now the Contextual Instance of
the Contextual Part Copy (1) of Pic1 and it gets this symbol:
.
With the Copy / Paste Special Break Link, there are two
distinct parts that is to say two References and two Contextual Parts:
Pic1 (Pic1.1) and Copy (1) of Pic1 (Copy (1) of Pic1.1). These two
References are contextual respect to this Instance Pic1 (pic1.1) and
both get this symbol: .
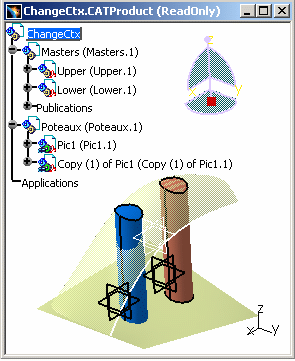
-
Update the document and you can see Copy (1)
of Pic 1 is still green. It adapts itself to the Surfaces.
With the Define Contextual Links
functionality, both Pic1 and Copy of Pic1 are contextual: they keep
a link with their Instance belonging to ChangeCtx.CATProduct.
|
|
|
|
Defining
Contextual Links Between 2 Instances Belonging to Different Products
|
|
-
Open the ChangeCtx.CATProduct
document.
-
Under Poteaux.CATProduct, insert a new product,
Product1 (Product1.1).
-
Copy the contextual Part, Pic1 (Pic1.1), and paste it
into Product1. This copy of Pic1 is the second or subsequent instance
of this contextual part. This copy of Pic1 is hidden behind Pic1 (1.1)
in the Geometry space.
-
Double-click Poteaux so that it is UI-active (in blue)
and drag and drop the compass on Pic1 (Pic1.1) in Product1 and move it.
-
To make both the Parts recognizable easily, give
Pic1 (Pic1.1) in Product1 the blue color via the Properties
contextual command). Pic1 in Product1 is the blue cylinder and Pic1 in
Poteaux is the pink one.
Pic1.CATPart is a Contextual Part.
Pic1 (Pic1.1) in Poteaux is a contextual instance
.
Pic1 (Pic1.1) in Product1 is the second or
subsequent instance of this
contextual Part.
-
Double-click ChangeCtx so that it is UI-active (in
blue) and in the contextual menu of Pic1 (under Product1), select
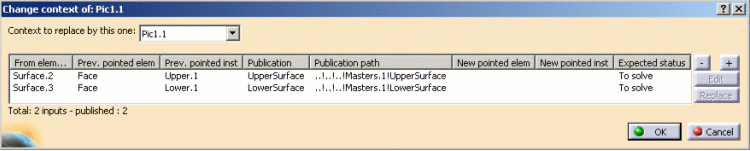
Components > Define Contextual Links. The Change
context dialog box appears:
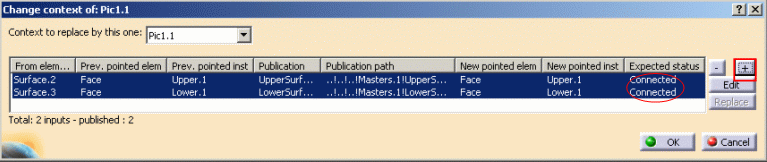
By choosing the option
Expected Status as To Solve, the Instance of Pic1
under Product1 becomes the contextual instance of the Part Pic1.
This window provides information about the context you want to
change and the external references of the instance Pic1 (in
Product1):
- Expected status: To solve, meaning that the links have
to be restored between the following references:
- Pic1 and Surface.2 (belonging to the
Previous pointed element Face and to the Previous pointed
instance Upper.1)
- Pic1 and Surface.3 (belonging to
the Previous pointed element Face and to the Previous pointed
instance Lower.1) in External References.
-
Select both lines and press the
 button
once, corresponding to the number of the missing levels:
..!..!...!Masters.1UpperSurface and click OK. button
once, corresponding to the number of the missing levels:
..!..!...!Masters.1UpperSurface and click OK.
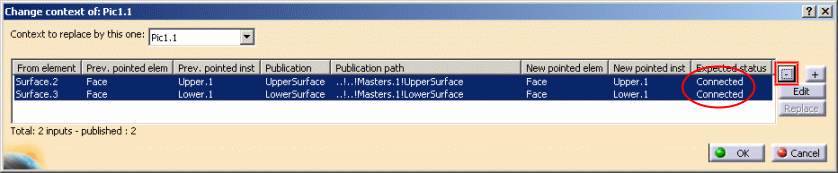
The Contextual Part Pic1 has to be updated because the
Contextual Instance has been changed. Update the
document and you can see:
The links are converted into
..!..!..!Masters.1UpperSurface and ..!..!..!Masters.1LowerSurface.
Pic1 (Pic1.1) in Product1 is now the
Contextual Instance, its icon becomes:
because there is only one
Contextual Instance for a Reference (Pic1 in Product1 and Pic1 in
Poteaux have the same Reference). Applying the Define
Contextual Links functionality on Pic1 in Product1 means
when you change its property, it becomes the Contextual Part.
Pic1 (Pic1.1) in Poteaux is no longer
a Contextual Part, it is a "regular" instance, its icon changes
into: .
When more than one contextual instance
of the same CATPart Reference is present in a CATProduct, only one
of them can be the Contextual Instance (with the green wheel and
little chain) at a time, when the subsequent instance is
"Copy/Paste Special as a Result With Link" of this contextual
instance.
-
To make Pic1 (in Poteaux) a Contextual Part, select the
Components > Define Contextual Links contextual
command. The Change context dialog box is displayed:
-
To choose new pointed elements and instances,
select both lines and press the  once, corresponding to the number of the previous levels and you
obtain: ..!..!Masters.1UpperSurface and ..!..!Masters.1LowerSurface.
once, corresponding to the number of the previous levels and you
obtain: ..!..!Masters.1UpperSurface and ..!..!Masters.1LowerSurface.
Pic1 (in Poteaux) becomes a contextual part
. Click OK and
Update your document:
|
|
|