|
The first task,
Replacing a Component by another one in Session, involves in
replacing a component and showing the impacts of this action. Using the
Replacement Component command means replacing one component with another.
The second task,
The Impacts of the Replace Command, explains what can be the impacts
of replacing a component whose Part Number is same as the replaced
element, and what can be done to solve the conflict.
The third task
Replacing a Specific Instance or All
Instances of a Reference, shows you that you can replace several
instances. The process is the same but when a component dialog box is
displayed, you select the component of your choice and tick the
MultiInstances box in order to replace all instances. |
 |
See also next task
Replacing on a Specific Instance or All
Instances. |
|
|
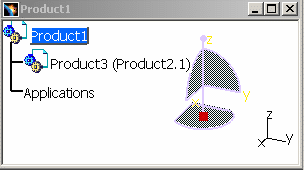
Within an
assembly, two components can have the same Part Number and be the
Instances (1 and 2, in our example below) of two References only if their
References are inserted in two different documents (in different assembly
levels, Local References). For instance:
- occurrence 1 is an Instance of CARBODY Reference in Landing_Gear
document.
- occurrence 2 is an Instance of CARBODY Reference in
PartNumberConflicts1 document.
A Local Reference is a Reference that can only be used in its own
document. This is what we call an embedded Reference in a CATProduct. For
more information about Local References, please refer to
Naming or Renaming a product.
Therefore, if the Replace All Instances functionality is
applied to one of these instances (1), it will not replace both Instances
and the behavior will be the same like the common Replace:
For more information about this example, please refer to
Inserting Existing Components.
A V4 model is not a Product, therefore it is considered as a
Representation, a CATShape.
A model is inserted in a product structure by means of a local Reference
created in this particular case. The model is a representation attached
to this Reference. For more information, please refer to
Managing Representations. |
 |
- Replacing a
component means that you are replacing a Reference by another
Reference and you are also keeping the same Instance. The Instance
Name is the data of an Instance. It is not changed after the Replace
operation, so that links (External References) are not broken. You
are allowed to reconnect the links with the new Reference.
For more
information about modifying Instance Name, please refer to
Naming or Renaming a product (Instance or
Reference).
- Actions performed after replacing components cannot be undone. The
history of actions is cleared and the Undo
icon is grayed out.
|
| |
Replacing a Component by another one in Session
|
 |
If you want to
replace your CATIA documents by downloaded ones, you need to activate the
following option, in Tools > Options > General > Document >
Document Environments - Loaded document: Allowed.
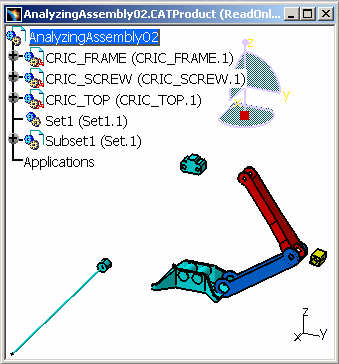
Open the
AnalyzingAssembly02.CATProduct.
|
 |
-
Right-click CRIC_SCREW (CRIC_SCREW.1) and the
Replace Component contextual command. The following windows are
displayed:
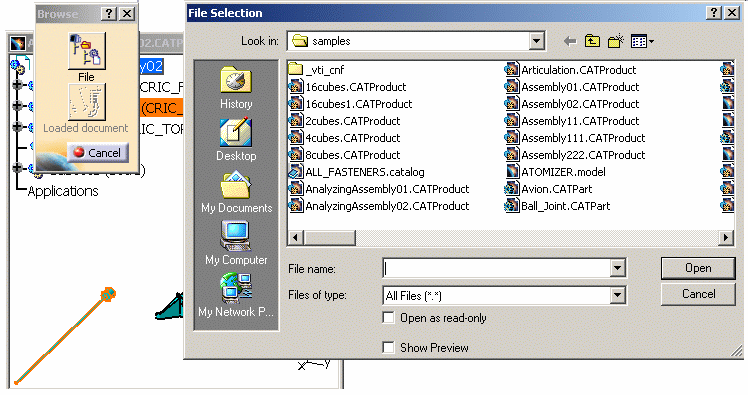
-
Click Cancel in the file Selection window. The Browse
window is still available.
-
Click the Loaded document icon. A Session document
window appears:
-
Select one of the downloaded documents, for instance:
Subset1.CATProduct. An Impacts on Replace window is
displayed, showing you what can interfere with the other downloaded
documents. For more information about the impacts on replace, please
refer to the following section.
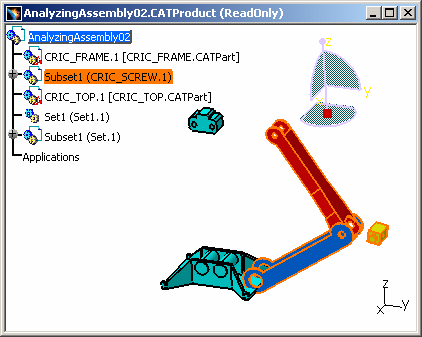
-
In the Impacts on Replace
window,
select
Yes
radio button and click
OK if all the replacing impacts have resolved. And you obtain:
|
| |
 |
The Impacts of
the Replace Command
|
|
|
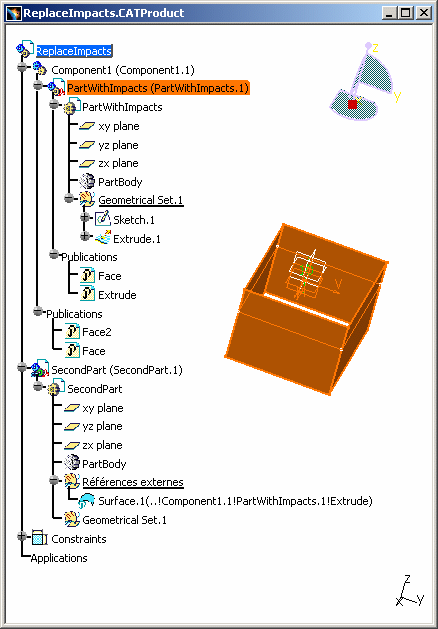
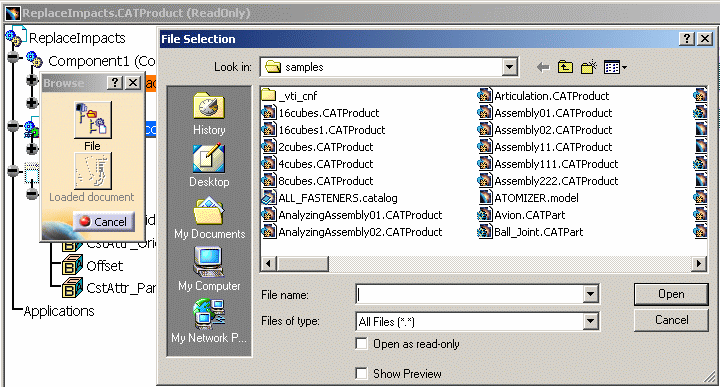
Open the
ReplaceImpacts.CATProduct
document.
Note: depending on the document environments
you have allowed in the Document settings, an additional window may
appear simultaneously to let you access your documents using an alternate
method. For detailed information, refer to
Opening Existing Documents Using the Browse Window. |
|
|
-
Select PartWithImpacts (PartWithImpacts.1) and click
the Replace Component icon
 .
You can also right-click on PartWithImpacts (PartWithImpacts.1) and go
to Components > Replace Component. .
You can also right-click on PartWithImpacts (PartWithImpacts.1) and go
to Components > Replace Component.
The File Selection and Browse windows are displayed:
|
|
|
To have the
Browse window opened, go to Tools > Options > General. In
the Document tab, select Loaded document in the Document Environments
panel and click Allowed. |
| |
-
Click Cancel in the File Selection window;
the Browse window becomes activated.
Or if you select
Support1.CATPart for instance, in the File Selection window, and
click Open, the Browse window disappears and, An
Impacts on Replace window appears:
Therefore, you do not need to follow the steps 3 and 4.
-
Click the File icon and another File
Selection window appears.
-
Select
Support1.CATPart for instance in the File Selection window and
click Open.
An Impacts on Replace window appears:
|
|
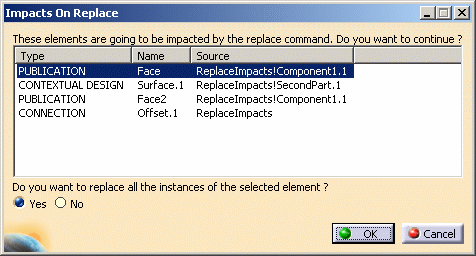
This window shows
you the impacts of the Replace command on PartWithImpacts.CATPart. You
can see the impacted objects (2 Publications, 1 External Reference and 1
Constraint) that can be re-connected or not. You have access to the
following information:
- Type of the impacted objects (Publication, Contextual Design
Connection)
- Name of the impacted objects (which is connected to
PartWithImpacts.CATPart)
- Source or path of the impacted objects
You can interrupt the Replace operation by clicking the
Cancel button. |
|
|
-
There is
a question in the window:
By default, the YES option is
checked. It means that all the instances will be replaced (and the Part
number conflict window does not appear because it is no longer needed).
If you click NO, only the selected instance will be
replaced but, in the case of a Part Number conflict, the Part
Number Conflict dialog box appears. For more information about
Part Number Conflict, please refer to the following scenario.
-
Click OK and the Impacts on Replace
dialog box disappears. You can visualize the impacts in the Geometry
and in the Specification Tree.
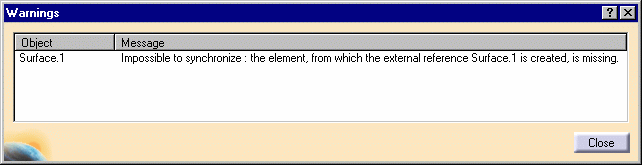
-
Update your document and the following warning points
out the impacted objects: Surface.1 no longer has its External
Reference.
|
|
|
You can however use
the replace command on the objects that may be impacted. The links can be
modified but not necessarily broken. |
|
-
Click Close. The symbol next to the External Reference
 means that the part is not
connected with the correct External Reference. The other Publications
with a broken link are represented with this yellow exclamation mark means that the part is not
connected with the correct External Reference. The other Publications
with a broken link are represented with this yellow exclamation mark
 meaning that the link with the
root document has been lost. meaning that the link with the
root document has been lost.
|
|
|
-
When you replace a Product by another Product, the
Instance path is broken (all links under this instance are broken),
because you are destroying a Product and re-instantiating a different
one. Therefore, you cannot map the Instance's links anymore.
When you replace a Product by another Product, note that only the Part
Number is modified, but the Instance Name never changes:
-
When you replace a Product by a copy of this Product,
the process is successful because the Instance links are not modified,
only the Reference is changing (all links are kept), because the
Reference of the Copy of the Product belongs to the same family and
Instance links can be re-mapped.
-
About Reference / Reference link: If the replaced Reference is pointed by a Reference /
Reference link, this link is not impacted nor broken, as a consequence
the replaced Reference will not be unloaded.
|
|
|
|
Replacing a Specific Instance or
All Instances of a Reference
|
|
|
This task consists
in replacing All Instances of a reference and a Specific Instance.
As it was described in the previous section the user activates the
Replacement Component icon
to replace one component with another. This command automatically chooses
the first instance of the object that is going to be replaced. |
|
|
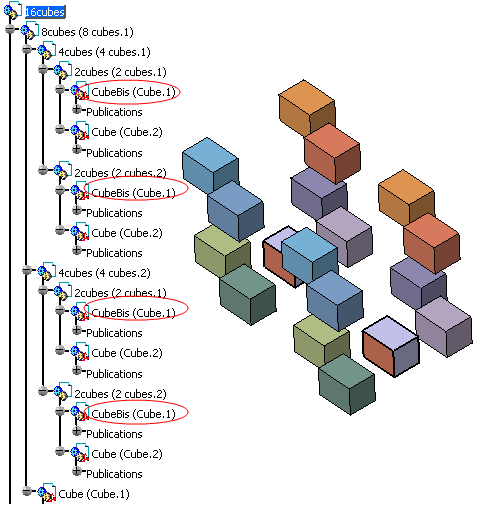
Open the
16cubes.CATProduct document:
|
|
This document
contains two identical CATProducts: 8 cubes (8 cubes.1) and 8 cubes (8
cubes.2). Both CATProducts have the same CATParts: Cube (Cube.1) and Cube
(Cube.2). |
|
|
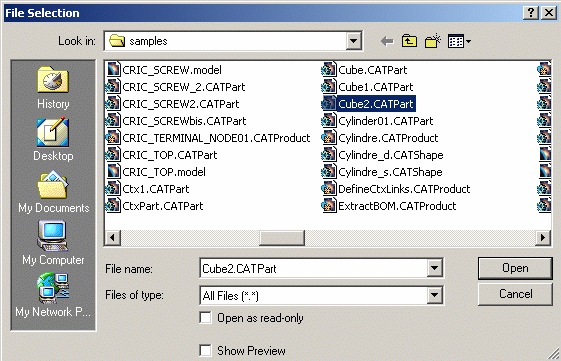
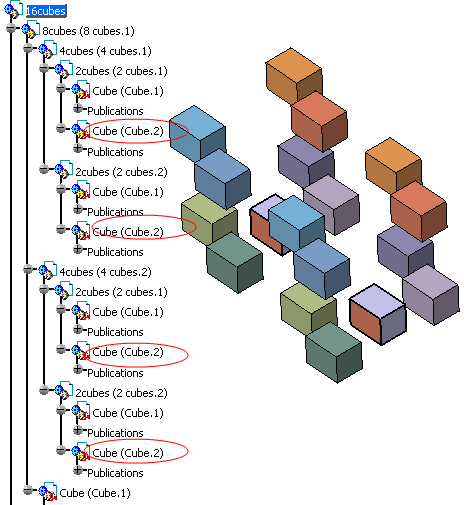
-
First of all, select Cube (Cube.1) and click the
Replace Component icon
.
The File Selection dialog box is displayed, select
Cube2.CATPart and click Open:
-
Click Open and the Impacts on
Replace dialog box appears, with the following message:
|
|
|
If you choose to
replace Cube(Cube1.1) with Cube2(Cube1.1), there is a Part Number
conflict because both entities have the same Part Number
(Cube). Therefore, if you click:
- YES, all the instances will be replaced (and
the Part Number conflict window does not appear because there is no
longer any conflict).
- NO, only the selected instance will be replaced
but, in the case of a Part Number conflict, the following dialog box
appears:
|
| |
-
Select Yes. There is no Part Number
conflicts window (no impact on Cube (Cube.1)) because the
replacing component, Cube2.CATPart, does not create any conflict since
all the "cube" Part Numbers have been replaced:
 |
| Wherever the element's instance is in the product,
it is replaced by the new component. In our example, the
Multi-Instances functionality looks for all the instances of the
reference Cube (Cube.1) in the product and replaces them in the
whole document. |
-
Close 16cubes.CATProduct without saving
it. Re-open it.
-
Repeat the same operation: select Cube
(Cube.1) in 2cubes (2 cubes.1) and click the Replace Component
icon
.
-
In the File Selection window, select
Cube2.CATPart and click Open: the Impacts on
Replace dialog box appears.
-
Click No to replace only
one instance:
-
Click OK button. And two
windows appear:
-
the Incident Report: it is a warning telling you that the
component you are inserting is read-only. Click Close.
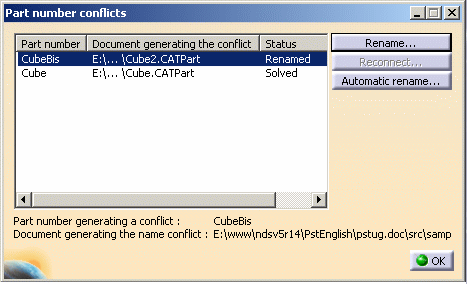
-
the Part number conflict window; you can Rename (or
use the Automatic rename option) the new instance
Cube2.CATPart so that there is no longer conflict with the other
Part Numbers (you do not replace):
|
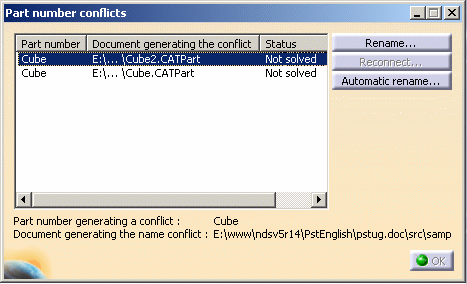 |
-
Select this line (Cube) and click the Rename
button. The (New) Part Number window appears: enter a new Part Number (CubeBis).
-
Click OK. In the Part number conflicts, you can see
that the name of the Part Number is now CubeBis instead of Cube (for
Cube2.CATPart).
-
Click OK and you obtain:
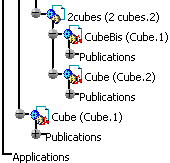
As a consequence, only a Specific Instance, Cube
(Cube.1), is replaced by Cube2.CATPart (whose Part Number is different
from the one of Cube (Cube.1)) in the Specification Tree and in the
Geometry area.
Note that the last entity of Cube (Cube.1) has not been replaced by
Cube2.CATPart because the entity's instance is not at the same level:
|
|
|
For more information about Part Number conflict, please refer to
Insert Existing Component.
|
|
|