|
|
This task shows how to insert a Reverse
Threading operation in the program.
To create the operation you must define:
|
||
|
|
Open the
HoleMakingOperations.CATPart document, then select the desired
Machining workbench from the Start menu.
Make the Manufacturing Program current in the specification tree. |
||
|
|
1. |
Select Reverse Threading
A Reverse Threading entity along with a default tool is added to the program. The Reverse Threading dialog box appears directly at the
Geometry tab page
|
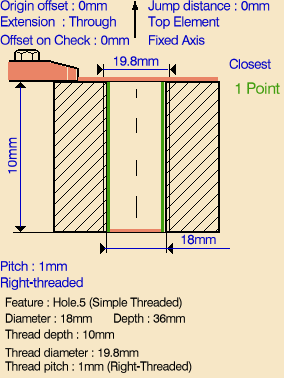 |
| 2. | Select the red
hole depth representation then select a threaded hole feature in the 3D
window. Just double click to end your selection. The sensitive icon is updated with the following:
You can modify this data. |
||
| 3. | If needed, you can invert the tool axis direction by selecting the axis representation in the sensitive icon. | ||
| 4. | Select the
Strategy tab page
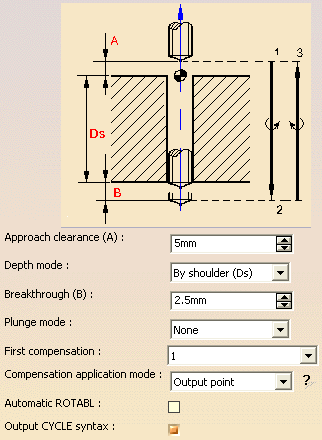
The other parameters are optional in this case. |
 |
|
|
|
A tool is proposed
by default when you want to create a machining operation.
If the proposed tool is not suitable, just select the
Tool tab page
|
||
| 5. | Select the
Feeds and Speeds tab page
Note that in the tool path represented in the strategy page, tool motion is at:
|
||
| 6. | If
you want to specify approach and retract motion for the operation, select
the Macros tab page
|
||
|
|
Before accepting the operation, you should check its validity by replaying the tool path. | ||
| 7. | Click OK to create the operation. | ||
|
|
Example of output If your PP table is customized with the following statement for Reverse Threading operations:
A typical NC data output is as follows:
You can use Edit Cycle
The parameters available for PP word syntaxes for this type of operation are described in the NC_REVERSE_THREADING section of the Manufacturing Infrastructure User's Guide. |
||
|
|
|||