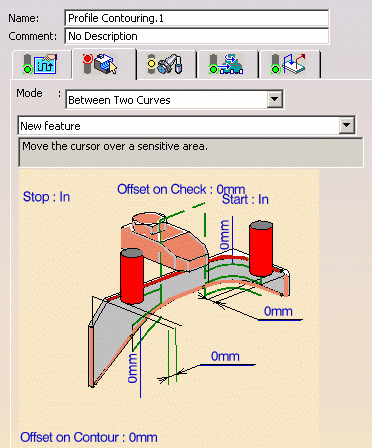
Between Two Curves
|
|
This task shows how to insert a 'Between Two Curves'
Profile Contouring operation in
the program. To create the operation you must define:
|
|
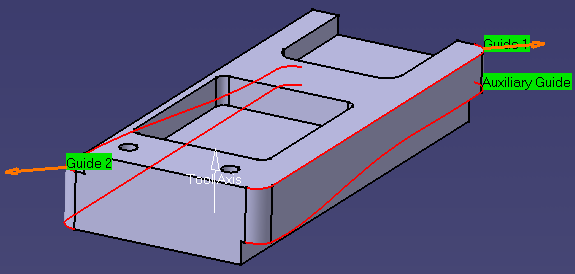
| This task also illustrates the capability to machine a discontinuous guiding curve. | ||
|
|
Open the PrismaticMilling02.CATPart
document, then select the desired Machining
workbench from the Start menu. Make the Manufacturing
Program current in the specification tree. |
|
|
|
1. |
Select Profile Contouring
Set the Contouring mode to Between Two Curves.
|
|
|
The top guiding curve in the icon is colored red indicating that this geometry is required for defining the operation. All other geometry is optional. | |
| 2. |
Click the red guiding curve in the icon, then in the 3D window:
During the selection, answer No to the question about inserting a line. |
|
| 3. |
Click the auxiliary guiding curve in the icon, then in the 3D
window:
During the selection, answer No to the question about inserting a line. |
|
| 4. | If needed, set offsets on the geometric elements. | |
|
|
The guide and limit elements of the icon are now colored green indicating that this geometry is now defined. These are also indicated on the part. | |
|
|
||
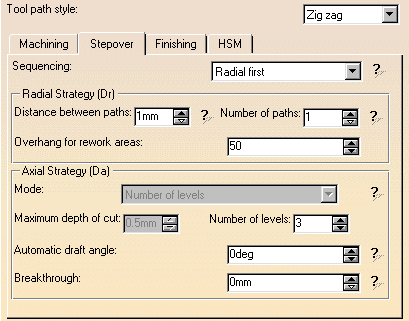
| 5. |
Select the Strategy tab page
|
|
| 6. |
In the Macros tab page
|
|
|
|
A tool is proposed by default when you want to create a machining
operation. If the proposed tool is not suitable, just select
the Tool tab page
|
|
| 7. |
If needed, select the Feeds and Speeds
tab page
|
|
| 8. |
Check the validity of the operation by
replaying the tool path.
|
|
|
|
Please note that the tool tip is shifted below the guiding curves by a distance equal to the tool corner radius. If you want the tool tip to exactly follow the guiding curves you should enter an appropriate Offset on Contour value. | |
| 9. | Click OK to create the operation. | |
More About Profile Contouring Operations
|
||
|
|
||