 |
Before you can run this procedure, take the following
steps:
-
On the Tools > Options > Machining
Simulation > NC Machine Tool Simulation > Simulation
tab,
select the Enable material removal
computation during machine simulation check box.
-
On the Tools > Options > Machining > Output
tab,
select a Post Processor type for your NC code (e.g.,
ICAM®).
-
On the Tools > Options > Machining > Output
tab,
in the Default File Locations area, specify CATNCCode as the
file extension, and select output locations.
-
Assign an NC machine to the part operation.
-
In the machine editor dialog box for the NC machine
(accessible in NC Machine Tool Simulation by right-clicking the machine
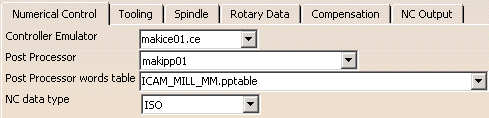
on the PPR tree, and selecting machine object > Edit), set
the Controller Emulator, Post Processor, and
Post Processor words table appropriate for your machine and the
Post Processor you selected in Step 1.
 |
 |
The contents of the lists available on the machine editor
dialog box depend on the options selected in Tools > Options >
Machining > Output. |
|
 |
-
Double-click on the manufacturing program in the PPR
tree.
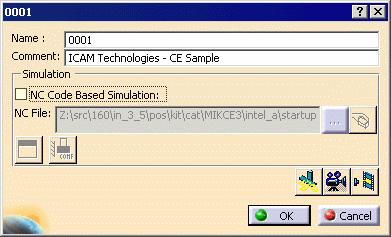
| The program dialog box appears (the name of the
dialog box is the name of the manufacturing program, e.g., 001). |
 |
-
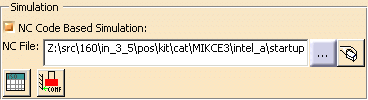
Select the NC Code Based Simulation check
box.
| The options in the Simulation
area become available. |
 |
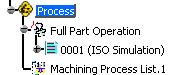
| The manufacturing program on the PPR
tree has ISO Simulation as part of its name. |
 |
|
|
If you alter these selections to return to tool
path-based simulation, ISO Simulation ceases to be part
of the program's name. |
|
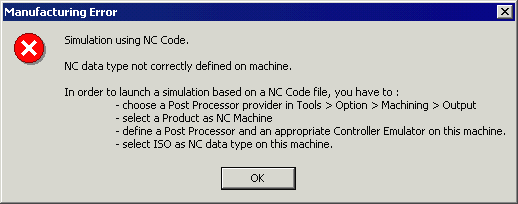
If you have failed to set up one of the parameters
correctly, either in Tools > Options > Machining > Output
or in the machine editor dialog box, you receive the
following message: |
|
 |
|
If you receive this error:
-
Click OK on the Manufacturing Error
message
-
Select the Tools > Options > Machining >
Output and machine editor dialog box as described
above.
-
Try again.
|
-
Click Machine Simulation
 . .
| The Process Simulation toolbar appears. |
 |
Updating the stock can impact performance. If you do not want
the stock updated during the simulation, clear the Update
Stock ON/OFF
 check
box. When Update Stock ON/OFF is checked,
material removal updates occur during machine motion; that is,
the stock part is constantly updated. When Update Stock
ON/OFF is cleared, stock updates are not be shown during
machine motion, but material removal computation is continued in
the background. Toggling material removal updates back to
ON updates the stock to its current state, and subsequent
stock updates resume. You can only toggle the updates back to
ON
when the simulation has been halted, using Pause check
box. When Update Stock ON/OFF is checked,
material removal updates occur during machine motion; that is,
the stock part is constantly updated. When Update Stock
ON/OFF is cleared, stock updates are not be shown during
machine motion, but material removal computation is continued in
the background. Toggling material removal updates back to
ON updates the stock to its current state, and subsequent
stock updates resume. You can only toggle the updates back to
ON
when the simulation has been halted, using Pause
 . . |
-
Do you want to save the result of the simulation in a
CATProduct?
| This result can be used as initial stock in another Part
Operation or as stock in a roughing operation. |
- If NO, go to next step.
- If YES, click Save Stock
 . .
| The Save As dialog box appears.
Navigate to the correct directory, and save the .CATProduct
file. |
| Please note that this command combines CATIA
graphic representation (cgr) and
WPC information.
This helps to avoid open stock problems when used in
another setup thanks to precision of the WPC data.
|
|
-
Do you want to associate the machined stock with the
Machining Operation that was used to start the simulation?
| Choosing this option means that any subsequent
single MO simulation uses this machined stock as its starting
stock. |
- If NO, go to the next step.
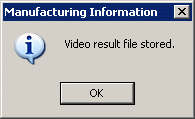
- If YES, click Associate Stock with Manufacturing Program
 . .
| Click OK when the Manufacturing
Information dialog box appears. |
 |
|
-
Do you want to perform stock analysis?
- If NO, go to the next step.
- If YES, click Stock Analysis
 . .
| See Analyzing Stock
for information about using this command and its
sub-commands. |
|
|