For information about how to acquire Post Processor parameters files that provide machine specific NC code output, please contact your IBM representative.
Select the type of Post Processor solution using Tools > Options > Machining > Output tab. If the output option is set to None, you will not be able to generate NC code.
Cenit Post-Processor Solution
Sample Cenit Post Processor parameter files are delivered with the
product in the folder
\Startup\Manufacturing\PPPar
which provides NC output for various machine types. To execute your own PP
you must copy it into this folder.
You can use PPs that include external macros. In this case, you should define them in the PP in:
Modify postprocessor // Define NC-blocks // Index : MACRO APT
     WORDS
and then copy these macros in the same folder as the PP.
IMS Post-Processor Solution
Sample IMS Post Processor parameter files are delivered with the
product in the folder
\Startup\Manufacturing\IMSPar
which provides NC output for various machine types. To execute your own PP
you must copy it into this folder.
The IMSPar folder must be accessible in Read/Write mode.
Note: The IMS PP solution is not available when working on a Windows XP 64-bits machine.
ICAM Post-Processor Solution
Sample ICAM Post Processor parameter files are delivered with the
product in the folder
\Startup\Manufacturing\ICAMPar
which provides NC output for various machine types. To execute your own PP
you must copy it into this folder.
Always save your program modifications before generating NC code.
For best results, you should first verify the operations of your program by means of a replay or simulation. There should be no operations to be updated or in an undefined state.
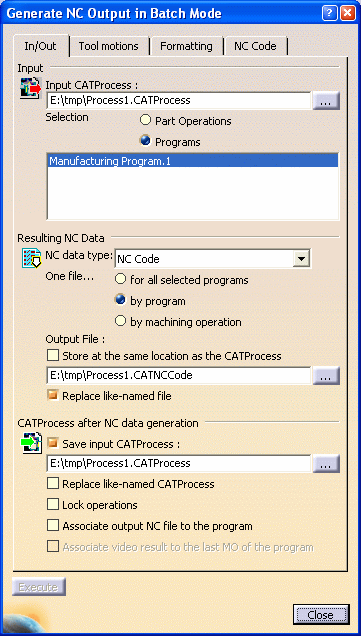
In the In/Out tab page...
Select the type of NC entity to be processed. This can be:
- one part operation in the input CATProcess. In this case all the manufacturing programs of the selected part operation will be processed.
- one or more manufacturing programs in the input CATProcess.
- for all the selected manufacturing programs
- for each selected manufacturing program
- or for each machining operation in the selected manufacturing
programs.
Please note that this option is not supported in programs containing Copy or Tracut Operators.
Otherwise, specify the Output file where you want the NC data to be written using the [...] button.
A default name is proposed for the
output file (for example,
Process1_Manufacturing_Program_1.CATNCCode). This name can be modified
directly in the Output File text field.
On subsequent batch executions, the filename and the path of the last generated output are remembered if the Store at same location as the CATProcess check box is not selected. If this option is selected, only the filename of last generated output is remembered.
The output file can be accessed by right-clicking the manufacturing program and selecting Display NC File.
See Manufacturing Program with Associated NC File for additional information.
In the Tool Motions and Formatting tab pages...
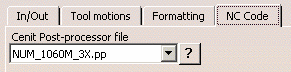
In the NC Code tab page...
![]()