Recess Turning Operations

The information in this section will help you create and edit Recess Turning operations in your manufacturing program.

The Recess Turning operation allows you to machine a recess by means of a One Way, Zig Zag or Parallel Contour tool motion. 

You can specify:

The following topics are dealt with in the paragraphs below:

Tooling for Recess Turning

The following tooling may be used:

  • External and Internal insert-holders with all insert types except groove and thread. 
  • Internal, External and Frontal Groove insert-holders with groove and trigon inserts.
    Refer to Trigon Insert Used on a Groove Insert-holder for more information about this tooling configuration.

Note that the following attributes may influence machining (they are located on the Insert-holder's Technology tab):

  • Gouging angle
  • Trailing angle
  • Leading angle
  • Max Recessing Depth
  • Max Cutting Depth
  • Max Boring Depth.

These attributes take tooling accessibility into account and may reduce the machined area.
However, you can use the Insert-Holder Constraints option on the operation editor to either ignore or apply these tooling attributes. You can replay the operation to verify the influence of these attributes on the generated tool path.

Note that the Insert-Holder Constraints setting does not influence the Gouging Safety Angle or the Leading and Trailing Safety Angles defined in the operation editor.

Geometry for Recess Turning

Part and Stock profiles are required. They can be specified as follows:

  • select edges either directly or after selecting the By Curve contextual command. In this case the Edge Selection toolbar appears to help you specify the guiding contour.
  • select the Sectioning contextual command. Please refer to Sectioning for details of how to use this capability.
    Please note that the sectioning selection method is not associative.

Orientation for Recess Turning

The following Orientations are proposed: internal, external, frontal and inclined.

The selected Orientation defines the type of geometric relimitation to be done between the stock and part geometry in order to determine the area to machine. For an inclined orientation you must specify the Angle of Incline.

Part and Stock Offsets for Recess Turning

  • Stock offset, which is defined perpendicular to the stock profile
  • Part offset, which is defined perpendicular to the part profile.
  • Axial part offset
  • Radial part offset.

Offsets can be positive or negative with any absolute value. The global offset applied to the part profile is the resulting value of the normal, axial and radial offsets.

Machining Strategy Parameters for Recess Turning

Path Definition for Recess Turning

  • Recess Turning Mode: One Way, Zig Zag or Parallel Contour
  • Max Depth of Cut
    This option is used to specify the maximum distance between passes.
    Axial and Radial Depth of Cut
    These options are used to specify the maximum axial and radial distances between passes for Parallel Contour mode.
  • Machining Tolerance
  • Machining Direction
    For Zig Zag tool motion, you must specify a first cutting direction as follows:
    • To or From Head Stock for Internal and External machining
    • To or From Spindle for Frontal machining
    • To Right or Left of Recess for Inclined machining

    When a part profile has multiple recesses (that is, a non-convex profile along the cutting direction), only the first recess along the specified direction is machined.

  • Leading and Trailing Safety Angles for One way and Parallel Contour modes
    The insert geometry is taken into account to avoid collision by reducing the maximum slope on which the tool can machine. The Leading and Trailing Safety Angles allow you to further reduce this slope.

    Leading and trailing angles can also be defined on the insert-holder to define the maximum slope on which machining can be done. In this case and if the Insert-Holder Constraints setting is applied (see above), the angles that reduce the slope the most will be taken into account.
  • Gouging Safety Angle (for Zig Zag mode only)
    Angles of the insert are taken into account to avoid collision by reducing the maximum slope on which the tool can machine. The Gouging Safety Angle allows you to further reduce this slope.

    Note that a gouging angle can also be defined on the insert-holder to define the maximum slope on which the tool can machine. In this case and if the Insert-Holder Constraints setting is applied (see above), the angle that reduces the slope the most will be taken into account.
  • Under Spindle Axis Machining
    For Frontal or Inclined machining, this option allows you to request machining under the spindle axis.
  • Part Contouring
    You can specify if contouring is required by means of the proposed checkbox.
    The part profile is followed at the end of Recess Turning. This is done by machining down the sides of the recess in order to clear the profile.

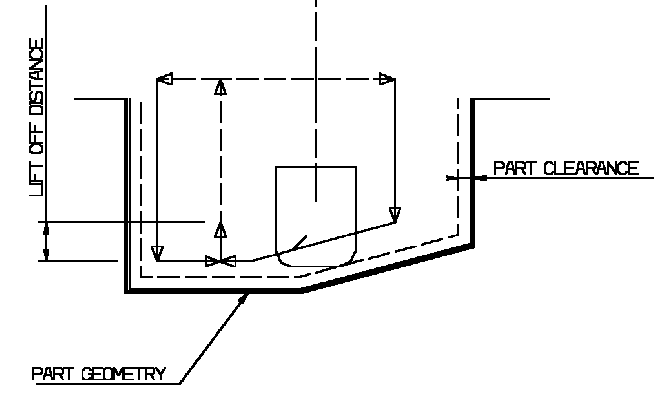
Lead-in, Lift-off and Attack for Recess Turning

  • Lead-in Distance
    Defined with respect to the cutting direction. It takes the stock profile and stock clearance into account. The tool is in RAPID mode before this distance.
  • Attack Distance
    Defined with respect to the cutting direction and the stock profile with a stock clearance.
  • Angle and Distance before Plunge
    Define the plunge vector before each new pass with respect to the cutting direction.
  • Lift-off Distance and Lift-off Angle
    Define the lift-off vector at the end of the last pass with respect to the cutting direction. The figure below shows the effect of a positive lift-off angle (external machining is assumed).


Feeds and Speeds for Recess Turning

Speed unit can be set to:

  • Angular: spindle speed in revolutions per minute
  • Linear: constant cutting speed in units per minute

then you can give a Machining Speed value.

The following feedrates can be set to either Angular units (length per revolution) or Linear units (length per minute):

  • Machining Feedrate
  • Lead-in Feedrate, which is applied during the lead-in and attack distance.
  • Lift-off Feedrate
  • Contouring Feedrate
  • Plunge Feedrate.

Feedrates in units per minute are also available for air cutting such as
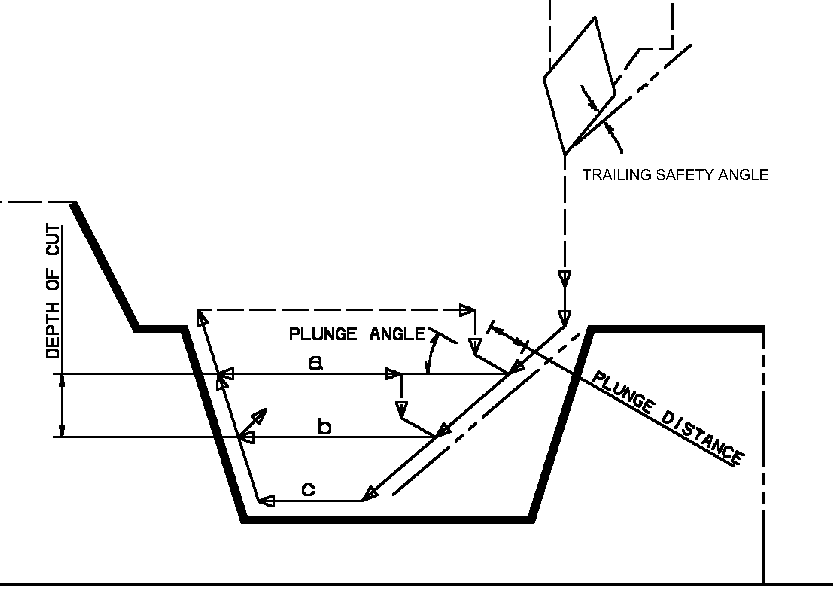
 macro motions and path transitions.
Note that RAPID feedrate can be replaced by Air Cutting feedrate in tool trajectories (except in macros) by selecting the checkbox in the Feed and Speeds tab page .

Dwell setting indicates whether the tool dwell at the end of each path is to be set in seconds or a number of spindle revolutions.

Please note that decimal values can be used for the number of revolutions. For example, when machining big parts that have a large volume, it can be useful to specify a dwell using a value of less than one revolution (0.25, for example).

Example of one-way Recess Turning. Note that Trailing angle is defined on the tool.  

In the figure below the tool motion is as follows:

  • approach in RAPID mode
  • lead-in at the first recess pass and plunge approach for other passes
  • plunge at plunge feedrate
  • machine at machining feedrate
  • contouring at contouring feedrate
  • lift-off at last recess pass at lift-off feedrate.

Tool Compensation for Recess Turning

You can select a tool compensation number corresponding to the desired tool output point. Note that the usable compensation numbers are defined on the tool assembly linked to the machining operation. If you do not select a tool compensation number, the output point corresponding to type P9 will be used by default.

Note that the change of output point is managed automatically if you set the Change Output Point option.

If the output point is consistent with the flank of the recess to be machined, the output point is changed when the other flank of the recess is machined.

At the end of the operation, the output point is the same as it was at the start of the operation. See Changing the Output Point for more information.

Approach, Retract and Linking Macros for Recess Turning

The following Approach and Retract macro modes are proposed: Direct, Axial-radial, Radial-axial, and Build by user. The selected macro type (Approach or Retract) defines the tool motion before or after machining.

Various feedrates are available for the approach and retract motions (RAPID, lead-in, lift-off, and so on). Local feedrates can be set to either Angular units (length per revolution) or Linear units (length per minute).

Linking macros, which comprise retract and approach motion can also be used on Recess Turning operations.
Approach and retract motions of Linking macros are interruptible. It can be useful to interrupt an operation when the foreseeable lifetime of the insert is not long enough to complete the machining.

See Define Macros on a Turning Operation for more information.