- Create a loop referencing the inputs of an existing User Feature (UDF) used to make holes in a pad.
- Save the loop in a Power Copy.
- Instantiate the Power Copy into an existing document and creates the holes.
To perform the scenario, you will need the following files:
 |
The
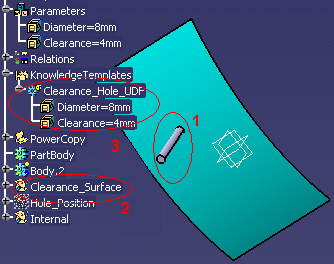
KwrLoop1.CATPart is made up of a surface (2)
and a solid (1) that
symbolizes a hole. This hole is inserted into a User Feature (UDF)
named Clearance_Hole_UDF for a later instantiation. The User Feature
(UDF) has 3 different inputs (a point, an axis and a surface). 2
parameters of the User Feature (UDF) are published (3):
|
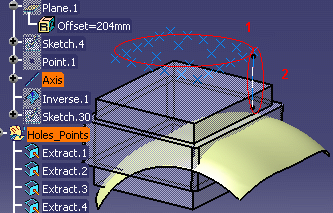 |
The KwrLoop3.CATPart file is made up of a pad and a surface and of 24 points (1) inserted into a list. Line.2 is the instantiation axis (2). This .CATPart file is the one that will contain the loop contained in the Power Copy that will be instantiated into KwrLoop4.CATPart. |
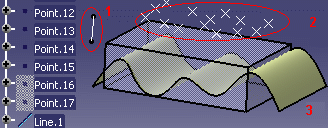 |
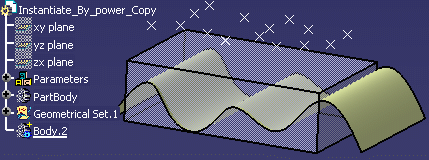
The KwrLoop4.CATPart is made up of a pad and a surface (3) and of 17 points (2) inserted into a list. Line.1 is the instantiation axis (1). It will contain the instantiated loop and the holes. |
Create the Loop Referencing the User Feature (UDF)
-
Open the KwrLoop3.CATPart. The following image is displayed.
-
From the Start>Knowledgeware menu, access the Knowledge Advisor workbench.
-
Click the Loop icon (
 )
in the Control Features bar. The Loop Edition window is
displayed.
)
in the Control Features bar. The Loop Edition window is
displayed. -
In the specification tree, select the inputs of the loop.
-
Expand the Parameters node and click the Lists_PointRef list. In the Input Name field, enter the name of the list: PointsList.
-
Expand the Geometrical Set.1 node and select the Clearance_Surface feature. In the Input name field, enter the name of the feature: SurfRef.
-
Expand the Holes_Points node and select the Line.2 feature. In the Input name field, enter the name of the line: LineAxis.

Note that the name indicated in the Input name field is the one that will be used in the loop body.
-
-
Select the context, that is to say, in this scenario, the feature that will contain the instantiated holes.
-
Click the Context field.
-
Click ResultBody in the specification tree.
-
-
Indicate the number of holes that you want to instantiate into the surface.
-
In the From field, indicate 1. (1 corresponds to Extract.1.)
-
Right-click the To... field and select Edit formula.... The Formula Editor is displayed.
-
In the specification tree, click ListSize=24. Click OK when done. The number of instantiated holes is now valuated by a formula based on the list, that is to say on the number of points contained in the list.
-
-
Enter the following action script into the Editor.
-
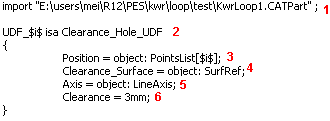
Use the import keyword to indicate the path of the file containing the User Feature (UDF) to be instantiated (KwrLoop1.CATPart).
-
To indicate the path of the file, it is recommended to use Insert File Path available in the contextual menu to import KwrLoop1.CATPart. (1)
-
UDF_$i$ is the name that will be attributed to each instance of the hole. (2)
-
Clearance_Hole_UDF is the name assigned to the User Feature (UDF) in the KwrLoop1.CATPart file. (2)
-
Position is a point and also the first input that needs to be valuated when instantiating the holes. PointsList[$i$] is the name of the List. [$i$] corresponds to the nth item of the list. In this case, nth is equal to 24, the number of holes to be instantiated (3).
-
Clearance_Surface is the second input required and defined when creating the User Feature (UDF) and SurfRef is the revolute into which the holes will be instantiated. (4)
-
Axis is the third input required and defined when creating the User Feature (UDF) and LineAxis is Line.9, that is to say the instantiation axis. (5)
-
Clearance is one of the published parameters of the User Feature (UDF). It is used in the action script because you want the value of the published parameter to be modified. (6)
For more information about the syntax to be used (;, {}, $i$) in the loop body, see Using the Scripting Language.
-
-
Click OK when done. The holes are instantiated (see graphic below.)
-
Click the Update icon (
 )
to update the document.
)
to update the document.
-
Right-click the loop and use the Properties command to rename the loop into Loop_Holes. Click OK when done.
-
In the specification tree, right-click the loop (located below the Relations node) and select the Loop_Holes object>Deactivate command.
Save the Loop in a Power Copy
-
Click the root of the specification tree, and from the Start>Mechanical Design menu, access the Part Design workbench.
-
From the Insert>Advanced Replication Tools menu, select PowerCopy Creation.... The Power Copy Definition window is displayed.
-
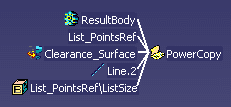
In the specification tree, select the items making up the Power Copy:
-
Formula.1
-
Loop_Holes
Note that the Power Copy will need the following inputs at instantiation time:
-
ListSize
-
Line.2
-
Clearance_Surface
-
List_PointsRef
-
ResultBody
-
-
Click OK when done. The Power Copy is created and is displayed below the Power Copy node in the specification tree.
-
Save your file and close it.
Instantiate the Power Copy into an Existing Document
-
Open the KwrLoop4.CATPart file. The following image is displayed.
-
From the Insert menu, select Instantiate From Document....
-
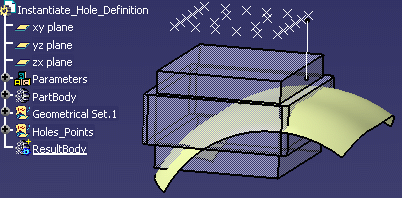
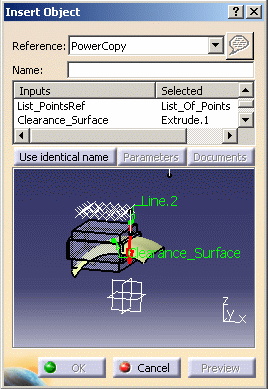
In the File Selection window, select the KwrLoop3.CATPart file that you have saved and click Open. The Insert Object dialog box is displayed.
|
 |
-
Click OK when done. The Loop and the formula contained in the Power Copy are instantiated.
-
To instantiate the holes, activate the loop. To do so, right-click Loop.1 in the specification tree and select Loop.1 object>Activate. The holes are instantiated.

![]()