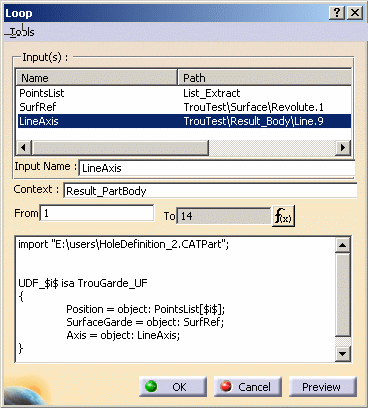
The Loop Edition window is displayed when you click the Loop icon (![]() )
in the Control Features toolbar.
)
in the Control Features toolbar.
 |
Input(s)This field enables you to select the features that you want to use in the specification tree or in the geometry. The selected features are those that will be used in the loop body.
The Input Name field enables you to rename the inputs that you selected. In this case, this name will be used in the loop body. |
|||||||||||||
ContextThis field enables you to define the application context of the loop. It can be any V5 feature. To select the context, click the Context field once, then click the item in the specification tree. IteratorsThe From ... To fields enable you to define the number of times that the loop will operate. When defining the ranges, you can right-click the From... and the To fields to access the contextual menu.
EditorThe Editor enables you to enter the loop syntax. The language to use in this editor is the scripting language. For more information about the syntax to be used, see Using the Scripting Language. |
||||||||||||||
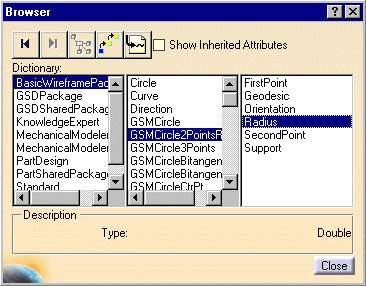
The Tools>Object Browser ... command enables you to access the Object Browser. This browser contains the types and attributes that are part of the scripting syntax.
The object browser guides you when writing a script. It allows you to access the keywords, operators and feature attributes that can be used when working with the loop features.
|
|
The packages displayed in the left part of the browser are those you selected from the Tools>Options... command. |
To add or remove packages:
Select Tools>Options... to open the Options window, then select General>Parameters and Measure, and click the Knowledge Environment tab.
In the Language field of the Knowledge tab, check Load extended language libraries and select the libraries.
 |
... and write loop bodies (see example below):
|
|
|
Back To return to your last interaction in the wizard. Has no action on the script editor. |
|
|
Forward To go forward to your next interaction in the wizard when moving through a series of interactions. |
|
|
Browse Attribute Description This icon is not available in the current version of the product. |
|
|
Jump to prototype To return to the root object. |
|
|
Paste Selection To insert the object name in the script. |
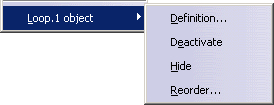
You can access the Loop contextual menu by right-clicking the loop in the specification tree.
 |
|
|
|
||
|
||
|