This task shows how to re-mesh a domain using new specifications such as mesh method and size.
You will see here only three particular mesh methods:
Mapped Quads Mesh Method
Open the sample22.CATAnalysis document from the samples directory.
-
Enter the Advanced Surface Mesher workshop.
For more details, refer to Entering the Advanced Surface Mesher Workshop.
-
Click Remesh Domain
 in the Edition Tools toolbar.
The Remesh Domain dialog box appears.
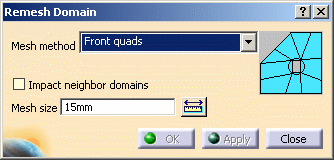
- Mesh method:
 Front quads (*)
 Front trias (*)
 Mapped quads (**)
 Mapped trias (**)
 Mapped free (**)
 Bead quads
 Half Bead quads
 Projection
Mapping (*)(*) indicates that the Trap Type dialog box appears at the same time you choose the option.

(**) indicates that for Mapped and Mapped Tria options, you can mesh cylinder and ring topology and that for Mapped Free option, you can mesh cylinder topology.

- You can use multi-selection:
- using an intersection polygon trap: all the domains which have non-empty intersection with the trap will be selected.
- using an inclusive polygon trap: all the domains that are completely included within the trap will be selected.
- Impact neighbor domains: lets you define whether you wish to apply the new mesh method to the neighboring domains. If the option is deactivated, the nodes on domain edges will not be modified.
- Smooth projected mesh: allows you to optimize the quality of the projected mesh (this option is only available with the Projection and the Mapping options).
- Mesh size: lets you enter the desired mesh size (this option is not available with the Projection and the Mapping options).
- Mesh method:
-
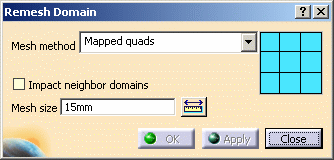
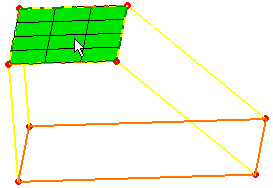
Select the Mapped quads option.
-
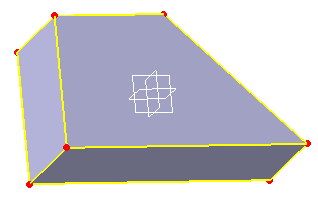
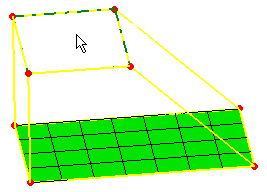
Select the desired domain on the surface.
The edge of the selected domain can be either green (constrained) or yellow (free).

Imposed points are allowed in the mapped mesh specifications (Mapped quads and Mapped trias), but imposed curves are not allowed.
-
Enter the desired Mesh size value.
In this particular example, enter 15mm.
-
Click Apply.
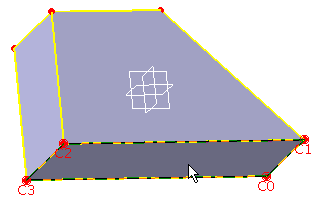
The selected domain is re-meshed.
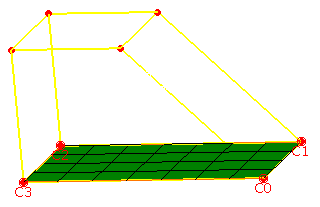

You can see that the corners (C0, C1, C2 and C3) of the domain are displayed.
You can select a corner and change its position by clicking another vertex. -
Click Close.
|
|
Note that: you can remove the mesh if you are not
satisfied. |
![]()
Projection Mesh Method
All the mesh elements are projected on the receiving domain and the projected mesh respects the initial mesh topology.
The projection mesh method automatically makes the correspondence between vertex and node (by projecting a vertex on a node).
Open the sample22_1.CATAnalysis document from the samples directory.
-
Enter the Advanced Surface Mesher workshop.
For more details, refer to Entering the Advanced Surface Mesher Workshop.
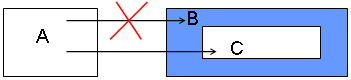
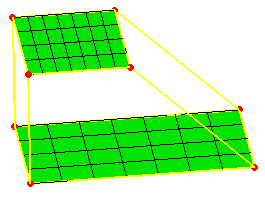
The two domains (the meshed one and the receiving one) must
have the same number of boundaries.
In the following example:
- you can project the mesh of the domain A to the domain C.
- you cannot project the mesh of the domain A to the domain B.
If you try to do this, an error message appears to inform you that the number of boundaries of the two domains is different.
-
Click Remesh Domain
in the Edition Tools toolbar.The Remesh Domain dialog box appears.
For more details about this dialog box, refer to Mapped Quads Mesh Method. -
Select the Projection option.
-
Select the domain you want to mesh.
The meshed domain must be towards the receiving domain. 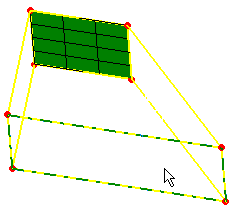
-
Select the mesh domain.
-
Click OK.
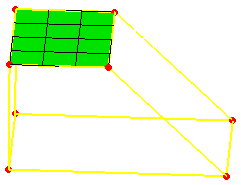
The projected domain is updated.
The projected mesh entirely fills the receiving domain.
The projected mesh is not partial.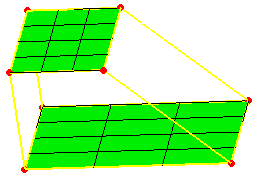
The only way to preserve the mesh elements size between the meshed domain and the receiving domain
is to modify the receiving domain (by splitting it, for example)
Mapping Mesh Method
All the mesh elements are projected on the receiving domain and the projected mesh respects the initial mesh topology.
Contrary to the projection mesh method, you have to define the correspondence between vertex and node in case of mapping mesh method.
Open the sample22.CATAnalysis document from the samples directory.
-
Enter the Advanced Surface Mesher workshop.
For more details, refer to Entering the Advanced Surface Mesher Workshop.
The two domains (the meshed one and the receiving one) must
have the same number of boundaries.
In the following example:
- you can project the mesh of the domain A to the domain C.
- you cannot project the mesh of the domain A to the domain B.
If you try to do this, an error message appears to inform you that the number of boundaries of the two domains is different.
-
Click Remesh Domain
in the Edition Tools toolbar.The Remesh Domain dialog box appears.
For more details about this dialog box, refer to Mapped Quads Mesh Method. -
Select the Mapped Quads option.

Multi-selection is not available.
-
Select the desired domain.
-
Enter the desired Mesh size value.
In this particular example, enter 15mm.
-
Click OK.
-
Click Remesh Domain
in the Edition Tools toolbar. -
Select the Mapping option.
-
Select the domain you want to mesh.
The Trap Type dialog box appears.
For more details about this dialog box, refer to Mapped Quads Mesh Method.
Multi-selection is available on the condition you multi-select connected mesh domains. -
Select the meshed domain to be projected on the previously selected domain.
-
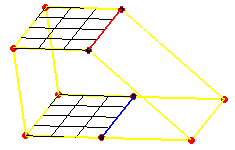
Select a vertex on the domain that will receive the projected mesh to identify it with the nearest node of the mesh domain.
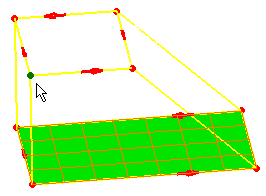
You now have to set up all the needed correspondence between vertex (of the domain to be meshed) and the nodes (of the mesh domain).
-
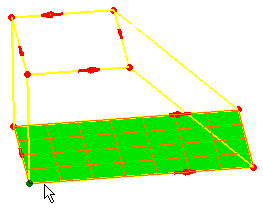
Select the corresponding node on the mesh domain.
As soon as you have selected the node, the geometry appears as shown here:
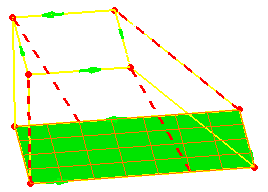
You can see that some vertex are not corresponding with nodes of the mesh domain. You can manually establish the correspondence.
To do this, select a vertex and then the corresponding node on the mesh domain. -
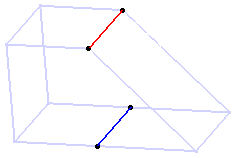
Click OK.
The mapped domain is updated as shown here:
![]()