This task shows how to check intersections and interferences on meshed 2D geometry (surface element).
Intersection means standard geometrical intersection.
Interference means that the elements generated are positioned beyond a given distance (or clearance). This lets you take into account the real width of the geometry when detecting interferences.
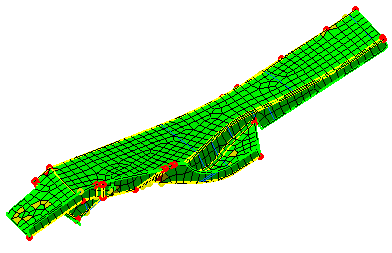
Open the sample05.CATAnalysis document from the samples directory.
-
Enter the Advanced Surface Mesher workshop.
For more details, refer to Entering the Advanced Surface Mesher Workshop. -
Mesh the surface.
For more details, refer to Meshing the Part.
-
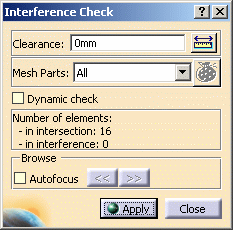
Click Intersections / Interferences
 in the Mesh Analysis Tools toolbar.
The Interference Check dialog box appears.
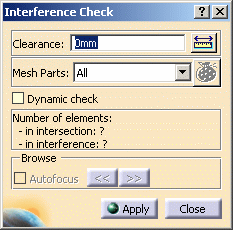
- Clearance: lets you define the clearance from which
you decide that an interference exists.

The clearance maximum value should not be greater than the mesh size.
Note that:
- If the value is equal to zero, only the existing intersections will be visualized.
- If the value is greater than zero, both the existing intersections and interferences will be visualized.
- Mesh parts: lets you filter mesh parts on
which you want to check the interference and the intersection.
- All: lets you check the interference and the intersection between all the active mesh parts.
- Selection: lets you check the interference
and the intersection
inside a user-defined selection of mesh parts.
If you select this option, the Mesh Part Selector button becomes available.
For more information, refer to Filtering Mesh Parts in Intersection.
- Dynamic check: lets you modify the mesh and dynamically visualize the corresponding interferences.
- Number of elements:
gives you the number of elements that are:
- in intersection
- in interference
- Browse: lets you focus on interference area.
- Autofocus: lets you localize easily visible interference area by focusing on them.
Note that the Interference visualization mode is different.
- Clearance: lets you define the clearance from which
you decide that an interference exists.
-
Enter the desired Clearance value.
In this particular example, enter 1mm.
-
Click Apply
Information on the number of the intersection elements and interference elements automatically appears in the dialog box.
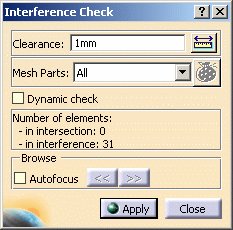
Note that the Autofocus option is available.
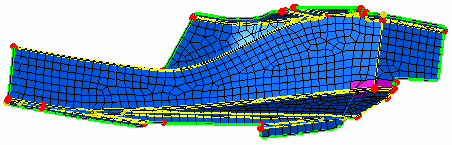
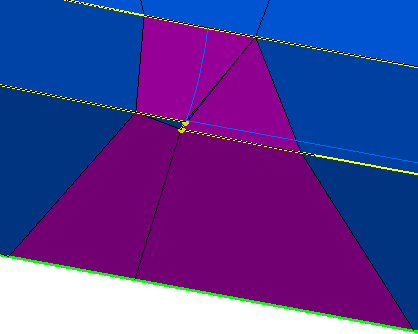
These intersection elements and interference elements also appear on the geometry:
- the red color is assigned to intersection elements.
- the pink color is assigned to interference elements.
-
Select the Autofocus check box.
The first interference area is displayed:
-
Click the >> button to display an other area.
-
Click Close.
Note that if you need to visualize the intersection elements exclusively, use the Wireframe (NHR) visualization type as the command is still active.
![]()
Filtering Mesh Parts in Intersection
Open the sample29_1.CATAnalysis document from the samples directory.
-
Click Intersections / Interferences
in the Mesh Analysis Tools toolbar.The Interference Check dialog box appears.
For more details, refer to the description of the dialog box. -
Enter 0mm as Clearance value.
-
Click Apply
-
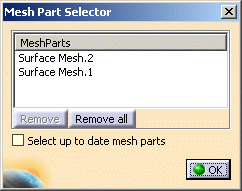
Select Selection in the Mesh Parts list.
-
Click the Mesh Part Selector
button.The Mesh Part Selector dialog box appears.
-
Mesh Parts: lets you select the mesh parts on which you want to check the interference and the intersection.
The Mesh Parts list is automatically initialized with all the active mesh parts belonging to the Nodes and Elements set. -
Remove: lets you remove a particular mesh part.
-
Remove all: lets you remove all the mesh parts displayed in the list.
-
Select up to date mesh parts: lets you select only the updated mesh parts.
-
-
Select Surface Mesh.2 and click Remove.
-
Click OK in the Mesh Part Selector dialog box.
-
Click Apply in the Interference Check dialog box.
-
Click Close.
![]()