This task will show you how to mesh a solid part by generating hexahedron (HE8 and HE20) and wedge (WE6 and WE15) elements from surface meshes.
The sweep 3D provides volume mesh (Linear Hexahedron, Parabolic Hexahedron, Linear Pentahedron or Parabolic Pentahedron - refer to the Finite Element Reference Guide) from a surface mesh.
- This functionality is only available with the FEM Solid (FMD) product.
- To generate a sweep mesh, the volume must be assimilated to a prism with a top and a bottom.
- A surface mesh must exist and can be associated or not to
a geometry.
If the surface mesh is associated to a geometry, this geometry can be either a surface or a set of connected faces. - To prepare the geometry for a hexahedral meshing, it is highly
recommended to use the Split command of the Generative Shape Design workbench.
To know more, refer to Generative Shape Design and Optimizer User's Guide: Basic Tasks: Performing Operations on Shape Geometry: Splitting Geometry.
Open the Sample25.CATAnalysis
document from the samples directory.
In this particular example, a surface mesh has been already created.
-
Click Sweep 3D
 in the Meshing Methods toolbar.
The Sweep 3D dialog box appears.
Geometry tab
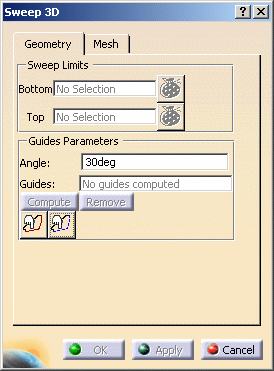
- Sweep Limits:
- Bottom: lets you select the mesh surface from
which the sweep mesh will be generated.
Multi-selection of faces is available. - Face Selector button
 :
for more details, refer to
Filtering Geometries.
:
for more details, refer to
Filtering Geometries. - Top: lets you select the target domain.
Multi-selection of faces is available.
- Bottom: lets you select the mesh surface from
which the sweep mesh will be generated.
- Guides Parameters: guides are lines that constrain
the solid mesh between bottom and top faces.
- Angle: lets you specify the tolerance angle
between two curves to
compute the guides.
The angle parameter represents the maximum discontinuity between curves.
The default value is given by the normal to the Bottom from the first vertex of the candidate curve. - Guides: gives you the number of computed guides.
- Angle: lets you specify the tolerance angle
between two curves to
compute the guides.
- Compute: lets launch the computation to find the guides.
- Remove: lets you remove the results of the guides computation.
- Impose Guides
 :
lets you select one or several edges that you want to include into
the guide computation.
:
lets you select one or several edges that you want to include into
the guide computation.
If you click this button, the Impose Guide dialog box appears.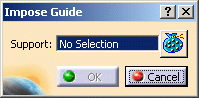

It is strongly recommended to use the Hide/Show command to select edges.
- Exclude Guides
 :
lets you select one or several edges that you want to exclude from
the guide computation.
:
lets you select one or several edges that you want to exclude from
the guide computation.
If you click this button, the Exclude Guide dialog box appears.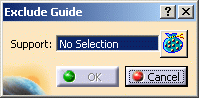
It is strongly recommended to use the Hide/Show command to select edges.
Mesh tab
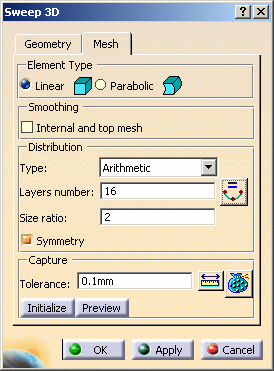
- Element type:
- Linear: lets you generate linear elements (HE8 or WE6 elements).
- Parabolic: lets you generate parabolic elements
(HE20 or WE15 elements).
You cannot generate parabolic elements if the surface mesh part has been built with linear elements.
- Smoothing:
- Internal and top mesh: lets you increase the mesh quality if needed (note that can be time consuming).
- Distribution:
- Type:
- Uniform: the distance between all the distributed nodes will be the same.
- Arithmetic: the distance between the distributed nodes will be defined by an arithmetical distribution.
- Geometric: the distance between the distributed nodes will be defined by a geometrical distribution.
- Layers number: lets you specify the number of
layers you want.
This value determines the sweep mesh size.
The button lets you initialize the Layers number field
with a number of edges equal to the number of edges found by mesh
capture along the guides.
button lets you initialize the Layers number field
with a number of edges equal to the number of edges found by mesh
capture along the guides. - Size ratio: lets you specify the common difference
value for an Arithmetic distribution or the common
ratio value for a Geometric distribution.
This option is only available if you selected Arithmetic or Geometric as Distribution Type option.
- Symmetry: lets you specify if the distribution
should be symmetric or not.
This option is only available if you selected Arithmetic or Geometric as Distribution Type option.
- Type:
- Capture:
- Tolerance: lets you specify the tolerance value of capture which is the maximum distance for mesh capture.
- Mesh Part Selector
:
to know more, refer to
Filtering Mesh Parts.
- Sweep Limits:
-
Select the body.
You can only select 3D geometries belonging to the default PartBody.
In this particular example, select Volume Sweep.1 in the specification tree or directly on the geometry:
As soon as you have selected the body, the Bottom field is activated in the Geometry tab of the Sweep 3D dialog box and the Tools Palette toolbar appears.
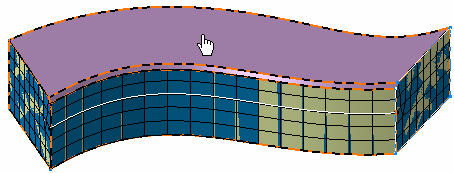
-
Select a face as Bottom.
- This face may be meshed or in the neighboring of a mesh part.
- Multi-selection is available. To do this, select in sequence several faces of the same surface.
In this particular example, select the face as shown below:
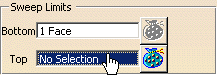
-
Activate the Top field.
To do this, select the Top field as shown below:
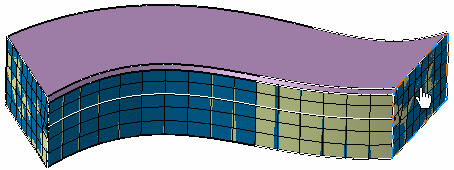
-
Select a face as Top.
- This face may be meshed or in the neighboring of a mesh part.
- Multi-selection is available. To do this, select in sequence several faces of the same surface.
In this particular example, select the face as shown below:
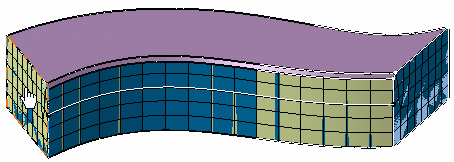
The Compute button is now available in the Sweep 3D dialog box.
-
Enter 45deg as Angle value.
-
Click Compute.
- Guides are computed and are yellow-highlighted. A red arrow shows the orientation of the guide.
- The geometry has been automatically hidden.
- Blue lines represent lines of the geometry ignored as guides with the given angle.
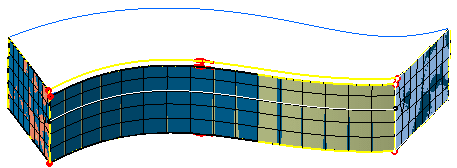
The Sweep 3D dialog box displays the number of computed guides:
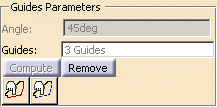
-
Select the Mesh tab and modify the mesh parameters as shown below:
- Select Linear as Element Type.
- Clear the Internal and top mesh check box.
- Select Uniform as Distribution option.
- Enter 7 as Layers number value.
- Enter 1mm as Tolerance value.
-
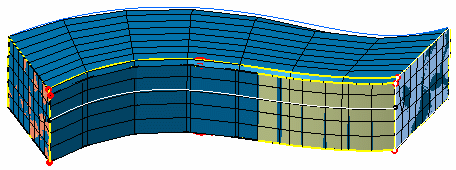
Click Apply in the Sweep 3D dialog box.
The sweep mesh is generated with the specified mesh parameters.
-
Modify the mesh parameters:
- Select Arithmetic as Distribution option.
- Enter 12 as Layers number value.
- Enter 4 as Size ratio value.
- Select the Symmetry check box.
-
Click Initialize.
A new value is initialized in the Tolerance box. -
Click Preview.
-
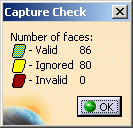
Click OK in the Capture Check dialog box.
-
Click the
button in the Mesh tab of the Sweep 3D dialog box.The Layers number is updated and fits with the number of edges of the captured meshes along the guides.
-
Click Preview.
All faces of captured meshes are valid in the preview and in the Capture Check dialog box.
-
Click OK in the Capture Check dialog box.
-
Click Apply.
The sweep mesh is updated.

-
Select the Geometry tab.
-
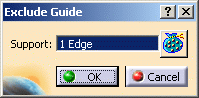
Click Exclude Guides
.The Exclude Guides dialog box appears.
-
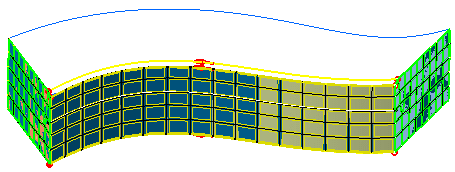
Select the edge you want to exclude from the guide computation.
In this particular example, select the edge as shown below:
The Exclude Guide dialog box is updated.
-
Click OK in the Exclude Guide dialog box.
-
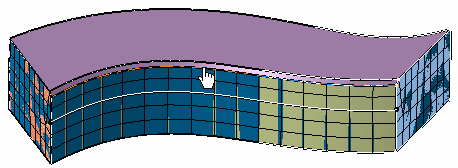
Click Apply.
The sweep mesh is updated.
The mesh does not follow the excluded edge represented by a blue dashed line.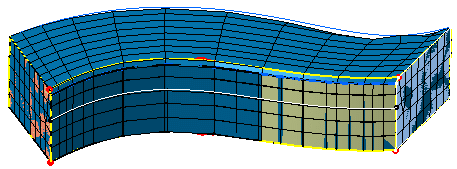
-
Click OK.
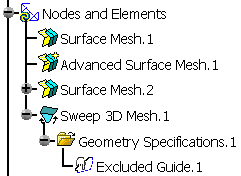
A Sweep 3D Mesh.1 mesh part with Geometry Specifications.1 is created in the specification tree:
After meshing using the Sweep 3D mesher, you can check
interferences using the Intersections / Interferences command
![]() .
.
To know more about interferences, refer to
Checking Intersections and Interferences.