This task shows how to create a Surface Welding Connection Property between two parts or within one part.
A surface welding connection property is a connection that is created from an existing Surface Analysis Connection or Surface Analysis Connection Within One Part.
Only available with the Generative Assembly Structural Analysis (GAS) product.
Open the sample11_1.CATAnalysis document from the samples directory.
-
Make sure you know all you need about what type of property you will use for what type of connection.
-
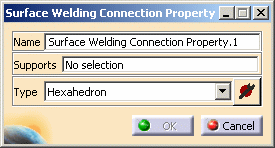
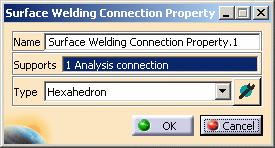
Click Surface Welding Connection Property
 in the Connection Properties toolbar.
The Surface Welding Connection Property dialog box appears.
-
Name: lets you change the name of the connection property.
-
Supports: lets you select the connection you want to associate to a property.

You can apply the surface welding connection property to Surface Analysis Connection and Surface Analysis Connection within one Part of the Generative Assembly Structural Analysis (GAS) product.
To know more, refer to About Connection Properties.
-
Type:
-
Hexahedron: the connection is meshed using hexahedron elements.
-
Component Edition
 :
lets you specify the associated material and if desired, an
orientation for the associated material.
:
lets you specify the associated material and if desired, an
orientation for the associated material.
To know more, refer to the third step.
The Component Edition button can have two status:
-
valid:
-
invalid:

-
-
-
-
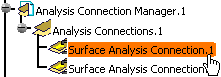
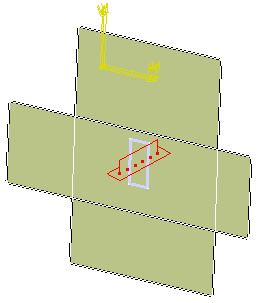
Select the surface welding connection.
In this particular example, select Surface Analysis Connection.1 object in the specification tree.
-
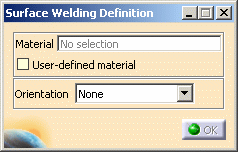
Click the Component Edition button
to specify the parameters.The Surface Welding Definition dialog box appears.
-
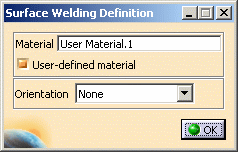
Material: gives you information about the associated material.
-
User-defined material: lets you select an user material.
To know more, refer Creating an User Material. -
Orientation: lets you associate or not an axis system.

This option is only available with the ELFINI Structural Analysis (EST) product. -
None: no axis system will be associated.
-
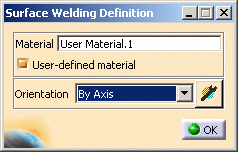
By axis: lets you define the axis system you want to associate to the selected user material.
If you select this option, the Component Edition button appears.

To know more about axis system, refer to Axis System Type.
-
-
-
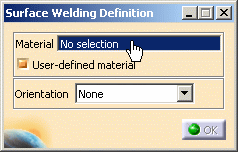
Select the User-defined material option in the Surface Weld Definition dialog box.
-
Activate the Material text box as shown below:
-
Select User Material.1 as Material.
The Surface Welding Definition dialog box is updated:
-
Select By axis as Orientation option.
The Component Edition button appears in the Surface Welding Definition dialog box:
-
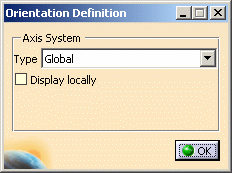
Click the Component Edition button
to specify the axis system.The Orientation Definition dialog box appears.
To know more about axis system, refer to Axis System Type.
-
Select Global as axis system Type.
-
Click OK in the Orientation Definition dialog box.
-
Click OK in the Surface Welding Definition dialog box.
Note that the Component edition button becomes valid in the Surface Welding Connection Property dialog box:
-
Click OK in the Surface Welding Connection Property dialog box.
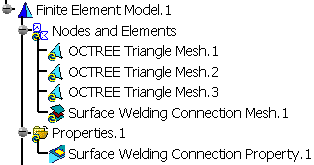
A Surface Welding Connection Property.1 connection property appears in the specification tree under the Properties.1 set and a Weld Surface Connection Mesh.1 connection mesh part appears under the Nodes and Elements set.
A symbol appears on the geometry:
-
You can edit the Surface Welding Connection Mesh.1 object.
To do this, double-click the Surface Welding Connection Mesh.1 object in the specification tree.
The Surface Welding Connection Mesh dialog box appears.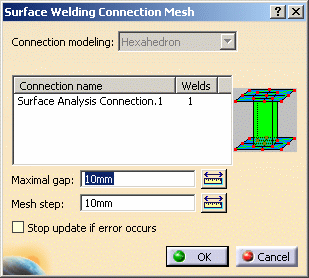
To know more about the surface weld connection mesh part, refer to Meshing Surface Welding Connections in the Advanced Meshing Tools User's Guide.
-
You can visualize the connection mesh.
To do this:- Compute the mesh only (to know more, refer to Computing Objects Sets).
-
Generate a Mesh image (to know more, refer to Generating Images).
![]()