This task shows how to generate a report for computed
solutions.
You can generate a report:
- using the Generate Report icon
- using the Report contextual menu (only available in the ELFINI Structural Analysis (EST) product)
A report is a summary of an objects set computation results
and status messages, captured in an editable file.
Once an objects set has been computed (meaning that the user-defined
specifications have been converted into solver commands, which in turn have
been transformed into degree of freedom data and processed), all data
contained in the object is ready for use in the subsequent finite element
computation process and the object can be analyzed.
Open the sample58.CATAnalysis document from the samples directory.
- Compute the solution. To do this, click Compute
 .
.
You can customize the report settings.
For more details about the report settings, refer to
Reporting
in the Customizing section of this guide.
Using the Generate Report Icon
-
Click Generate Report
 .
.The Report Generation dialog box appears.
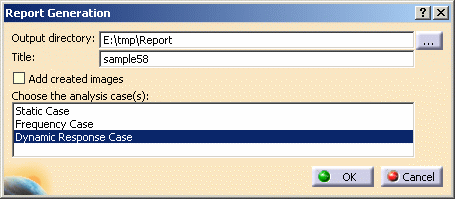
- Output directory: lets you change the directory in
which you will store the .html report.

The last selected path is automatically proposed.
- Title of the report: lets you modify the title of the .html advanced report.
- Add created images: lets you add automatically in the report the images created and activated in the selected cases.
- Choose the analysis case(s): lets you choose the
analysis case for which you want to work.
Multi-selection of analysis cases is available.

- The current point of view and the current zoom are taken into account when images are created in the report.
- For multi-occurrence solutions, the report
contains as many images as occurrences.
In this case, you may adjust the scaling factor of images to ensure that images fit correctly in the window. Otherwise some of the occurrence images cannot be seen in the report. For more details, refer to Amplification Magnitude.
- Output directory: lets you change the directory in
which you will store the .html report.
-
Set the desired options.
In this particular case, select Static Case.
-
Click OK.
A HTML file containing the Report of the Static Case Solution objects set computation is displayed.
-
Click Generate Report
. -
Select all the analysis cases.
-
Click OK.
The complete HTML report appears.
In addition to the HTML Report file, the program also generates a text file (.txt) ready for user editing.
![]()
Using the Report contextual menu
Only available with the ELFINI Structural Analysis (EST) product.
You can access the Report contextual menu on:
- Nodes and Elements set
- Material set
- Analysis cases
- Analysis solutions
- Images
- Sensors.
-
Generate an image.

For more details, refer to Generating Images.
-
Right-click an image in the specification tree and select Report
 .
.The report automatically appears and can now be saved, if needed in the directory you wish using the File > Save as... menu.
![]()