This task shows you how to import forces from a .xls file:
Importing forces from a text file means importing and mapping force data from a text or excel file. This force data can be either force extrapolated on the nodes of the closest element or force directly applied on the associated node. This allows transferring light data.
Only available with the ELFINI Structural Analysis (EST) product.
Imported forces can be applied to the following types of supports:
|
Geometrical Feature |
Mechanical Feature |
Analysis Feature |
||||
|
Spatial Groups |
Geometrical Groups |
Groups by Neighborhood |
Groups by Boundary |
Others |
||
|
Point/Vertex |
|
|
|
|
|
|
To know more, refer to Authorized Supports.
On a Surface
Open the sample53.CATAnalysis document from the samples directory.

-
Go to View > Render Style > Customize View and make sure the Shading, Outlines and Materials options are active in the Custom View Modes dialog box.
-
Click Imported Force
 in the Loads toolbar.
The Imported Forces dialog box appears.
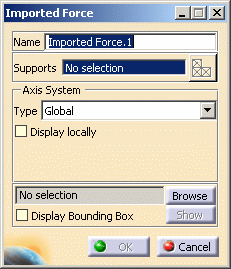
- Name
- Supports: As soon as the support is selected, the
Select Mesh Part button is available.
To know more about the Select Mesh Part button, refer to Selecting Mesh Parts. - Axis System: The Axis System Type combo
box allows you to choose between Global and User
Axis systems, for entering components of the resultant force
vector.
- Global: if you select the Global Axis system, the components of the force vector (in a file) will be interpreted as relative to the fixed global rectangular coordinate system.
- User: if you select a User Axis
system, the components of the force vector (in a file) will be
interpreted as relative to the specified rectangular coordinate
system.
To select a User Axis system, you must activate an existing Axis by clicking it in the specification tree. Its name will then be automatically displayed in the Current Axis field.If you select the User Type, the following options are available:
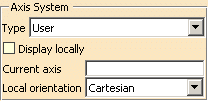
To know more about axis system, refer to Axis System Type.
- File Selection: use the Browse button.
- Display Bounding Box, if needed, on the model.
-
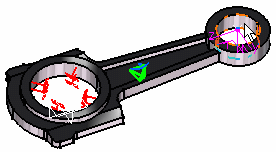
Select the surface as the Support on which you want to import the Force.
-
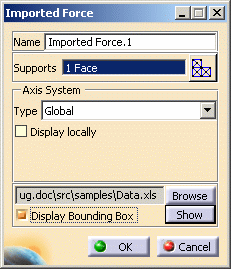
Click the Browse button in the Imported Forces dialog box to select the file to be imported.
The File Selection dialog box appears to let you choose the file to be imported. In this particular case, select Data.xls file.
-
Once the File name has been selected, click Open in the File Selection dialog box.
The Imported Forces dialog box is updated.
-
If needed, click the Show button to display the Imported Table dialog box corresponding to the selected file data.
In this particular case, the imported table appears as shown here:
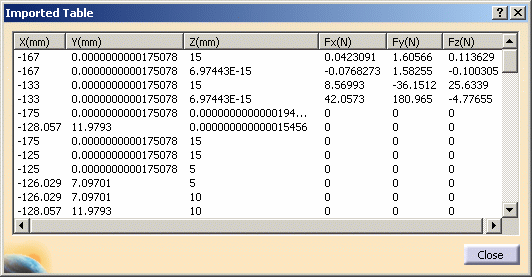
-
Click Close in the Imported Table dialog box.
-
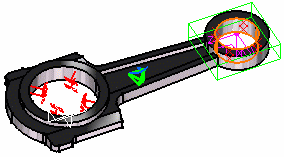
In this particular case, we also decided to activate the Display bounding box (as shown in the dialog box above).
The model appears as shown here:
-
Click OK in the Imported Forces dialog box.
The resulting model appears as shown here:
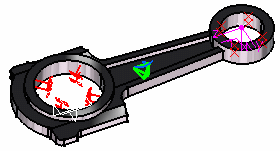
The Imported Forces.1 feature is displayed in the specification tree.

For each point in the data file, the corresponding force is distributed on the three closest nodes of the selected support in a certain neighborhood. Otherwise the force will not be applied.
If the point coordinates correspond exactly to a node, the
force is directly applied on it.
We consider that the point coordinates correspond exactly to a node if the
distance between the point and the node is less than or equal to 10-7m.
On a Virtual Part
Open the sample54.CATAnalysis document from the samples directory.
-
Go to View > Render Style > Customize View and make sure the Shading, Outlines and Materials options are active in the Custom View Modes dialog box.
-
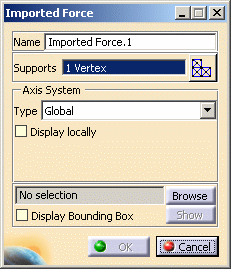
Click Imported Force
in the Loads toolbar. -
Select a vertex as Support.
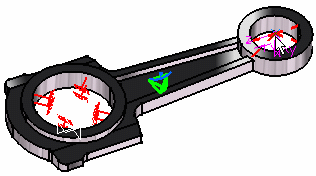
The Imported Forces dialog box now appears as shown here:
-
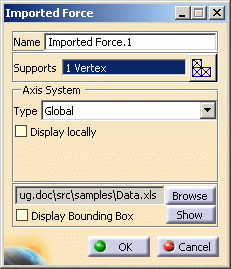
Click the Browse button to select the file to be imported.
The File Selection dialog box appears to let you choose the file to be imported. In this particular case, select Data.xls file.
-
Once the File name has been selected, click Open in the File Selection dialog box.
The Imported dialog box is updated.
-
If needed, click the Show button to display the Imported Table box corresponding to the selected file data.
In this particular case, the imported table appears as shown here:
-
Click Close in the Imported Table dialog box.
-
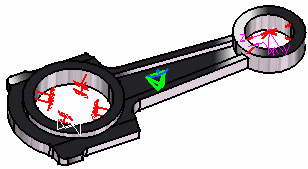
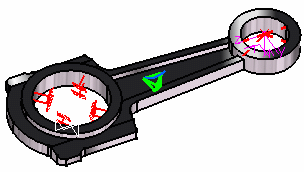
Click OK in the Imported Forces dialog box.
The model appears as shown here:
If you select as support of the Imported Force:
-
only one handler point (in case of one virtual part), then all the data file forces contained in a certain neighborhood of the selected handler point will be directly applied on this handler point. Otherwise the force will not be applied.
-
more than one handler point (in case of several virtual parts), then the corresponding forces will be distributed on the handler points of the virtual parts.
![]()