This task assumes you have created the component as described in Building a Component.
Object
Type of possible connectors
Objects it can be connected to
Electrical Equipment Wide pin
Pin
Electrical child connectorCable
SocketSocket Wide pin
Pin
Electrical parent connector
Plug mating connectorCable
Electrical equipment
PlugPlug Wide pin
Pin
Socket mating connector.Cable
PlugTerminal Board Pin
Junction box connectorCable
Junction boxJunction Box Wide pin
Terminal board connectorCable
Terminal boardCable Cable extremity
Wire
Cable route connectorPlug
Electrical equipment
Continuity
Junction box
Terminal board
SocketContinuity Wide Pin
PinCable
-
Click the tab corresponding to the detail sheet containing the component you created.
-
Click the Build Connector button
 and then select the component to which you want to add connectors, for
example a plug.
and then select the component to which you want to add connectors, for
example a plug.The Build Connector box displays, listing the connector types that you can place on the selected component. 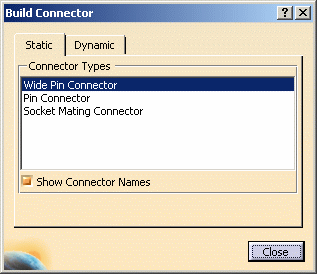
-
Select a connector type in the Build Connector box.
-
Click the component at the point where you want to place the connector.
The connector graphic representation appears. 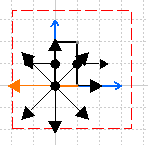
-
Click one of the arrows to define a directional vector for the connector. One of the arrows is already selected by default. The directional vector establishes the angle at which another connector can attach.
-
Add more connectors if you want to by clicking the component.
-
(Optional): To rename any connector, while it is highlighted, right-click and select Rename from the menu that appears.
The Name Connector dialog box displays:

Select a name for the connector; the name you choose will be mapped to the corresponding 3D connector when you associate the 2D component you created to a 3D physical part. See Customizing 2D and 3D Connector Names for more information about how automatic connector name mapping works. -
Click Close in the Build Connector dialog box to end. The connectors are added, but they are no longer displayed.
-
(Optional) To display the connectors again, click the Build Connector button and then select the component.
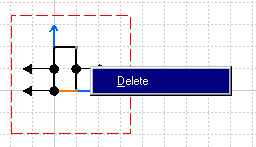
Once a connector is highlighted, you can also rename or delete it. -
(Optional) To delete a connector, right-click the connector, then click Delete in the menu that appears: