You can route branches and single bundle segments using this method. This task focuses on the branch.
Also in this page:
![]()
Open the NewRouting.CATProduct document.
-
Double-click to activate the geometrical bundle.
-
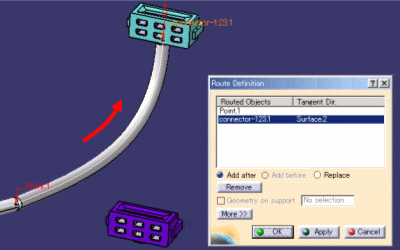
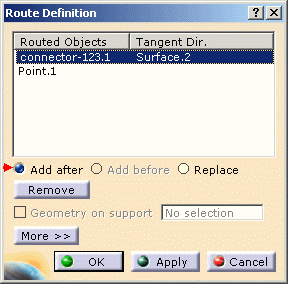
Click Route Definition.
The Route Definition dialog box opens: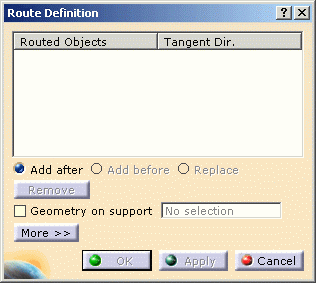
Options are available using More >>. -
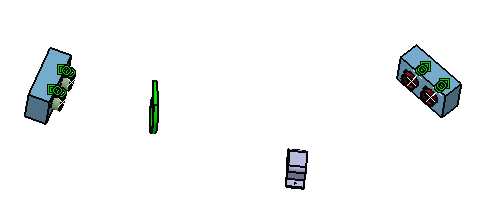
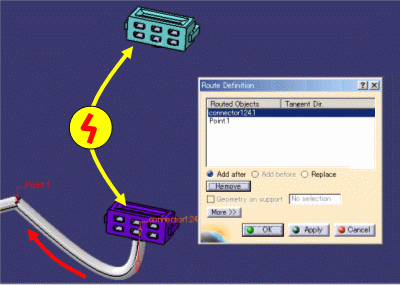
Click successively:

CATIA finds the closest bundle connection point or section on supports, according to the selection point. -
A connector on the left equipment
-
The multi-support
-
The adaptative clamp
-
A connector on the right equipment
The bundle segment is displayed: 
Click here to know more about adaptative part.
-
-
Click OK to validate.
The Route Definition dialog box closes and the Branch Definition is displayed afresh. 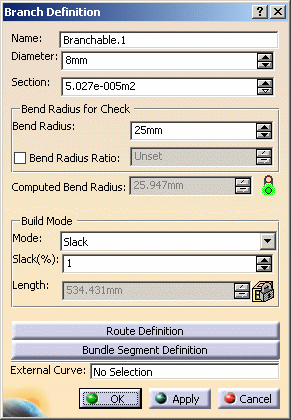
Note that OK and Apply are now activated. -
Click OK to validate the branch definition.
- You can take advantage of the Related Objects viewer to focus on an object and see how it is constructed via its related objects. The related objects command identifies the parent, any children or connected objects and the relationship between objects.
- When routing between construction points, only bundle segment extremities are published. Intermediate route points along bundle segments are not published. If these are required, the user should publish them manually in the Part Design workbench (Tools > Publications).
Selecting Devices in the Specification Tree
It is also possible to select the devices in the specification tree, if the selection is not ambiguous.
Ambiguous means that there are several possibilities for the bundle segment to be routed, for example:
- Connectors with two or more bundle connection points,
- Supports with two or more entry points.
In this case, the cursor shows like this
![]() and the selection is not possible
in the specification tree.
and the selection is not possible
in the specification tree.
The selection is only possible in the geometry: the closest connection point to the selection point is taken into account for the bundle segment route.
Otherwise, the cursor shows like this
![]() and the selection is possible both
in the specification tree and the geometry.
and the selection is possible both
in the specification tree and the geometry.
The system automatically selects the bundle connection point (for connectors and back shells) or the entry point (for supports) as if they were selected in the geometry.
Changing a Connector
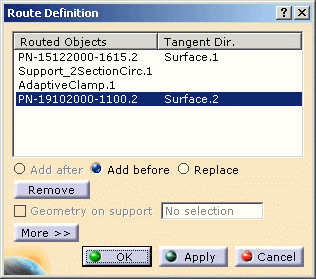
When changing a connector in the Route Definition dialog box, it's possible that you modify the branch/bundle segment orientation without noticing it:
- Click to remove the purple connector:
- Point.1 is the Routed Object selected.
- Add after is selected by default.
- Click to select Add before, then click the new connector
(the blue one).
Note that the selected option comes back to the default value: Add after. 
Otherwise, the blue connector would be added to the network after Point.1 and the branch/bundle segment orientation would be changed, as shown below: