- Making Two Actions Start Simultaneously
- Adding Analysis to a Sequence
-
Click Edit Sequence
 in the DMU Simulation toolbar.
The Edit Sequence dialog box (see below) is displayed. 
The Player toolbar appears when the Edit Sequence dialog box opens. Only the time mode is available for sequence editing. -
Select Track.1 (Track.1) in the Action in session list and then click the Add button.

-
Select Track.1 (Track.2) in the Action in session list and then click the Add button.
The tracks appear in the Action in Sequence list. 
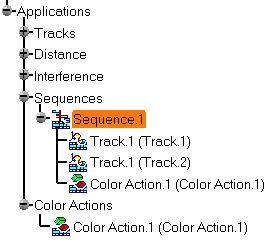
Sequence.1 is identified in the specification tree. 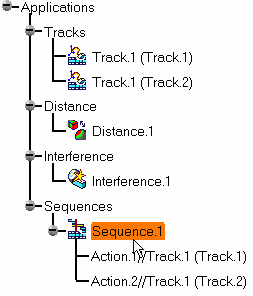
In the next steps, you make the two tracks start simultaneously. -
Select the Merge Up button

The two actions (in this case, tracks) start together. Alternatively, when first creating the sequence, you could have selected both tracks simultaneously in the Action in session list, and then selected the Add button (in lieu of Steps 2 and 3). -
Check the Add in last step option in the Edit Sequence dialog box.

Actions can be created on the fly. The next step will provide an example by creating a Color Action. -
Click Color Action
 in the DMU Simulation toolbar.
The Color Action dialog box and the Recorder pop-up toolbar appear. 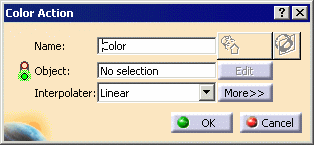
You can alter the name of the color action by entering one in the Name field, or you can accept the default name provided. For more information about how the initial color of an object is determined, see About Color Determination. -
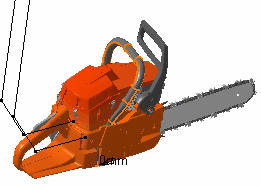
Select Handle.1 either in the specification tree or in the geometry area.
The Graphic Properties pop-up toolbar appears. 
-
Select a color of your choice using the arrow and combo list (e.g., blue).
The object changes to blue instantaneously. -
Click Record
 .
. -
Alter the opacity/transparency in one of two ways:
- On the Graphics Properties toolbar, select a percentage of
opacity (100%=completely opaque; 0%=completely transparent).

- Use the Color Action and Properties dialog boxes to alter the transparency:
-
Select the Edit button in the Color Action dialog box.
The Properties dialog box appears. -
Select the Graphic tab in the Properties dialog box.
-
In the Properties dialog box, check the Transparency option (if it is not already checked), and move the slider as desired.
In this case, 0 (i.e., the slider set to the left) equals completely opaque; and the largest number (i.e., the slider set to the right) equals completely transparent.
You can access the Properties dialog box at any time to change color or transparency. The Graphic Properties pop-up toolbar is a quicker way to modify graphic properties. 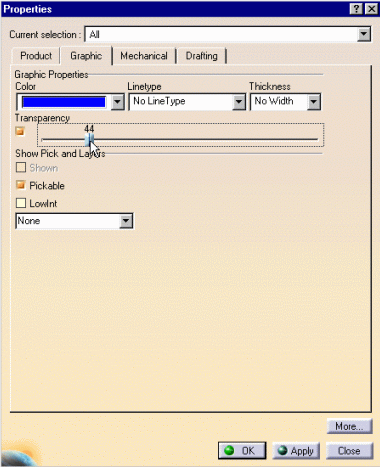
Note that the color or transparency of geometric data is a graphic property of the data. Therefore, if you delete a color action, the color or transparency selected in the color action remains a graphic property of the data. To alter the color or transparency, alter the graphic properties. - On the Graphics Properties toolbar, select a percentage of
opacity (100%=completely opaque; 0%=completely transparent).
-
Click the Apply button to confirm that the settings are those desired.
-
When done, click the Close button to exit the Properties dialog box.
-
Click Record
on the Recorder pop-up toolbar. -
Click OK in the Color Action dialog box.
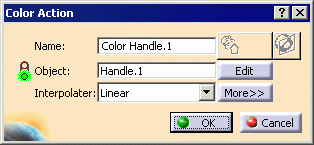
The color action is automatically added in the action in the sequence and identified in the specification tree. 
-
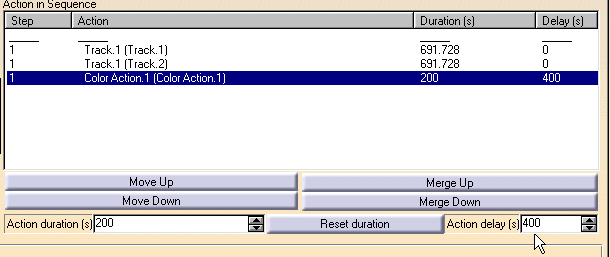
Modify the action duration by entering 200 in the Action duration(s) field (if the duration does not already equal 200).

For more detailed information, please read: About Action Modification. 
-
Select the Color Action.1 in the Action in Sequence list and enter 400 in the Action delay(s) field.
-
Play your sequence using the Player.
In next section, you can add analysis to your sequence. -
Select the Edit Analysis tab on the Edit Sequence dialog box.
-
Multi-select the existing analyses (i.e., Distance.1 and Interference.1) and click the Add button.
You can create and add analysis specifications on the fly. You can also edit existing analysis specifications by double-clicking them in the Analyses in Sequence list. 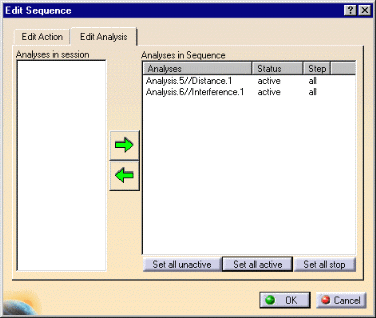
-
Select the Set all active button.
-
Click OK in the Edit Sequence dialog box.
-
Select your sequence in the specification tree and click Player
 .
. -
Simulate your sequence using the Player buttons.
-
If you need to restore the initial positions, click Reset
 .
. -
Open the DEFINE_SEQUENCE_RESULT.CATProduct to check your result.