This batch lets you use the CATDUA V5 to have a support CATIA level change, to make a diagnostic, and eventually a healing of CATIA document (CATPart, CATProduct, CATProcess, CATAnalysis, CATDrawing, CATMaterial):
- Method 1: Accessing the Batch Interface from the CATDUA V5 interactive Tool
- Method 2: Accessing the Batch Interface from the CATUTIL / CATDUA V5 Batch Tool
In this task, you will see how to:
- define the batch parameters,
- save the batch parameters,
- run the batch directly from the CATDUA V5 dialog box,
- run the CATDUA V5 Batch directly from the Batch Monitor,
- visualize the report of the CATDUA V5 Batch execution in the Batch Monitor.
In CATIA Tools -> Options -> General -> General, it is recommended to select the Load referenced documents option.
Method 1: Accessing the Batch Interface from the CATDUA V5 interactive Tool
On Windows
-
In a MS-DOS window (or Command Prompt), go to the level in which CATIA is installed (example: E:Install...).
-
Enter the following command: cd intel_a code bin.
-
Enter the following command: CATDUAV5. The CATDUA V5 dialog box appears.
On UNIX
-
Change the directory to: cd Install_folder/OS_a/code/command.
-
Run the following command: ./catstart -env EnvName -dirEnv DirName -run "CATDUAV5".
Note that EnvName is the environment file and DirName is the directory in which the environment is. The same CATDUA V5 dialog box appears.
Method 2: Accessing the Batch Interface from the CATUTIL / CATDUA V5 Batch Tool
You can also run the CATDUA V5 Batch using the Batch
Monitor which lets you access a specific batch interface or run a batch
directly from the command line.
For more information about the Batch Monitor, please refer to Running
Batches Using the Batch Monitor in the Infrastructure User's Guide.
In that case, an additional area will be displayed at the bottom of the window to let you select a license using the Licensing Setup... button (see Running Batches Using the Batch Monitor in the Infrastructure User's Guide, paragraph Defining the batch parameters).
The batch-specific online documentation can be
accessed directly from the batch interface by clicking the
![]() icon in the top right
corner (on Windows) or the
Help button (on UNIX).
icon in the top right
corner (on Windows) or the
Help button (on UNIX).
For this task, you have to open the Batch Monitor dialog box either in or out of a CATIA V5 session. To know how to access to the Batch Monitor, see Running Batches Using the Batch Monitor in the Infrastructure User's Guide.
Defining the Batch Parameters
-
Select CATDUAV5 in the Utilities tab of the batch Monitor dialog box.
-
Select New parameters file in the File menu or double-click the CATDUA V5 line in the Batch Monitor window. The CATDUA V5 dialog box appears.
Note that CATDUA V5 is able to process documents coming from ENOVIA VPM or ENOVIA LCA.
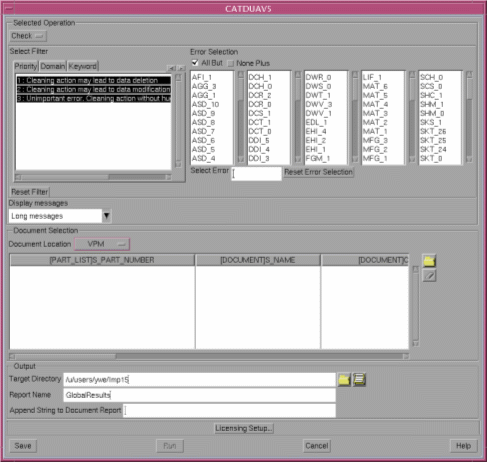
Here is the description of the CATDUA V5 window:- Selected Operation: this section allows you to
select the kind of analysis which will be processed, including:
- Check and Clean option,
- Error selection filtering.
- Document Selection: this section allow you to select the list of documents which will be processed and output information (for Clean mode).
- Output: this section allows you to define output criteria for reports.
- Save: this button lets you save the associated xml file. This save will let you launch other executions of the CATDUA V5 Batch.
- Run: lets you start the CATDUA V5 Batch execution.
- Cancel: lets you cancel the CATDUA V5 Batch execution.
- Help: lets you open the official CATDUA V5 documentation.
- Selected Operation: this section allows you to
select the kind of analysis which will be processed, including:
Selected Operation

- Check: if you only want to check the document.
- Clean: if you want to check and clean the document. In that case, cleaned documents will be automatically written, depending on the output criteria you will define below (see Document Selection section).
- Priority: this option lets you choose the result of priority errors you want to get (1 and/or 2 and/or 3 choices).
- Domain: this option allows you to check or clean errors from one or several specific domains.
- Keywords: this option allows you to check or clean errors
with a specific impact.
- Dealing with GhostLink,
- Dealing with the Specification,
- Dealing with the Geometry,
- Impacting the PCS and performance result.
- You can combine all filters, but almost one error must be selected for processing. Else, an error pop-up is displayed and the last filter selection is ignored.
The list of available errors according to the filters selection is dynamically computed. You can at any time go back to the initial selection (all priorities) by pushing the "Reset Filter" button. Then you can decide to apply:
- All but the list of selected errors,
- None plus the list of selected errors.
You can also manually exclude or add an error by selecting the error in
the list.
Display messages: this option lets you choose the kind of information
you need in the report (Long messages, Short messages,
Short/Long messages). Please note that Short, Long and
Short/Long messages are not available for all CATDUA rules and the same
message is issued in such cases.
Document Selection
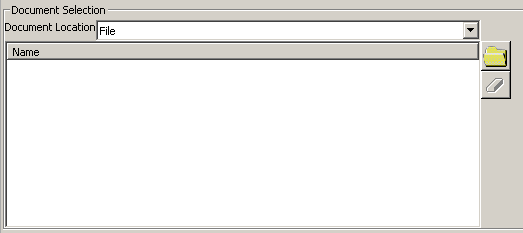
Still in the Document Selection area, click the
Each document type is associated to a specific search interface:
When searching for File documents with the "Clean" action selected, the search is performed via the following File Selection dialog box:

|
Note that this option allows you to rename automatically the cleaned
documents, keeping the input directory structure, and many more useful
options.
If the "Check" action is selected, the File Selection dialog box slightly
differs because this action does not require as many data as the "Clean"
action:

When searching for ENOVIA V5 documents, the search is performed via the Search Documents in ENOVIA LCA dialog box:

|
By the same way than the File selection, this panel may differ depending
on the Check or Clean option.
For detailed information about this dialog box, refer to the hyperlink:
Searching for Documents in ENOVIA LCA, within the page entitled: Running
the Data Life Cycle Batch, in the Infrastructure User's Guide.
When searching for ENOVIA VPM documents, the search is performed via the Search Documents in ENOVIAVPM dialog box:
|

By the same way than the File selection, this panel may differ depending
on the Check or Clean option.
For detailed information on this dialog box, refer to the hyperlink:
Searching for Documents in ENOVIA VPM, within the page entitled: Running
the Data Life Cycle Batch, in the Infrastructure User's Guide.
This scenario takes the "File" Document Location as an example.
Enter your search criteria in the search dialog box. Once documents have
been selected, their names are displayed in the Name list.
When working with File documents, note that the former Pointed document option (allowing to process all the documents pointed to by the document to be checked or cleaned) has been replaced by the Select pointed documents option available in the File Selection dialog box.
If you change your mind afterwards and decide not to process one or
several documents displayed in the Name list, select them (you can use the
multi-selection), then click the
![]() button to remove the
documents from the list. As long as no document is selected, the button is
dimmed.
button to remove the
documents from the list. As long as no document is selected, the button is
dimmed.

If you set the DLName environment as "Current" in the Tools -> Options -> General -> Document tab, the usual File Selection dialog box will be replaced by the following one:
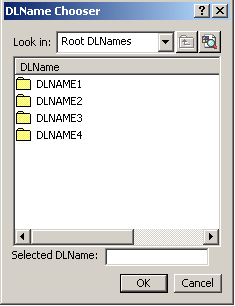
In this mode, the different file opening and saving commands only allow end users to access documents in directories referenced by DLNames.
DLNames are identified by the string CATDLN://, for instance "CATDLN://DLNAME3".
Use the "Look in:" pull-down list to select the root DLName in which you
want to navigate. The sub-folders (if any) stored in the selected root
DLName are then displayed in the DLName list below and you can choose a
DLName in list: the selected DLName is displayed in the "Selected DLName"
field and will be set as the target directory.
Note that once you are in a sub-folder, you can re-access the upper level
by clicking the ![]() button.
button.
You can also click the ![]() icon to
access the Search Results dialog box which lets you search for DLNames
using a specific interface. For more information, please refer to Searching
for DLNames in the Infrastructure User's Guide (Customizing
Settings, General, Document).
icon to
access the Search Results dialog box which lets you search for DLNames
using a specific interface. For more information, please refer to Searching
for DLNames in the Infrastructure User's Guide (Customizing
Settings, General, Document).
Once you have found the desired DLName, click OK to validate.
Enter the name of report in the Report Name field. By default, the report
is named "GlobalResults".
For each processed document, the batch creates a document report in the
target directory. By default, the name of the report is the name of the
document suffixed with ".htm". You can change this default name by
suffixing the document report name with the string of your choice. To do
so, enter the string to be added at the end of the name in the Append
String to Document Report field.
All these information can be automatically valuated using an existing xml
file, in the contextual menu "Read input parameters from file".
![]()
Saving the Batch Parameters
Note that you can save the xml file and run the batch execution directly from the CATDAUV5 dialog box.
Click the Save button. The Save As dialog box appears and lets you save the associated xml file and save the parameters you just have defined. This file contains information about the batch (name of the batch, name of the documents you want to check or clean, path directory of the check/clean report, ...). This file can also be used to valuate all the fields, using the contextual menu.
![]()
Running the CATDUA V5 Batch from the CATDUA V5 dialog box
Click the Run button to start the CATDUA V5 Batch execution.
![]()
Running the CATDUA V5 Batch directly from the Batch Monitor
-
Close the CATDUA V5 dialog box.
-
Select Associate a parameters file in the File menu in the Batch Monitor dialog box. The File Selection dialog box appears to let you select the xml file you want to associate to the CATDUA V5 Batch execution.
-
Click Open in the File Selection dialog box. The name and the path directory of the file are displayed in the Start tab of the Batch Monitor dialog box.
Note: You can associate several xml files in order to obtain a list of batches that you could run later. 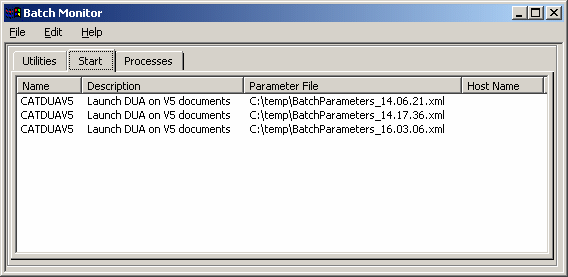
-
Select the file associated to the batch you want to run in the Start tab.
-
Select Run in the File menu to start the batch execution.
At the end of the execution, one of the following return codes will be returned:
-
ReturnCode = 0 -> the batch ended successfully,
-
ReturnCode = 4 -> at least one document could not be processed,
-
ReturnCode = 8 -> the batch aborted.
To display an HTML version of the report, click Open HTML Report in the CATDUAV5 dialog box
 . This button is
activated only once a report has been generated, otherwise it is
dimmed.
. This button is
activated only once a report has been generated, otherwise it is
dimmed. -
![]()
Visualizing the Report of a Batch Execution in the Batch Monitor
The report of the CATDUA V5 Batch execution is stored in the Processes tab of the Batch Monitor dialog box. You can find the following information:
- name,
- batch identification number,
- status (in progress or ended),
- start and end time,
- return codes detected,
- information (success of the execution).
In the batch mode, all levels of priority are automatically processed.
To know how to have access to the results of the check/clean execution, refer to Viewing Results of CATDUA V5 Execution in this guide.
![]()