This procedure describes how to assign products and resources to activities within the process. There are four methods that can be used to assign products and resources to activities:
- Using the Assign a Product/Resource command (Activity Management Workbench)
- This method allows you to define a relation from a list of relation types at the time of the assignment
- Using the Assign an Item and Assign a Resource commands (Activity Management Workbench)
- This method allows you to quickly assign a product or resource to an activity, without querying for the relation type
- Using the drag-and-drop method from within the PPR tree
- This method allows you to quickly assign a product or resource to an activity, without querying for the relation type
- Using the drag-and-drop method from the 3D viewer to the PPR tree
- This method allows you to quickly assign a product or resource to an activity, without querying for the relation type
Starting with R17 SP2 it is not possible to use these commands (Assign and unassign a Product/Resource command ) for Assembly Process. An error message box appears with message “This command does not work for Assembly Operation”
The following procedures describe each method:
- The products and resources to assign must have been previously imported to the process (i.e., they are currently displayed in the ProductList and ResourcesList).
- The activities that make up the process have been created.
- The PPR tree for the process must be visible.
To view assigned resources on the PPR tree, the appropriate filter (Resources) must be enabled. See the Tree section of Customizing for more information.
- The purpose of a process and its associated activities is to transform items, which are represented by a specific set of data. This data may refer to products, welds, other fasteners, or points to inspect. Therefore, the more generic term "item" is used throughout the application.
-
Because more than one resource is often needed for a particular activity, multiple resources may be assigned to an activity.
Assigning a product
Method 1: Using the Assign a product/resource command (Activity Management Workbench)
1.
Click on the Assign a product/resource command
![]() .
The command turns orange to indicate that it is active.
.
The command turns orange to indicate that it is active.
2.
Select the product to be assigned from the ProductList of the PPR tree:
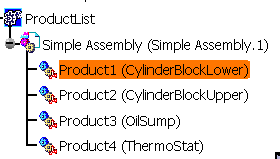
3.
Select the activity in the PPR tree that the product is to be assigned to. The Assignment Type dialog box is displayed when the activity is selected:
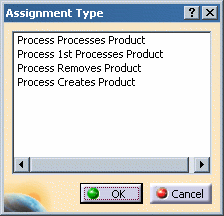
| Assignment Type | Definition |
|
Process Processes Product |
The activity works on the product. |
|
Process 1st Processes Product |
The activity works on the product, and the product is used for the first time in the process plan. |
|
Process Removes Product |
The activity disassembles the product. |
|
Process Creates Product |
|
4.
Select the type of relation for the process/product and click OK. The product will then be shown in the Items folder of the selected activity:
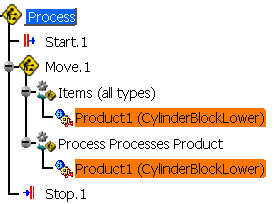
Method 2: Using the Assign an item command (Activity Management workbench)
1.
2.
Select the product to be assigned from the ProductList of the PPR tree.
3.
Select the activity in the PPR tree that the product is to be assigned to. The selected product will then be shown in the Items folder of the selected activity.
Method 3: Using drag-and-drop from within the PPR tree
Use the mouse to select a product from the ProductList and drag it onto the desired activity. Products dragged from the ProductList to an activity are automatically assigned as items.
Method 4: Using drag-and-drop from the 3D viewer to the PPR tree with Product Selection mode
1.
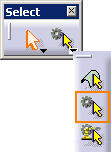
For non-simulation DELMIA applications, select the Products Selection icon from the Filtered Selection toolbar to activate Product Select mode:

Products Selection mode allows for products to be easily selected from geometry displayed in the 3D viewer. Without the Products Selection mode, clicking on the geometry in the 3D viewer selects only the individual lines, planes, etc. that are part of a product, but does not select an entire product. When enabled, Products Selection mode allows for the selection the entire product that a particular line or plane belongs to, and will highlight the selected product in the PPR tree.
Multiple part selections can be made by holding the CTRL key when clicking on the different products, and dragging the part last clicked to the desired activity on the PPR tree.
Assigning a resource
Method 1: Using the Assign a product/resource command (Activity Management Workbench)
1.
Click on the Assign a product/resource command
![]() .
The command turns orange to indicate that it is active.
.
The command turns orange to indicate that it is active.
2.
Select a resource in the ResourcesList on the PPR tree:

3.
Select the activity in the PPR tree that the product is to be assigned to. The Assignment Type dialog box is displayed when the activity is selected:
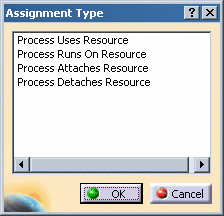
| Assignment Type | Definition |
|
Process Uses Resource |
Defines the selected product as the main resource for the process. |
|
Process Runs On Resource |
Defines the selected product as an auxiliary resource that is used by the main resource during the process. |
|
Process Attaches Resource |
Used when attaching a resource onto a product within the context of an activity. The assigned resource appears in the Items list of the PPR tree (not the Resources list). |
|
Process Detaches Resource |
Used when detaching a resource from a product within the context of an activity. |
4.
Select the type of relation for the resource/product and click OK. The resource will then be shown in the Resources folder of the selected activity:
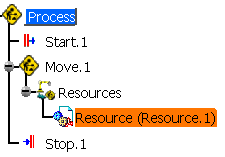
Method 2: Using the Assign a resource command (Activity Management workbench)
1.
2.
Select an element of the ResourcesList on the PPR tree.
3.
Select an activity in the PPR tree. The selected resource will be shown in the Resources folder of the selected activity.
Method 3: Using drag-and-drop from within the PPR tree
1.
Use the mouse to select and drag a resource from the ResourcesList and drop it on an activity. Elements dragged from the ResourceList to an activity will automatically be assigned as resources.
Method 4: Using drag-and-drop from the 3D viewer to the PPR tree with Products Selection mode
1.

For non-simulation DELMIA applications, select the Products Selection icon from the Filtered Selection toolbar to activate Product Select mode:

Products Selection mode allows for products to be easily selected from geometry displayed in the 3D viewer. Without the Products Selection mode, clicking on the geometry in the 3D viewer selects only the individual lines, planes, etc. that are part of a product, but does not select an entire product. When enabled, Products Selection mode allows for the selection the entire product that a particular line or plane belongs to, and will highlight the selected product in the PPR tree.
Multiple part selections can be made by holding the CTRL key when clicking on the different products, and dragging the part last clicked to the desired activity on the PPR tree.
Click on the Products Selection icon
![]() from the Select workbench to turn off Product Select
mode.
from the Select workbench to turn off Product Select
mode.
Unassigning a product
On the PPR tree, select the activity that the item is assigned to. A dialog box will be displayed which lists all products currently assigned to the activity:

Select as many items in the list as desired, and click the Unassign button to remove those selected from the activity.
Unassigning a resource
On the PPR tree, select the activity that the resource is assigned to. A dialog box will be displayed which lists all resources currently assigned to the activity:
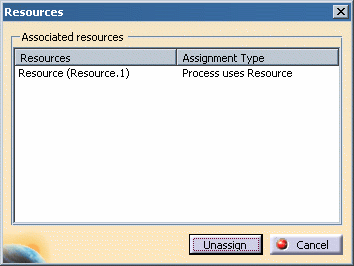
Select as many resources in the list as desired, and click the Unassign button to remove those selected from the activity.
During the assignment of products or resources, the system determines whether the current assignment duplicates any that already exist. Each product or resource can only be assigned to a particular activity within a particular process once.
The assignment of a product or resource differs from the use of copy and paste commands. Copy and paste commands should never be used in place of assigning products or resources to operations; this will not work.