This procedure describes how to add activities to a process from a set of process libraries. This procedure has the following sections:
- Insert Activities Using the User-Defined Activities Toolbar
- Insert Activities Using the Insert Activity Command
- Insert a Child Activity with a Resource as Parent
- Insert a Successor Activity
- Insert Activities with the PERT Chart
- Assign Products to Activities in Quick Sequence
- A PPR tree must be visible.
- You must have created process libraries.
-
You must have set the path(s) to your libraries via the Tools > Options > Libraries page.
OK button
The activity is added by clicking OK, which closes the dialog box.
Apply button
Apply is used to add the activity; the dialog box remains opened, which allows you to add additional activities.
Cancel button
Cancel closes the dialog box and voids any activity additions that occurred while the dialog box was opened, with the exception of activities you have already added by using Apply.
Either of two methods can be used to add activities to a process. These include:
- The User Defined Activities toolbar is automatically
generated from the process libraries defined in the Tools/Options
settings for a new process, or from the previously used and attached
process libraries for an existing process. You can add activities by clicking an icon in the toolbar, or by selecting the commands from the
Insert > User Defined Activities menu.

-
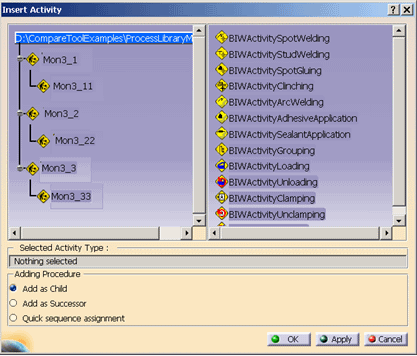
Insert Activity
 presents the
same process libraries, but displays them in a viewer that also indicates where the libraries are located, as
well as their internal hierarchy. Also, additional options allow the user to create activities in a different
context, as discussed in the sections below.
Insert Activities Using the User-Defined Activities Toolbar
-
Select the activity to be created by clicking one of the icons in the toolbar or one of the User Defined Activities menu items.
-
Select an existing activity (or the top-level Process node) in the PPR tree.
-
The newly added activity becomes a child of the selected activity.
-
If a PERT chart is open, an activity can also be selected in that viewer as the parent of the newly created activity.
-
Insert Activities Using the Insert Activity Command
Insert a Child Activity with Another Activity as Parent
-
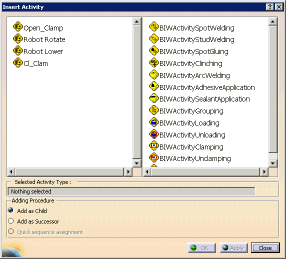
Click Insert Activity
 in the
Activity Management toolbar to display the
Insert Activity dialog box.
 -
On the PPR tree (or in a PERT chart), click on the activity (including the top-level Process node) that you want to be the parent of the activity.
-
In the Insert Activity dialog box, click Add as Child, if necessary (it is selected by default).

-
In the left column, select the activity to be added as a child activity of the parent selected above.

-
Click Apply (if you wish to add more activities) or OK (if you want the Insert Activity dialog box to close).
The activity selected becomes the child of the parent activity selected. 
- The activity selected in this example, Open_Clamp.1, could have been selected inside a PERT chart, if the PERT chart were open.
- If the activity addition had occurred within the PERT chart, the PERT chart of the Open_Clamp.1 activity would subsequently show one activity as a child.
Insert a Child Activity with a Resource as Parent
Insert Activity
![]() enables you to assign activities to resources. In order to assign
these resources in V5, they must demonstrate a specific behavior, e.g.,
for the DPE plantypes line and station.
enables you to assign activities to resources. In order to assign
these resources in V5, they must demonstrate a specific behavior, e.g.,
for the DPE plantypes line and station.
In order to assign activities to resources in V5, you must have first created a project in DPE, and then open it in V5. The plantypes line and station have already been configured to correspond to the plantype set in the R17 release. It is on this basis that you can create the plantypes line and station resources in V5.
These are the only resources in the tree that can
have activities assigned to them. In the case that a resource has been
selected for execution of Insert Activity
![]() , but cannot
demonstrate this behavior, then the portion of the tree above the
selected resource in the opened project is searched:
, but cannot
demonstrate this behavior, then the portion of the tree above the
selected resource in the opened project is searched:
-
If a resource is found in the tree, that demonstrates the behavior, then the activity is assigned to this resource. The Process uses Resource relation automatically links processes with a resource.
-
Insert Activity
 cannot be executed if a
resource is not found.
A parent/child relationship exists between resources and activities.activities can only be assigned to resources as children – Add as Child must be selected in the Insert Activity dialog box.
-
Click Insert Activity
 in the Activity Management toolbar.
The Insert Activity dialog box appears. -
In the Insert Activity dialog box, click Add as Child, if necessary (it is selected by default).

-
Select the activity to be added as a child activity to your resource.
In the example BIWActivitySpotwelding is selected.In the example BIWActivitySpotwelding is selected. Note that BIW-Activities are displayed in the right side of the dialog box. 
-
Select the resource in the tree.

The Create Activity dialog box appears only for BIW Activities. This dialog box opens automatically when you assign a BIW Activity to a resource (as in the example). You can edit the attributes of the activity in this dialog box. 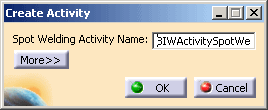
-
Click OK.
The activity is assigned to the resource. OK is only available if it is permissible to assign the activity to the resource. 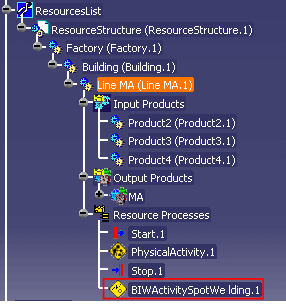
Insert a Successor Activity
-
In the Insert Activity dialog box, click Add as Successor.

-
In the Insert Activity dialog box, select the successor activity.
-
On the PPR tree, select the activity that you want the successor activity to follow.
The system responds by adding the activity to the PPR tree and to the PERT chart (if open). If a previously created activity, such as PaintInBlue.1 is selected on the PPR tree, the newly-created activity follows it. The image below shows PaintInBlue.2 as the successor. 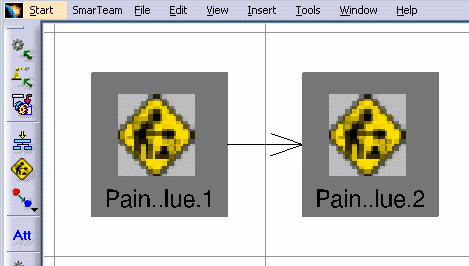
Insert Activities with the PERT Chart
Use Insert Activity
![]() as described above, but instead of clicking on an
activity in the PPR tree, click on an activity in the PERT chart.
as described above, but instead of clicking on an
activity in the PPR tree, click on an activity in the PERT chart.
-
If you select Add as Successor, the new activity is added between the two linked activities.
-
If you select Add as Child, a + (plus) symbol appears in the upper right corner of the selected parent activity to indicate that the activity has children. Clicking on the + symbol expands the parent activity to show its children.
Assign Products to Activities in Quick Sequence
The Quick sequence assignment option allows you to create a sequenced set of operations rapidly, each of which has a product assigned. This option allows you to work around the task of creating a set of activities, sequencing them, and then assigning products to each of them one by one.
Only activities that can be assigned to a selected object are displayed in the Insert Activity dialog box. Individual or multiple objects may be selected in the PPR tree. You first select the PPR object and then open the Insert Activity dialog. The dialog box displays only activities that can actually be assigned to the selected PPR object.
When selecting several objects at a time, be sure that the selected object types are compatible with one another. If you select several objects, the program first checks their compatibility and then opens the dialog. If the objects selected are not compatible with one another, a message will call attention to this fact.
If you select several objects, the option Quick sequence assignment is automatically pre-selected when you open the dialog box.
-
Using the Ctrl key, select multiple parts in the PPR tree. Select the parts in the order you want the activities associated with them to occur (e.g., if you want the Assembly Activity for Crankshaft_Assembly to occur before the Assembly Activity for the Cam_Assembly, then select Crankshaft_Assembly first.
-
Click Insert Activity
 .
. -
Select the parent activity (e.g., the Process node) in the PPR tree.
The Insert Activity dialog box appears; Quick sequence assignment is available and selected by default. -
In the Insert Activity dialog box, select the activity you want to assign to the products.
-
Click OK.
This creates the sequence of new activities, with the proper assignment. 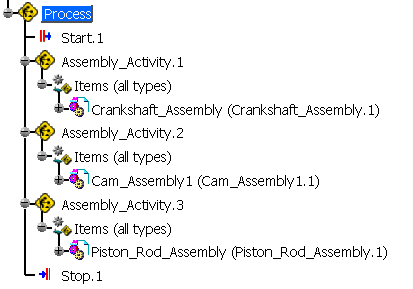
To see the assigned products in the PPR tree, select the Items folder / Input Products folder check box in the Tree tab of Tools > Options > Digital Process for Manufacturing. You can also see the order in the PERT view. 
Create Logical Activities
Logical activities are created by selecting the required parent activity in the PPR tree; their position is defaulted inside the PERT chart. Available activity types are:
-
 Start
Start -
 Stop
Stop -
 OrIn
OrIn -
 Switch
 -
 AndIn
AndIn -
 AndOut
The Switch activity has properties, which can be edited by right-clicking on the activity in the PERT chart or PPR tree, and selecting Properties. The properties enable you to define rules to branch out in the activity flow when an activity has outgoing control flow.
 |
About Start and Stop Activities
- The display of the Start and Stop activities in the PPR tree may be turned on or off via the Tools > Options > Digital Process for Manufacturing > Tree options.
- Start and Stop activities may be automatically created, depending upon the conditions described below.
For Start activities:
- If an activity is pointed to by a control flow, a Start activity is automatically created at the child level when adding the first child to the activity.
- If an activity has children and a control flow is created which points to the activity, a Start activity is automatically created at the child level if it does not already exist.
For Stop activities:
- If an activity is points to another activity via a control flow, a Stop activity is automatically created at the child level when adding the first child to the activity.
-
If an activity has children and a control flow is created which starts from that activity, a Stop activity is automatically created at the child level if it does not already exist.