Instead of using Advanced Draft to created both side draft features, we recommend you use Draft Both Sides which offers a more easy-to-use dialog box. More specifically, it provides helping images which dynamically reflects the geometry you select while designing. For more information, see Creating Advanced Drafts .
-
Click Advanced Draft
 in the Advanced Draft toolbar
 .
.In case the icon is not displayed in the workbench, to access it select View > Toolbars > Advanced Draft then display the Advanced Draft sub-toolbar.
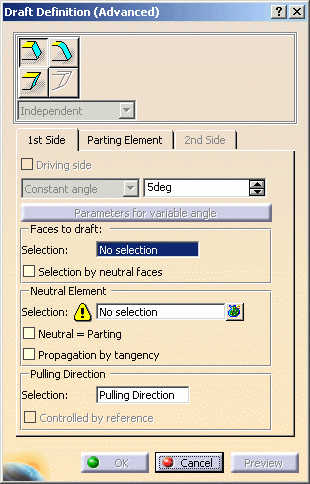
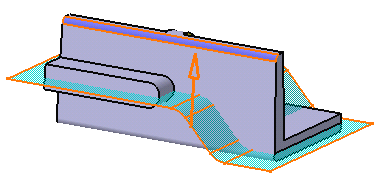
The Draft Definition (Advanced) dialog box is displayed as well as an arrow indicating the default pulling direction (xy plane) in the geometry area.
-
Specify that you wish to draft two faces from their reflect lines by clicking both icons as shown:

The Faces to draft options are no longer available. Now, three draft modes are proposed.
Draft Modes
The three draft modes available are:
- Driving/driven: the angle value you specify for one face affects the angle value of the second face.
- Independent: you specify two angle values that apply to both faces respectively.
- Fitted: you specify a minimum angle value for one side and the application ensures that both sides are adjusted onto the parting element.
-
Set Fitted.
1st Side
-
To define the first draft angle value, enter 3deg as the minimum draft angle value.
Neutral Element
-
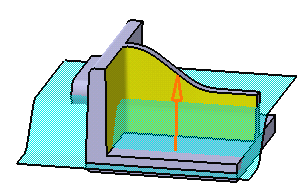
The Neutral Element frame is reserved for the face you wish to draft. Click No selection from the combo list and select the face as shown:
The application is going to detect the reflect line from this neutral face, and therefore the face that will be affected by the draft operation.
Pulling Direction
In the Pulling Direction frame, you can notice that the Selection field indicates that a pulling direction has been defined by default as indicated by the arrow in the geometry area. If you wish to change this pulling direction, you just need to click the field and select the element of your choice as the new pulling direction.
- Note that contextual commands creating the pulling directions you need are also available from the Selection field:
- Create Line: For more information, see Creating Lines.
- Create Plane: see Creating Planes.
- X Axis: the X axis of the current coordinate system origin (0,0,0) becomes the direction.
- Y Axis: the Y axis of the current coordinate system origin (0,0,0) becomes the direction.
- Z Axis: the Z axis of the current coordinate system origin (0,0,0) becomes the direction.
If you create any of these elements, the application then displays the corresponding icon in front of the Selection field. Clicking this icon enables you to edit the element.
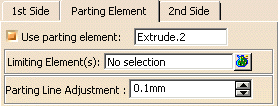
Parting Element
-
Click the Parting Element tab to define the parting element.
-
Check Use parting element and select Extrude.2 (the blue surface) as the parting element.
-
Enter 0.1mm, if not already set, in the Parting Line Adjustment field.
This option adjusts the smoothness of the transition zone on the draft surface. A transition zone occurs when a neutral element that was driving becomes driven, or vice versa. A zero parting line adjustment would yield a sharp edge on the draft surface. Usually, the default value (0.1mm) is most of the time efficient.
2nd Side
-
To define the other side to be drafted, click the 2nd Side tab.
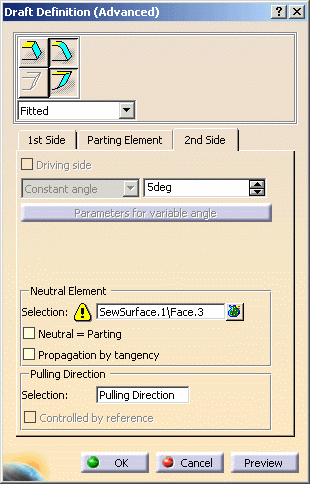
Neutral Element
-
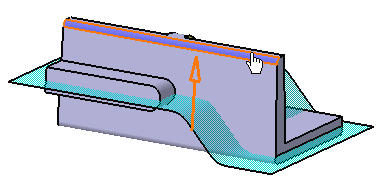
In the Neutral Element frame, click No Selection from the combo list and select the face as shown:

Note that the reflect line of the face you selected as the first side is now displayed in pink.
-
Click OK to confirm. The part now looks like this:
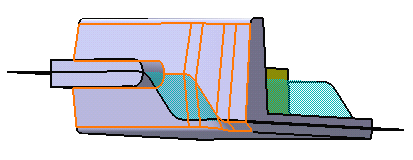
Taking a closer look at the result, you can notice that both sides are adjusted onto Extrude.2.
|
|
 |

- In case you wish to know both angle draft values finally used to draft both sides of the part, you can use the Draft Analysis capability.
- Double-clicking on both side draft features created using
Advanced Draft
displays the Draft Both Sides dialog box in which changing
parameters will be done more easily.