Introduction
In order to take advantage of the full text search feature in the ENOVIA Document Management application, full text servers must be activated on each vault server on which the full text indexing feature is enabled.
For example, the full text server is designed to be activated principally on vaults intended to store specification or maintenance documents in various word processing or spreadsheet formats. A full text server need not be activated on vaults dedicated to storing CAD data or images, since there would be no text to index.
Software Prerequisites
Full text indexing is supported only on Windows machines hosting a vault server.
The Microsoft Index Server (MIS) feature must be installed on the vault server running a vault with documents needing to be indexed in full-text mode. This is an optional component of Windows server operating systems, just like Microsoft IIS), along with the prerequisite .NET 1.1 Service Pack 1 runtime, with J# 1.1 and HotFix KB 899181.
Use of a Microsoft Index Server located on a different machine from the machine running the vault server is not supported.
WebSphere Application Server is no longer a prerequisite for full text indexing on the vault server.
Installation of the full text server is performed using command line instructions. However, the MIS administration is performed using the Microsoft Management Console. Everything related to MIS administration is located under the Indexing Services node in the Services and Applications node.
Full Text Indexing Command Syntax
For this task, you will need the following inputs:
| Input placeholder used in this task |
Meaning |
Source |
| <install_path> | Location of the code installation |
Unloading Your Product Code on
Windows Unloading Your Product Code on UNIX |
| <fulltext_workdir> | Location of the full text working directory. This directory contains the full text indexes, and other directories directly required for the full text solution. | Person in charge of full text server activation for the ENOVIA vault |
| <VaultAliasName> | Vault server name | Setting Up the Vault Server |
| <VaultServer_PropertiesFileName> | Optional: Name of the vault server properties file.
If not set, the vault server properties file is: <VaultAliasName>.properties |
Installing the Vault Server Manually |
| <VaultServer_PropertiesFilePath> | Optional: Path of the vault client properties file.
If not set, the vault server properties files is located at: <install_path>\intel_a\docs\java |
Installing the Vault Server
Manually
|
| <catalog_name> | Optional: name of the Microsoft Index Server catalog used to index vault documents. Default value is ‘vaultv5’ if not provided. | MIS Administrator |
| <rootURI> | Optional: name that appears in the URL your users
will use to connect to the web application. Default value is ‘/enovia’
if not provided. |
IIS Administrator |
Supported Formats
The full text engine allows indexing and searching of the following data formats:
- ANSI Text, ASCII Text
- HTML, SGML, XML
- Microsoft RTF, Microsoft Word for Windows V3.x upwards
- Microsoft Word Mac V4.x to 6.x, Microsoft Word PC V2.0 to 5.5
- Adobe PDF
- Microsoft Works V3.x upwards
- Microsoft Excel V3.x upwards
- Microsoft Powerpoint 4 upwards.
Extending Support to PDF and Other Formats
The full text infrastructure relies on MIS in order to index vault documents. In turn, MIS relies on IFilters in order to index documents of a given type. Windows provides pre-installed IFilters for the document formats listed above. To enable indexing of other document formats stored in the vault, two steps must be performed:
- the IFilter enabling MIS to index the new format must be installed on the machine running the vault server and MIS
- the mapping between the MIME type of the new document format and
its extension must be declared in the file:
FullTextTypeMap.property.
Given that Vault stores documents in its repository without their
original extension (using the .Vault extension), the full text
infrastructure for the vault needs to know the original file extension,
given its MIME type of the document. The mapping between MIME type and
document extensions is declared in the following file located in:
<install_path>\intel_a\docs\java\FullTextTypeMap.property
The format of this file is very simple:
# Syntax:

		# MIME.<id>=<mime type identified>

		# Extension.<id>=.<extension for the MIME<.id> mime type>
If you want to index PDF documents, the Acrobat PDF IFilter must be downloaded
from the www.adobe.com internet site. Once on this
site, enter the string IFilter and take the most recent version of the
IFilter. For example: Adobe - Acrobat : For Windows : Adobe PDF
IFilter v6.0.
The Adobe IFilter for PDF must be installed on the server machine hosting MIS, and the MIME type-to-extension mapping file must be updated accordingly. A sample pair of lines is left at the end of the file to help enable PDF indexing:
# Uncomment these two lines for PDF indexing support (once Adobe PDF
		IFilter is installed)

		#MIME.10 = application/pdf

		#Extension.10 = .pdf
The Microsoft Index Server will not index documents for which no IFilter has been installed, until the appropriate IFilter implementation is installed.
Text written after the sharp (‘#’) character is ignored until the end of the line, allowing you to write comments in this file. The space and tab characters are ignored.
Activating the Full Text Server
- In a Windows Command Prompt window, change directory to:
<install_path>\intel_a\code\binHere is the syntax of the
ActivateFullTextcommand used to activate the full text server:catstart –run “ActivateFullText.exe –d <fulltext_workdir>
[–catalog <catalog_name>]
[-rootURI <rootURI>]
[-alias <VaultAliasName>]”Run the command, for example, like this:
catstart –run “ActivateFullText.exe –d E:\FullTextWorkDir –catalog
		SESFullTextR18 -rootURI FullTextR18 -alias ENOVIAVaultServer”
The different parameters are described in Full Text Indexing Command Syntax.
The
-envand-direnvparameters may also be used if several environment files exist.
- Make sure that the Microsoft Indexing Service is stopped, otherwise
stop it.
To stop it, select the My Computer icon then right-click and select the Manage command on the contextual menu. Go to Services and Applications, select Indexing Service, then right-click and select the Stop command.
- Create a new catalog.
Microsoft Index Server has its own format to manage full text indexes. To index a given set of locations, MIS uses a catalog. The indexes corresponding to a given catalog are stored in a location associated with this catalog.
To create a catalog, right-click Indexing Service, select New->Catalog and provide the name and location of the catalog. Make sure that the catalog name is the same as
<catalog_name>you specified with theActivateFullTextcommand: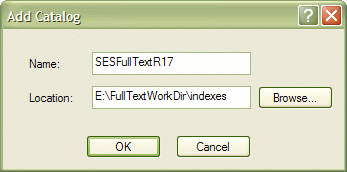
When the following popup appears:

click OK.
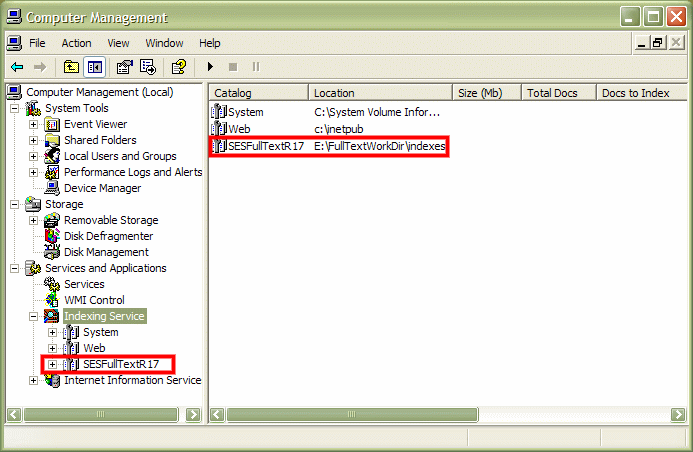
The catalog is added like this:
- Add the following directory to the catalog:
<fulltext_workdir>\ftvaultTo do so, right-click the catalog name, select the New->Directory command, and provide the path:
<fulltext_workdir>\ftvaultFor example:
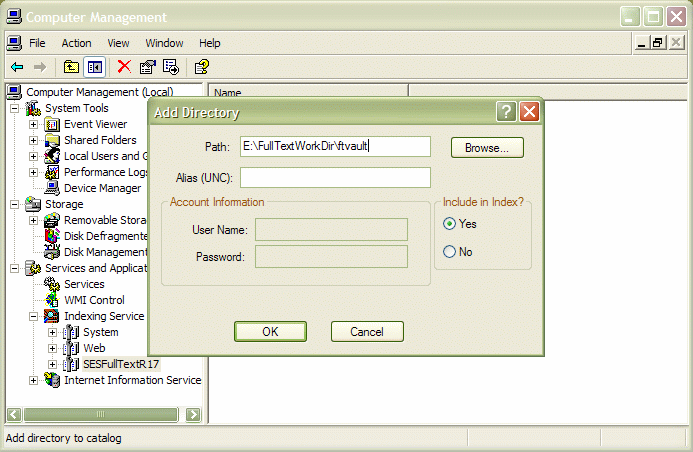
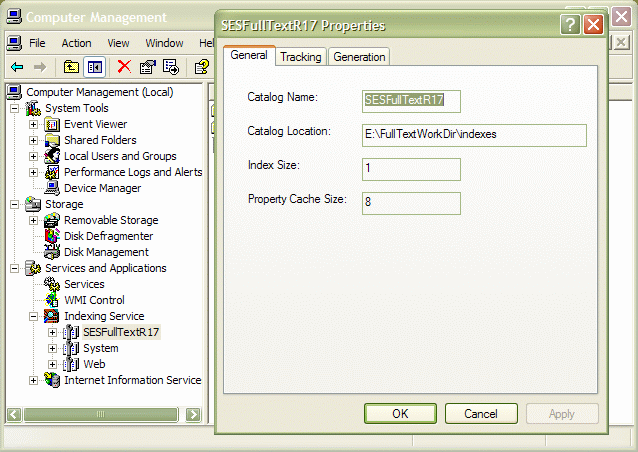
then click OK.To find where MIS stores full text indexes (and other working files) associated with a given catalog, select Services and Applications, then Indexing Service, then right-click on the catalog. Select Properties to access the information:
- Tune Microsoft Index Server to maximize performance.
While it is not possible to guarantee when the full text index will take into account a file inserted, modified or deleted in the vault, it is possible to tune MIS to make it as reactive as possible.To be more precise, if MIS performance is configured as shown below, the lag between the moment when a document modification is committed on a full-text indexed vault will be equal to:
sleep time of the full text queue reader + MIS time to index a document in "Immediate mode"
MIS time in "Immediate mode" depends on the machine load. Using very slow "sleep time" for the queue reader and dedicated full text machine can help to attain as close as possible "real time".
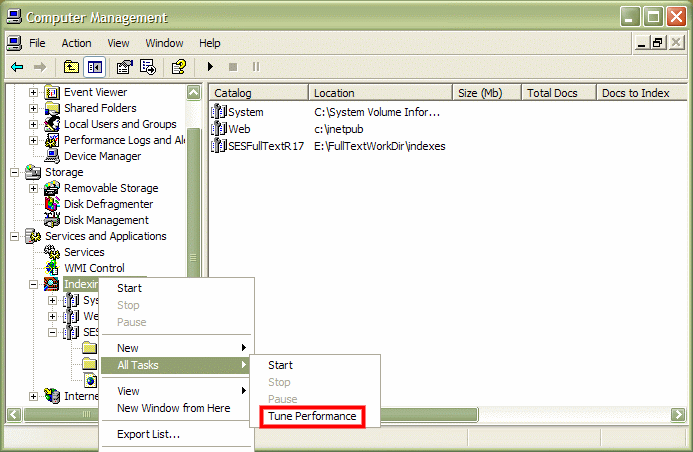
To set up MIS "Immediate mode", use the Microsoft Management Console, right-click on Indexing Services and then select All Tasks and Tune Performance:
to display the Indexing Service Usage dialog box. In the Indexing Service Usage dialog box, select Customize:
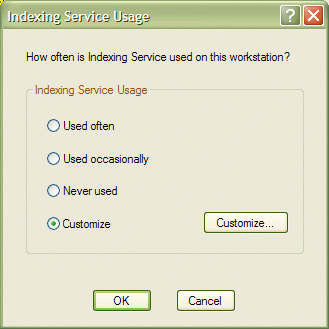
then click on the Customize… button. In the Desired Performance dialog box, move the Indexing performance cursor to Instant, and the Querying performance to High load:

then click OK, then OK again.
- Finally, restart MIS and restart IIS.
To restart MIS, right-click Indexing Service then select the Start command.
The vault full text server is ready for service. Any documents created in the vault from now on will be automatically indexed.
XML Settings for Full Text Search
XML Settings need to be setup in the ENOVIA installation (on the client side) to enable Full Text Search capabilities. Depending on the type of application you are deploying, the locations and contents are different.
There are two groups of applications:
- Webtop applications: ENOVIA VPM Lifecycle Navigator
- Wintop applications: the ENOVIA VPM Product Editor (the ENOVIA VPC product).
The full path of the XML Settings file for Wintop configuration is:
intel_a\resources\fulltext\fulltextserverconfig.xml
and for Webtop configuration:
intel_a\resources\fulltextconfig\fulltextserverconfig.xml
From the installed samples delivered on the CD-ROM at installation time,
you will notice that they contain different tags.
As an example, the settings for Webtop deployment require setting the
ftsInstalled tag to true.
Example for ENOVIA VPM Lifecycle Navigator
In order to operate full text searching in ENOVIA VPM Lifecycle Navigator, the following settings need to be customized after completing full text server setup:
The fulltextserverconfig.xml file located at:
install_path/resources/fulltextconfig (UNIX)

	install_path\resources\fulltextconfig (Windows)
contains the following:
<?xml version="1.0" encoding="UTF-8"?>

	<FullTextServers>

	<ftsInstalled>false</ftsInstalled>

	<server>

	<ftServerHost>FTServerHost:HTTPPort</ftServerHost>

	</server>

	</FullTextServers>
Modify the file fulltextserverconfig.xml as follows:
Example:
<?xml version="1.0" encoding="UTF-8"?>

	<FullTextServers>

	<ftsInstalled>True</ftsInstalled>

	<server>

	<ftServerHost>pinnacle1plb:80</ftServerHost>

	<collection>ev5vault</collection>

	<iisNode>enovia</iisNode> (optional)

	</server>

	</FullTextServers>
Note:
<ftsInstalled>True</ftsInstalled>
ftsInstalled: The value True/False in this Tag says whether
the full text server is installed or not.
True : FTS is Installed.
False : FTS is Not Installed (Default).
In Server Node:
<server>

	<ftServerHost>pinnacle1plb:80</ftServerHost>

	<collection>ev5vault</collection>

	<iisNode>enovia</iisNode> (optional)

	</server>
ftServerHost: FTServerHost: HTTPPort
FTServerHost: Hostname of the Full Text Server (eg.
"pinnacle1plb").
HTTPPort: This is the TCP Port provided in IIS (by default it
is 80)
The IIS Website Port may be checked as follows (TCP Port):
- Go to the Computer Management Console.
- Expand Service and Applications->Internet Information Services->Web sites.
- Right-click on Default Web Site and click Properties.
- Check the TCP Port number.
Collection: The collection in which the queries are made.
A default is used on the server side (for example,
ev5vault)
iisNode: The IIS website name.
Optional parameter: the default /enovia is used on the server
side. If the IIS Website name is other than /enovia, the
iisNode Node should be added in the Server Node (<server>).
Since the full text search supports multiple full text servers, there can
be multiple server nodes (<server>) in the
fulltextserverconfig.xml file.
Example:
<?xml version="1.0" encoding="UTF-8"?>

	<FullTextServers>

	<ftsInstalled>true</ftsInstalled>

	<server>

	<ftServerHost>pinnacle1plb:80</ftServerHost>

	<collection>ev5vault</collection>

	<iisNode>enovia</iisNode>

	</server>

	<server>

	<ftServerHost>pinnacle1plb:80</ftServerHost>
	<collection>ev5vault1</collection> <iisNode>enovia</iisNode>

	</server>

	<server>

	<ftServerHost>pinnacle1plb:80</ftServerHost>
	<collection>ev5vault1</collection> <iisNode>enoviaTVD</iisNode> </server>

	</FullTextServers>
Notes
Multi-vault support (one FTS for multiple vaults) is available. The full text infrastructure can be used with multiple vaults, provided the following actions are taken:
- Run the full text activation using the ActivateFullText
command on each vault, choosing distinct catalog names for each vault,
and a distinct
full text working directoryper vault. - Create an MIS catalog, one per vault, with associated catalog name
and directory corresponding to where each vault stub will store the
.ftvaultfiles. - The client application (ENOVIA VPM Product Editor or
ENOVIA VPM Lifecycle Navigator) must support
configuration of catalog name, i.e. the fulltextserverconfig.xml file
should contain details about the server name and catalog.
Example (for ENOVIA VPM Lifecycle Navigator):
<?xml version="1.0" encoding="UTF-8"?>

		<FullTextServers>

		<ftsInstalled>true</ftsInstalled>

		<server>

		<ftServerHost>pinnacle1plb:80</ftServerHost>

		<collection>ev5vault</collection>

		<iisNode>enovia</iisNode>

		</server>

		<server>

		<ftServerHost>pinnacle1plb:80</ftServerHost>
		<collection>ev5vault1</collection>

		<iisNode>enovia</iisNode>

		</server>

		</FullTextServers>
Multi-full text server support is also provided.
You do not need to have one full text server per vault: you can have multiple catalogs, each for one vault, in a single full text server.
Creating Documents and Search
This example uses ENOVIA VPM Product Editor:
- Open Content Management.
- Create and check in one or many text document(s).
- Commit the document(s).
- Wait for a minute. The indexing is done at the beginning of every minute.
Using the Full Text Search Command
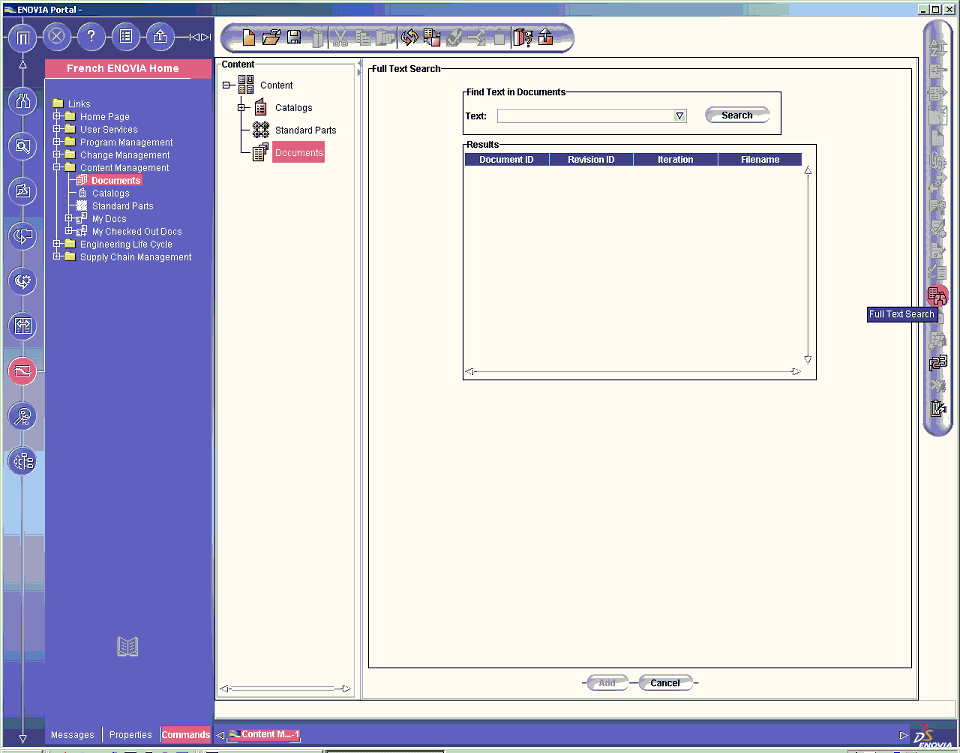
- Click on the Full text search icon.
- Enter the text you want to search and Click 'Search'
- Check the results.
Deactivating the Full Text Server
- In a Windows Command prompt, change directory to:
<install_path>\intel_a\code\command - Run the InactivateFullText command:
catstart
			–run "InactivateFullText.exe [-alias <VaultAliasName>]
For example:
catstart –run "InactivateFullText.exe -alias
			ENOVIAVaultServer"
This command will not remove any data from
<fulltext_workdir>.An inactivated full text server can be re-activated later using the same full text working directory.
Any documents created, modified or deleted in a vault having an inactivated full text server will not be taken into account in the full text indexes. If documents were created, modified or deleted while the full text server was not active, the vault must be re-indexed. Otherwise, the full text query results will not be consistent with the actual document content and status.
Indexing Previously Existing Vaults
The ftreindex command allows you to index previously existing vaults. By default, the ftreindex command performs the following operations:
- retrieves the required parameters, in particular the name of the
directory in which the
.ftvaultfiles will be written (this property was added to theVaultserver.propertiesfile when you ran theActivateFullTextcommand) - extracts the documents from the vault one by one
- reads the data required to create the
.ftvaultfiles - and generates the
ftvaultfiles in the indexing directory.
Then, MIS indexes the all the new files automatically (but you can also force indexing using the Management Console).
Here is the syntax of the ftreindex command:
catstart - jrun "ftreindex"
Note that the vault server in question must have been activated in full text mode.
Exporting Variables
The vault server properties file can be located elsewhere than in the default installation path. This is managed using the following two variables:
VaultServer_PropertiesFilePath

    VaultServer_PropertiesFileName
These variables have to be set to allow successful execution of the command:
catstart - jrun "ftreindex"
The key point is that the information of the vault to re-index is not an
input parameter for the command, and has to be explicitly provided using the
VaultServer_PropertiesFilePath and
VaultServer_PropertiesFileName properties.
What Happens if the Full Text Server Is Not Active For a Short Time?
If the full text server Is not active for a short time, the consequences depend on "what was not active" when the documents were written to the vault:
- if full text indexing was not active: this can happen for example,
when migrating an R17 to an
R18 vault, or when a decision has been taken
not to activate full text indexing immediately in the production
version.
Solution: use the reindexing command since in this case there are missing.ftvaultfiles to inform MIS what it has to index. - if full text indexing has been activated, but MIS has been stopped;
Solution: restart MIS, then MIS will index the.ftvaultfiles submitted while MIS was stopped. The only method for determining if the indexes are up-to-date is to look at the MIS Console to determine the number of files remaining to be indexed for the catalog created to index the vault. - if full text indexing has been activated, MIS is running, but IIS
has been stopped;
There are no consequences on indexing: the query service will be available immediately once IIS has been restarted.
Advanced task: Activate Full Text for Multiple Vault Servers Located on the Same Machine
The following instructions are required if there is, for a given ENOVIA V5 VPM installation, more than one vault server running on the same machine, and if full text is required on more than one vault server running on the same machine.
To index several vault servers running on the same machine, the only
requirement is to follow the activation steps as many times as there are
vaults, to have the same <fulltext_workdir>, and to create
the MIS catalog only once.
Warning: it is currently not possible to have more that one full text server active at the same time on the same machine, even if these servers originate from distinct ENOVIA installations or distinct ENOVIA releases.
Limitations
- There is no full text solution for vaults on UNIX. The by-pass is to use a vault on Windows for documents on which full text indexing is needed. Mounting a vault file system on a Windows machine using Hummingbird NFS or a similar solution is not supported by Microsoft Index Server. MIS prevents users from adding a directory originating from an NFS mount to a catalog.
- Due to the underlying MIS technology, it is not possible to
activate full text from more than one ENOVIA installation on the
same machine. To activate full text, an IFilter for is registered
for the
.ftvaultdocument extension. This IFilter is part of the unloaded ENOVIA vault administration product, and Windows does not allow registering of more than more IFilter for a given extension.
Temporary ASP.NET Files
When using the Index Server, you must exclude the Temporary ASP.NET Files directory from the folders that the Index Server scans. To do so, follow these steps:
- Click Start, point to All Programs, point to Administrative Tools, and then click Computer Management.
- Expand the Services and Applications node, expand the Indexing Service node, and then expand the System node.
- Right-click the Directories folder, point to New, and then click Directory from the subform to open the Add Directory dialog box.
- Click Browse, and then locate the Temporary ASP.NET Files
directory. You typically find the Temporary ASP.NET files in the
following path:
c:\<WINDIR>\Microsoft.NET\Framework\<Version Number>\Temporary
			ASP.NET Files
Note<Version Number>is the version of .NET Framework installed on your computer. - Click No under the Include in Index? option buttons.
- Click OK to close.
- Close the Computer Management dialog box.
- Restart the Indexing Services service.
For more information, refer to Microsoft Article ID 329065.
![]()