It contains enough information to get you through the vault deployment stage during installation. For more detailed information about the vault, refer to Setting Up Vault Servers and Clients.
The screen shots in this scenario reflect primarily the Windows platforms because the differences between the vault setup user interfaces on both platforms are minimal. UNIX screen shots are used only occasionally if there is a significant difference between the two.
Setting Up the Vault Server
- You can start the vault server administration tool in either of two
ways.
If you are still in the installation procedure, and if you selected the Vault Administration configuration, the Vault Setup dialog box will appear BEFORE the enoviadbsetup step.
Or, if the installation is finished:
Windows
Log on as administrator, open a Command Prompt window, go to the following installation directory:
C:\Program Files\Dassault Systemes\B18\intel_a\code\binand enter the command:
UNIX
Log on as root, open a shell window, go to the following installation directory:
/usr/DassaultSystemes/B18/OS/code/commandwhere "OS" is:
- aix_a
- hpux_b
- solaris_a.
and enter the command:
./catstart -run VaultSetupThe Vault Setup dialog box looks like this:
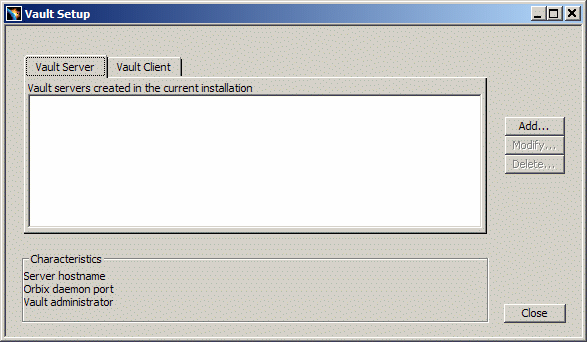
- Because you have not yet created a vault server, click the Add...
button.
The Vault Server Authentication dialog box is displayed like this on Windows:
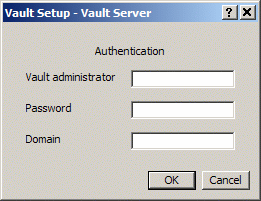
and like this on UNIX:
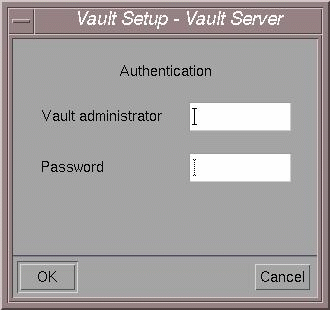
- On Windows, provide the vault administrator userid, password and
domain name.
On UNIX, the domain name is not applicable.The vault administrator can be any operating system userid recognized on the computer on which you are creating the vault server. This userid is the same as the userid to which the vault server process belongs. Furthermore, the files created in the vault by applications will be owned by this userid.
The Vault Administrator:
- must have the privileges to administrate the vault (the user must have write authorization on the vault directories)
- must already exist as a system user.
Vault Identification
- Click OK to continue to the Vault Server Add dialog box:
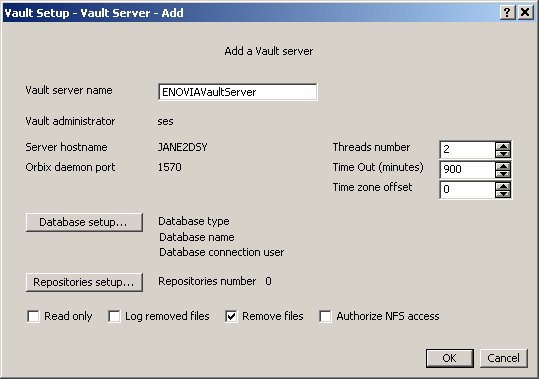
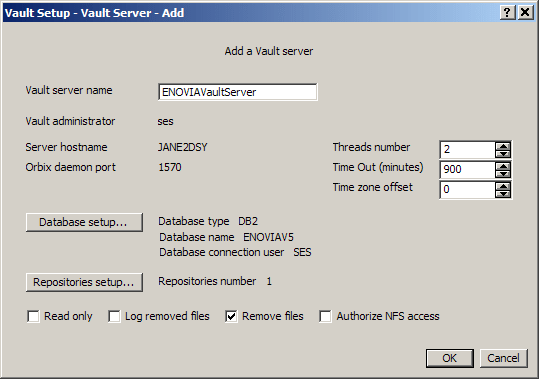
Vault Server Name
The Vault server name is the way for vault client applications to identify a vault server. A vault client application needs three items of information to connect to a vault server:
- the Orbix service name under which the vault server is registered via Orbix
- the Orbix listening port on the remote machine where the vault server is running
- the remote machine name.
The vault client properties file (set up when installing a vault client) is used to provide the link between a given vault server name and the three items of information identifying a given vault server.
The default server name is ENOVIAVaultServer, but can be customized.
Vault administrator
The userid of the Vault administrator you entered in the Vault Server Authentication dialog box is displayed for information purposes.
Server hostname
The server hostname is the name of the machine on which you are creating the vault server.
Orbix daemon port
The Orbix daemon will listen on the specified Orbix daemon port on the machine hosting the vault server. This value is the initial value entered during the unload step in the installation procedure.
Warning: When attempting to install an ENOVIA V5 VPM server and a Vault server on the same machine, the administrator may be allowed to specify two different port numbers for the servers. If you do so, the application does not work afterwards. This is particularly important since the vault server and ENOVIA V5 VPM server can be more easily installed separately, that is on two different server paths, which implies two different port numbers.
Thread number
Set the thread number, which is the number of threads waiting for client requests. A vault server can answer several vault client applications simultaneously. This number specifies the number of simultaneous requests that can be processed. The default is 2. Multi-processing capacity depends on the number of processors on the workstation.
Timeout
Set the timeout value in minutes. The timeout is applied if the vault server does not receive a request from a vault client after the specified period of time starting when the last connection to the Vault server was closed. The default is 900 minutes.
Time zone offset
Set the time zone offset in minutes. The server time zone offset (in milliseconds) is used for document creation and modification dates. For example, if you set the value to 3600000, the server time zone is GMT+1 hour.
- Click the Database setup... button to access the Vault
Server Database dialog box, then check the DB2 or Oracle option to
specify which database you are working with, fill in the fields, and set
the desired options.
Database Setup
Each vault server requires its own data structure in the database. During this step, you are going to create tables in the database to support the vault server.
The options specific to your database are displayed.
Note that, before entering this phase, you must have already created a database on DB2 or Oracle. If you already created a database intended to be used for the enoviadbsetup procedure, you can use that database here.
Note that a tablespace also has to be created first before you enter this phase.
For DB2
The Vault Server Database dialog box looks like this for DB2:
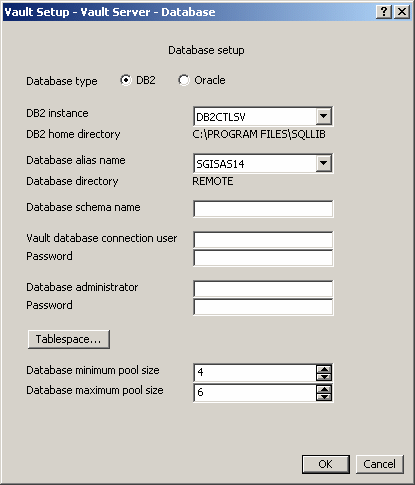
Options Specific to DB2
DB2 instance
Select the DB2 alias name to be used to store the vault tables. All available DB2 alias names, remote as well as local, will appear in the selection list.
DB2 home directory
The DB2 instance home directory is indicated as information only; you cannot modify this field.
Database alias name
Select the database alias name for the chosen DB2 instance.
Database directory
If the database directory of the chosen database alias is LOCAL, then the database directory field will contain its path. If the database directory of the chosen database alias is REMOTE, then the database directory field will simply specify the text REMOTE.
For Oracle
The Vault Server Database dialog box looks like this for Oracle:
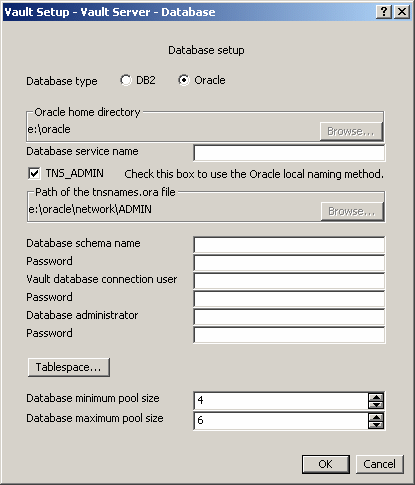
Options Specific to Oracle
Oracle home directory
Click the Browse... button and browse to select the home directory of the Oracle installation if it is not already detected automatically.
Database service name
Oracle clients communicate with Oracle servers through service names, which are easy-to-remember aliases for database addresses. Service names can be resolved using various methods:
- Local Naming method: resolves service names using a local configuration file (TNSNAMES.ORA, SQLNET.ORA, LISTENER.ORA).
- Centralized Naming method: resolves service names using Oracle Names (highly recommended to centrally administer large Oracle networks).
TNS_ADMIN
To use the Local Naming method:
- check the TNS_ADMIN option (this is the default): the path of the default tnsnames.ora file containing the list of database service names is highlighted, but you can click the browse button and choose the file at a different location
- select the database service name from the pulldown list.
Note: If you don't check the above button, the Centralized Naming method will be used.
To use the Centralized Naming method:
- uncheck the TNS_ADMIN option: the Database Service Name field appears
- enter the database service name in this field.
Options Common to Both DB2 and Oracle
Database schema name
Enter the database schema name. A schema is a collection of named objects. It provides a logical classification of objects in the database. This name is a database userid and is used as a prefix in the name of the vault tables. For example, if you enter VPMADM, the table name will be: VPMADM.VAULTDOCUMENT. The userid is the owner of the database structures created. The resources created in the database for the vault will belong to this schema (=resource owner).
For DB2, the schema name could be any database userid accepted by DB2, whereas the connection user must exist at the operating system level.
On Oracle, you have to provide a password. This password is not required in DB2.
Vault database connection user
This is a system userid used by the vault to connect to the database. All connections to the database will be performed under this id (the main interest of this specific user being for remote database connectivity, since server authentication is being used). With a local database, it might identical to be the vault administrator.
Password
Enter the vault connection password.
Database administrator
Enter the user name of the database administrator.
The Database Administrator User:
- has the privileges to administrate the database
- creates tablespaces (spaces for the data structures that will contain the data).
Password
Enter the database administrator password.
Notes: The Administrator's user name and password must already exist as a UNIX User Name and Password. Both of these entries are case sensitive.
For Oracle, both the Vault database connection user and the Database administrator will have to exist as Oracle users (and will be created as such if needed), but do not have to exist at the operating system level.
Database minimum pool size
Minimum number of connections for the vault server database connection pool.
Database maximum pool size
Maximum number of connections for the vault server database connection pool.
Tablespaces
Reminder: a tablespace has to be created first before you enter this phase. You cannot create one interactively at this stage (unlike during the ENOVIA database setup). Note that the table space for the vault does not require a size of 8K (unlike the ENOVIA database setup which does require a size of 8K). You can select the default tablespace, for example USERSPACE1, or the tablespace created by the ENOVIA database setup phase (if you already created the ENOVIA database). However, note that the reverse is not true: you cannot create a vault tablespace and use it during the ENOVIA database setup.
- After filling in all the fields, click the Tablespace...
button.
Note: on Oracle, if you already performed a previous installation and created a table schema, and want to reuse the same schema, you will be prompted to reuse it. If so, click Yes. If you do not succeed, use the Oracle Enterprise Manager Console and delete the corresponding schema name. To delete, the schema name, you may first have to delete the tables in the schema.
The Vault Server Tablespace dialog box looks like this:
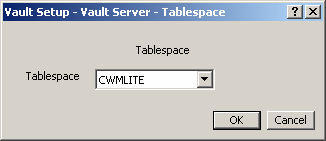
then select the tablespace and click OK, then click OK again.
This returns you to the Vault Server Add dialog box:
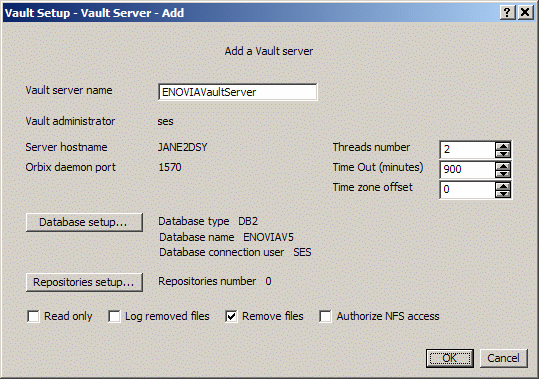
The database type, database name and vault database connection user you just configured are now displayed next to the Database setup... button.
Setting Up Repositories
Data is stored in the vault server repository. A vault server repository is characterized by:
- its name
- a tmp directory: when vault client applications create new documents, they are stored temporarily in this directory, and are written to a secured directory when saved
- and a set of secured directories.
These directories have to be on the same file system for a specific vault server repository to improve performance and reliability.
- Click the Repositories setup... button to access the Vault
Server Repositories dialog box:
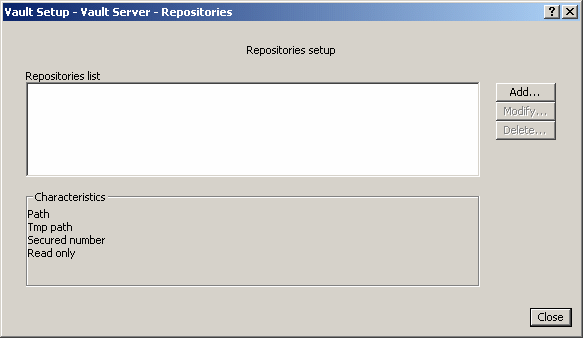
- Click the Add... button to access the Repository Add dialog box:
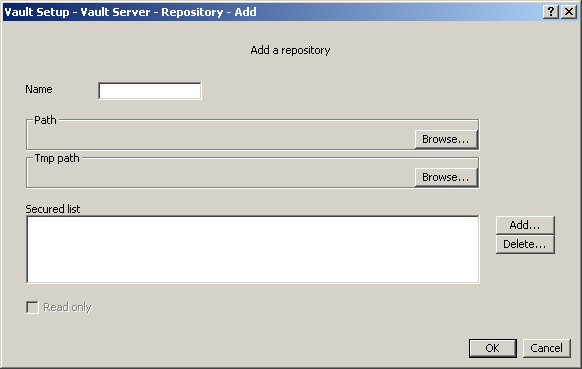
Name
Enter a name for the vault server repository.
Path
Click the Browse... button, double-click a directory in the list to select the repository path, then click OK. This path will contain the tmp and secured directories. You can select an existing directory or create a new one using the Browse... button.
If you have already created a directory used by another repository, you cannot choose the same directory used by the other repository, either in the same vault server or a different vault server, and either in the same installation or in a different installation.
Tmp path
Click the Browse... button, double-click a directory in the list to select the path of the temporary directory, then click OK. The directory must already exist. You can select an existing directory or create a new one using the Browse... button.
Secured list
Secured storage occurs when the saved documents are actually committed into the database.
The secured list displays the list of secured directories. To add a secured directory, click the Add... button, double-click a directory in the list to select the secured directory, then click OK. The secured directory must already exist. You can select an existing directory or create a new one using the Browse... button.
A warning will inform you if the selected Tmp path or Secured path is not empty, however you can maintain your choice.
A warning will also inform you if the Repository's path contains something else other than the Tmp path and the Secured paths: in this case, you must choose another directory.
Select a directory and click the Delete... button to delete it.
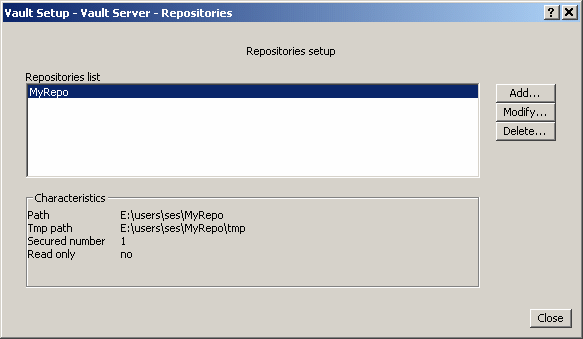
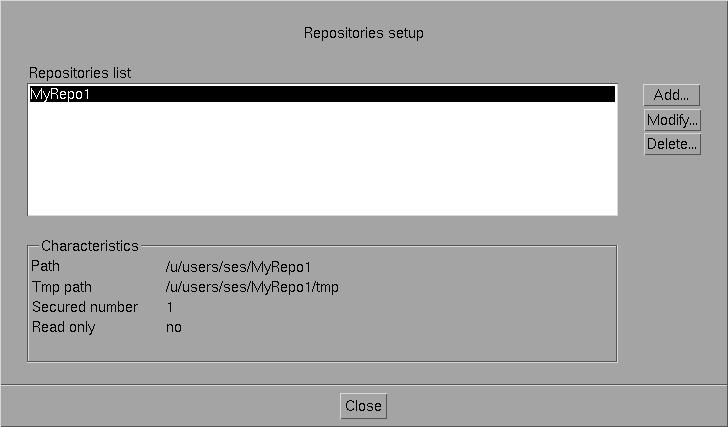
- Click OK to confirm, and return to a summary of your repository
setup.
It looks like this on Windows:
and like this on UNIX:
- Click the Close button.
On Oracle, if the user names you used for the Database schema name and Vault database connection user exist already in the database, the following warning message appears:
The user xxx already exists in the database.

       Do you want to use this user?
If so, click Yes. If it does not exist, the following message:
The user xxx doesn`t exist in the database.

       Do you want to create this user now?
prompts you to create it. To do so, click Yes.
The Vault Server Add dialog box now displays all the information you entered, and now looks like this, for example on DB2 on Windows:
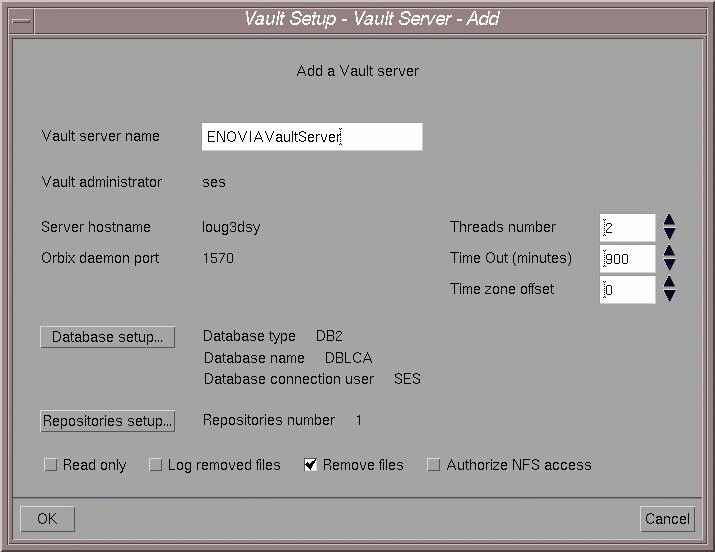
and like this for example on Oracle on UNIX:
- Check the appropriate global vault server administration options at
the bottom of the dialog box.
Read only
Check the Read only option to set the entire vault to read only mode. This is useful when the vault is full and you want users to be able to continue to read data from the vault. Obviously, no documents can be saved in the vault in this mode.
Remove files
Check the Remove files option to trigger file deletion on disk. When you request a deletion operation using a vault client application (CATIA V5, ENOVIA V5 VPM lifecycle application, etc.), a line containing the instruction to remove the file is stored in the database: the file itself is not removed from the vault. This option must be checked if you want files to be physically removed. This option is checked by default.
Log Removed Files
Check the Log removed files option to trigger the logging of deletion operations requested by vault client applications. If you did not check the Remove files option, your files will remain in the vault. You can then use the log containing the list of deletion operations as input for your own deletion batch programs.
Authorize NFS access
Check the Authorize NFS access option to ensure that the authorization rights set for the vault directories are correctly set for NFS access. NFS access is an alternative enabling vault client applications to access the vault directly by the vault server. Refer to How to Set Up File Transfer Mode for the Vault for details about different file transfer modes supported.
- Click OK again.
If this is the first time you are creating a vault, you will be prompted to create the user if the database. Click Yes to do so. If the user you declared already exists in the database, you may be prompted to choose whether you want to use this user. If so, click OK to confirm.
You then return to the Vault Setup dialog box:
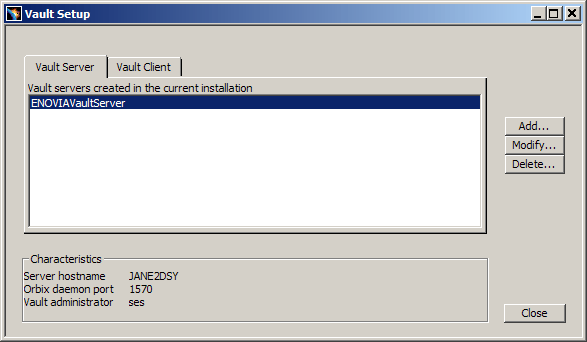
Note that you can also modify an existing vault or delete a vault using the Modify... and Delete... buttons. You will be prompted to log on using the Vault Server Authentication dialog box.
Modifying a Vault Server
You can edit most vault server properties. However, you cannot select another database for your vault server: the corresponding options are grayed out in the Database setup... dialog box.
Deleting a Vault Server
If you attempt to delete a vault server, you will be warned that the catalogued entries for the vault server you want to delete will be deleted, along with the associated properties file, but the associated database and repositories will not be deleted. However, the ENOVIAVaultServer.imp file is deleted.
If there is only one vault server, you cannot delete it. If you attempt to do so, a warning will inform you that there must always be at least one default vault alias name.
The characteristics of the vault server you created are displayed in the Vault Setup dialog box.
- Click the Close button to exit the vault setup.
Note: creating the vault server does NOT start the vault server process.
The installation procedure then initializes the database setup process. Refer to ENOVIA Database Setup Process to continue with the installation.
Vault Setup Log Files
Vault setup log files are located in:
C:\Documents and Settings\ses\Local Settings\Temp\VaultSetup.log
           (Windows)
$HOME/VaultSetup.log (for root user on UNIX)
Which Objects Are Created?
Setting up a vault client and vault server creates the following objects:
- the vault database tables
- the following files:
XXXVaultServer.properties
VaultClient.properties
VaultLocalServerList.properties
are created, where "XXXVaultserver" is the appropriate name of the vault server (Orbix service name) in:install_dir/docs/javaFor example, the default vault server name and resulting file are named:
ENOVIAVaultServer.properties - the following files:
ENOVIAVaultServer.imp
are created with the appropriate name (Orbix service name) in:
install_dir/startup/orbix/config/Repositories/ImpRep
Properties File Contents
In a default installation, for example, the ENOVIAVaultServer.properties
file looks like this:
## Vault Server Properties File
## Orbix parameters
VaultServer_Name = ENOVIAVaultServer
VaultServer_HostName = jane2dsy
VaultServer_DaemonPort = 1570
VaultServer_TimeOut = 54000000
## Request execution parameters
VaultServer_ThreadNumber = 2
VaultServer_TimeZoneRawOffset = 0
## Database connection pool parameters
VaultServer_DBMINPoolSize = 4
VaultServer_DBMAXPoolSize = 6
## Database connection parameters
VaultServer_DBName = DBSESR14
VaultServer_DBVendor = Oracle
VaultServer_DBUser = SES
VaultServer_DBPassword = 252C252C
## Other parameters
VaultServer_VaultAdministrator = ses
VaultServer_ReadOnly = false
VaultServer_LogRemovedFiles = false
VaultServer_RemoveFiles = true
VaultServer_AuthorizeNfsAccess = false
VaultServer_Trace = OFF
## Repositories parameters
VaultServer_NumOfRepo = 1
VaultServer_DBSchema = SES
VaultServer_Repo_0_Name = MyRepo1
VaultServer_Repo_0_ReadOnly = false
VaultServer_Repo_0_Path = E:\\users\\ses\\MyRepo1
VaultServer_Repo_0_TmpDirName = tmp
VaultServer_Repo_0_NumOfSecDir = 2
VaultServer_Repo_0_SecDirName_0 = Secured
VaultServer_Repo_0_SecDirName_1 = secured2
The corresponding VaultClient.properties file looks
like this:
## Vault Client Properties File
## File read protocol
VaultClient_ReadProtocol = 3
VaultClient_ReadProtocol_0 = CORBA
VaultClient_ReadProtocol_1 = NFS
VaultClient_ReadProtocol_2 = HTTP
## File write protocol
VaultClient_WriteProtocol = 2
VaultClient_WriteProtocol_0 = CORBA
VaultClient_WriteProtocol_1 = NFS
## File transfer protocol activation
VaultClient_Active_ReadProtocol = CORBA
VaultClient_Active_WriteProtocol = CORBA
## Data BlockSize parameter
VaultClient_BlockSize = 1048576
## Trace parameter
VaultClient_Trace = OFF
## Default alias name
VaultClient_DefaultAliasName = ENOVIAVaultServer
## Vault server alias ENOVIAVaultServer
VaultClient_ENOVIAVaultServer_ReadVaultServerName =
           ENOVIAVaultServer
VaultClient_ENOVIAVaultServer_ReadVaultServerHostName =
           jane2dsy
VaultClient_ENOVIAVaultServer_ReadVaultServerDaemonPort = 1570
VaultClient_ENOVIAVaultServer_WriteVaultServerName =
           ENOVIAVaultServer
VaultClient_ENOVIAVaultServer_WriteVaultServerHostName =
           jane2dsy
VaultClient_ENOVIAVaultServer_WriteVaultServerDaemonPort =
           1570
the corresponding VaultLocalServerList.properties contains the vault server alias name:
ENOVIAVaultServer
and the ENOVIAVaultServer.imp file containing the
name of the Orbix service name looks like this:
Name : ENOVIAVaultServer
Comms : cdr/tcp
Activation : shared

Owner : ses
Launch : ;all;
Invoke : ;all;
ImpRep Version : 2
no. of servers : 1
server's port : 0
Marker Launch Command
*
     C:\Program Files\Dassault Systemes\B18\intel_a\code\bin\catstart.exe
           -env "ENOVIA_V5_VPM.V5R18.B18" -direnv "C:\Documents and Settings\All
           Users\Application Data\DassaultSystemes\CATEnv" -run "VPMVaultStarter.exe"
           -object "-user ses -passwd 050C050C -domain ds -PFileName
           ENOVIAVaultServer.properties" > C:\DOCUME~1\ses\LOCALS~1\Temp\VaultServer.log
           2>&1
How to deal with Multiple Network Domain Names
Use the full qualified name in the VaultClient.properties file on client side in order to avoid the problem of network domain name resolution. For instance, if the Vault server machine name is "reverdsy" and the network domain name is "ds.dsy", you should replace "reverdsy" in the VaultClient.properties file by "reverdsy.ds.dsy"
Vault Server Trace File on Windows
Note: the vault server trace file is generated in the %USERPROFILE%
directory under the name ENOVIAVaultServer.log.
For instance, if the user used for running the vault server is XYZ on a particular domain AA, the trace file will be located in:
C:\Documents and Settings\xyz.AA
Setting Up the Vault Server and Client in Batch Mode
Setting Up the Vault Server
The batch tool provides the same functions as the interactive tool, with some minor exceptions indicated below.
Windows
To perform a batch installation:
- Select Start->Programs->Command Prompt
- Go to the following installation directory:
C:\Program Files\Dassault Systemes\B18\intel_a\code\bin
- Enter the command:
catstart -run VaultServerSetupBwith the appropriate arguments.
UNIX
- Log on as root.
- Enter the command:
           /usr/DassaultSystemes/B18/OS/code/command/catstart -run
           VaultServerSetupB
where "OS" is:
- aix_a
- hpux_b
- solaris_a.
with the appropriate arguments.
Command Syntax
-list [VaultServerName | -a]-add VaultServerName -adm [domain@]VaultAdministrator:password
[-thread ThreadNumber] [-timeout TimeOut] [-offset TimeZoneOffset]
-db_vendor db2|oracle
-instance DB2Instance -db DBAliasName -schema DBSchemaName
or
-oracle_home OracleHomeDirectory -db DBServiceName
[-tns_admin true|false] [-tns_path tnsnames.oraPath]
-schema DBSchemaName:password
-connect DBConnectionUser:password -db_adm DBAdministrator:password
-tbs Tablespace
[-min_pool DBMinimumPoolSize] [-max_pool DBMaximumPoolSize]
-repo RepositoryName -repo_path RepositoryPath -tmp RepositoryTmpPath
-secured SecuredPath [-secured OtherSecuredPath ...]
[-repo OtherRepoName -repo_path OtherRepoPath -tmp OtherRepoTmpPath
-secured SecuredPath [-secured OtherSecuredPath ...] ...]
[-read_only true|false] [-log_removed_files true|false]
[-remove_files true|false] [-nfs_access true|false]-modify(to modify
general-purpose
options)
 VaultServerName -adm [domain@]VaultAdministrator:password

     [-thread ThreadNumber] [-timeout TimeOut] [-offset TimeZoneOffset]

     [-min_pool DBMinimumPoolSize] [-max_pool DBMaximumPoolSize]

     [-read_only true|false] [-log_removed_files true|false]

[-remove_files true|false] [-nfs_access true|false]-modify(to add
repositories)
 VaultServerName -adm [domain@]VaultAdministrator:password

     -add_repo RepositoryName

     -repo_path RepositoryPath -tmp RepositoryTmpPath

     -secured SecuredPath [-secured OtherSecuredPath ...]

     [-add_repo OtherRepositoryName

     -repo_path OtherRepositoryPath -tmp OtherRepositoryTmpPath

-secured SecuredPath [-secured OtherSecuredPath ...] ...]-modify(to modify
existing
repositories)
VaultServerName -adm [domain@]VaultAdministrator:password

     -modify_repo RepositoryName

     [-add_secured SecuredPath [-add_secured OtherSecuredPath ...]]

     [-del_secured SecuredPath [-del_secured OtherSecuredPath ...]]

     [-repo_read_only true|false]

     [-modify_repo OtherRepositoryName

     [-add_secured SecuredPath [-add_secured OtherSecuredPath ...]]

     [-del_secured SecuredPath [-del_secured OtherSecuredPath ...]] ...]

[-repo_read_only true|false] ...]-modify(to delete
existing
repositories)
VaultServerName -adm [domain@]VaultAdministrator:password

-del_repo RepositoryName [-del_repo OtherRepositoryName ...]-deleteVaultServerName -adm [domain@]VaultAdministrator:password-hhelp-list: lists the vault servers
-list VaultServerName: lists the properties of VaultServerName
-list -a: lists the properties of all Vault servers.-add: creates the Vault server VaultServerName.
Default values with-add:thread: 2,timeout: 900,offset: 0,min_pool: 4,max_pool: 6,read_only: false,log_removed_files: false,remove_files: true,nfs_access: falseinstance: the DB2INSTANCE value in the environment file.oracle_home: the ORACLE_HOME value in the environment file.tns_admin: truetns_path: the TNS_ADMIN value in the environment file.
If not valued, the default value is:
%ORACLE_HOME%\network\ADMIN.
-modify: modifies the vault server VaultServerName. You can add, modify or delete repositories. Note: unlike in interactive mode, you cannot create repositories from scratch in batch mode so you must create them manually beforehand. You can also change general-purpose vault properties.Default values with
-modify: the parameters keep their current values (at creation,repo_read_onlyis false).-delete: deletes the VaultServerName's catalogued entries and properties file; the data (database, repositories) are not deleted.-h: this help.
Vault Server Setup Batch Examples
The following commands were run on Windows in a Command Prompt window in the installation directory:
C:\Program Files\Dassault Systemes\B18\intel_a\code\bin
Command:
catstart -run "VaultServerSetupB.exe -add ENOVIAVaultServer -adm
     the:pwd -db_vendor db2 -instance DB2 -db THEDB2A8 -schema the -connect
     the:pwd -db_adm db2admin:db2admin -tbs USERPACE1 -repo Repo1 -repo_path
     C:\Temp\Repositories\Repo1 -tmp C:\Temp\Repositories\Repo1\Tmp -secured
     C:\Temp\Repositories\Repo1\Secured -secured
     C:\Temp\Repositories\Repo1\Secured2"
Output:
C:\Temp\Repositories\Repo1: directory not found.

     The command failed.
The command failed because the repositories had not been created, so you must create them first using the following Windows command:
mkdir C:\Temp\Repositories\Repo1 C:\Temp\Repositories\Repo1\Tmp
     C:\Temp\Repositories\Repo1\Secured

     C:\Temp\Repositories\Repo1\Secured2
Then, the following command was run:
catstart -run "VaultServerSetupB.exe -add ENOVIAVaultServer -adm
     the:pwd -db_vendor db2 -instance DB2 -db THEDB2A8 -schema the -connect
     the:pwd -db_adm db2admin:db2admin -tbs USERPACE1 -repo Repo1 -repo_path
     C:\Temp\Repositories\Repo1 -tmp C:\Temp\Repositories\Repo1\Tmp -secured
     C:\Temp\Repositories\Repo1\Secured -secured
     C:\Temp\Repositories\Repo1\Secured2"
Output:
The Tablespace parameter is not found in the following list:

     USERSPACE1

     The command failed.
There was a spelling mistake in the tablespace name ("USERPACE1" instead of "USERSPACE1"), so it was corrected and the command was run again:
catstart -run "VaultServerSetupB.exe -add ENOVIAVaultServer -adm
     the:pwd -db_vendor db2 -instance DB2 -db THEDB2A8 -schema the -connect
     the:pwd -db_adm db2admin:db2admin -tbs USERSPACE1 -repo Repo1 -repo_path
     C:\Temp\Repositories\Repo1 -tmp C:\Temp\Repositories\Repo1\Tmp -secured
     C:\Temp\Repositories\Repo1\Secured -secured
     C:\Temp\Repositories\Repo1\Secured2"
Output:
[2672: New Connection (vagu1dsy.dsy.ds,IT_daemon,*,the,pid=2808,optimised)
     ]

     [2324: New Connection (vagu1dsy.dsy.ds,IT_daemon,*,the,pid=2808,optimised)
     ]

     [2672: New Connection (vagu1dsy.dsy.ds,IT_daemon,*,the,pid=2808,optimised)
     ]

     Command successful.
The vault server is created.
The following command lists the vault servers created:
catstart -run "VaultServerSetupB -list"
Output:
Vault servers created in the current installation:

     -------------------------------------------------------------------------------

     Server hostname: VAGU1DSY

     -------------------------------------------------------------------------------

     Alias name | Orbix daemon port | Vault administrator

     -------------------------------------------------------------------------------

     ENOVIAVaultServer | 1570 | the
The following commands list the characteristics of the vault server you just created:
catstart -run "VaultServerSetupB -list ENOVIAVaultServer"
or:
catstart -run "VaultServerSetupB -list -a"
Output:
Alias name
     ENOVIAVaultServer

     Vault administrator
     the

     Server hostname
     VAGU1DSY

     Orbix daemon port
     1570

     Threads number
     2

     Time Out (minutes)
     900

     Time zone offset
     0

     Database type
     DB2

     Database name
     THEDB2A8

     Database schema name
     THE

     Database connection user
     THE

     Database minimum pool size
     4

     Database maximum pool size
     6

     Repositories number 1

     Repositories list:

     1) Repo1

    Read only
     false

    Path
     C:\Temp\Repositories\Repo1

    Tmp path
     C:\Temp\Repositories\Repo1\Tmp

    Secured number   2:


     C:\Temp\Repositories\Repo1\Secured


     C:\Temp\Repositories\Repo1\Secured2
Read only
     false

     Log removed files
     false

     Remove files
     true

     Authorize NFS access
     false
The following command modifies the general-purpose properties of the vault server:
catstart -run "VaultServerSetupB.exe -modify ENOVIAVaultServer -adm
     the:pwd -thread 8 -timeout 9 -offset -10 -min_pool 11 -max_pool 12 -read_only
     true -log_removed_files true -remove_files false -nfs_access true"
Output:
[1708: New Connection (vagu1dsy.dsy.ds,IT_daemon,*,the,pid=2808,optimised)
     ]

     [2328: New Connection (vagu1dsy.dsy.ds,IT_daemon,*,the,pid=2808,optimised)
     ]

     [1708: New Connection (vagu1dsy.dsy.ds,IT_daemon,*,the,pid=2808,optimised)
     ]

     Command successful.
The following command deletes the vault server:
catstart  -run "VaultServerSetupB.exe -delete
     ENOVIAVaultServer -adm the:pwd"
Output:
Command successful.
The following command lists the vault servers, and the list is now empty:
catstart -run "VaultServerSetupB.exe -list"
Output:
Vault servers created in the current installation:

     -------------------------------------------------------------------------------

     Server hostname: VAGU1DSY

     -------------------------------------------------------------------------------

     Alias name | Orbix daemon port | Vault administrator

     -------------------------------------------------------------------------------
Setting Up the Vault Client
Windows
To perform a batch installation:
- Log on as administrator.
- Select Start->Programs->Command Prompt
- Go to the following installation directory
C:\Program Files\Dassault Systemes\B18\intel_a\code\bin
- Enter the command:
catstart -run VaultClientSetupBwith the appropriate arguments.
UNIX
- Log on as root.
- Enter the command:
           /usr/DassaultSystemes/B18/OS/code/command/catstart -run
           VaultClientSetupB
where "OS" is:
- aix_a
- hpux_b
- solaris_a.
with the appropriate arguments.
Command Syntax
-list

     -add VaultAliasName -host ServerHostname -port OrbixDaemonPort

     -modify VaultAliasName [-host ServerHostname] [-port OrbixDaemonPort]

     -delete VaultAliasName -h help
-list: lists the catalogued vault servers
Example:
Catalogued Vault servers:

       -------------------------------------------------------------------------------

       Vault alias name | Server hostname | Orbix daemon port

       -------------------------------------------------------------------------------

       ENOVIAVaultServer | jane2dsy | 1570
-add: catalogues the vault server VaultAliasName-modify: modifies the catalogued Vault server VaultAliasName in order to update the server hostname and Orbix daemon port-delete: deletes the VaultAliasName's catalogued entries; the VaultAliasName properties file and the data (database, repositories) are not deleted.-h: this help.
![]()