 |
This task shows you how to create a joint body
that is a container for joint elements. |
 |
Open the
Joint1.CATProduct. |
|
There are several ways to create joint bodies:
- select the publications, and click BiW JointBody
 .
If no joint was created previously, it is automatically created; it
links the corresponding components. The joint body links the selected
publications. .
If no joint was created previously, it is automatically created; it
links the corresponding components. The joint body links the selected
publications.
- select the components, and click BiW JointBody
.
If no joint was created previously, it is automatically created; it
links the corresponding components. The connected zones of this joint
body are not specified.
- a joint is already created: select it
in the specification tree, and click BiW JointBody
.
- a joint is already created. Click
BiW JointBody
and select the joint in the specification tree.
- during the creation of a joint, if
the Create Joint Body after OK option is checked, when you
click OK, the BiW Joint Body Definition dialog box is
automatically displayed (this is the example for our scenario).
|
| |
|
| |
This chapter also deals with the following subjects:
|
 |
-
Perform one of the above mentioned steps.
| The BiW Joint Body Definition dialog box opens. |
-
Give a new name for the Joint Body, "New Joint Body.1"
for instance.
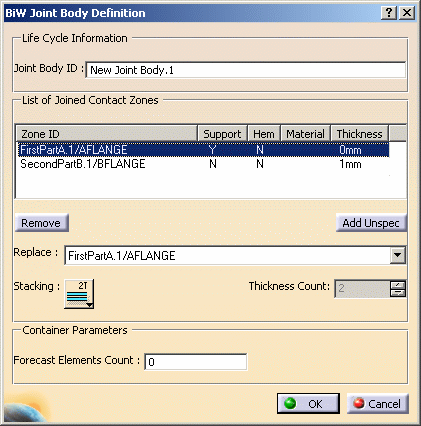 |
| The List of joined Contact Zones display the Zone ID. |
-
Define whether the zone is the Support zone.
-
Define whether the zone is a Hem.
 |
- The thickness and the orientation can be defined using the
Thin Parts Attribute command in the Generative Shape
Design workbench.
Refer to Applying a Thickness in the Generative Shape Design
User's Guide.
- The material can be defined using the Apply Material
command.
If you modify the material applied on a
zone, it is not automatically updated on the published element.
It is however updated during the next update.
Refer to
Applying Material.
|
-
Define the stacking and the thickness count depending
on the number of joined zones.
|
You can click the down arrow to display the
stacking toolbar and choose the stacking type:
|
 |
|
The Forecast Elements Count field allows
you to define a number of fasteners this joint body is supposed to
contain for further verifications. |
-
Click OK to create the joint body.
| "New Joint Body.1" appears below "New Joint.1"
(created in the previous task) in the specification tree. |
|
|
When creating a Joint Body with
one zone, a second one is automatically created. You can edit
the second zone and delete it if needed. |
 |
Managing multi-zones, whether published or not, is possible: one
joint body can join several zones for a same component. |
|
|
|
|
Removing a Zone
|
|
|
-
Double-click New Joint Body.1 from the specification
tree.
| The BiW Joint Body Definition dialog box is displayed. |
-
Select the zone you wish to remove.
-
Click Remove to
remove this zone.
| A zone should be first selected in the list, and one zone at
least must be connected for a linked component. If not, the zone
can not be removed. |
-
Click OK in the BiW
Joint Definition dialog box.
|
| |
Adding an Unspecified Zone
|
|
|
-
Double-click New Joint Body.1 from the specification
tree.
| The BiW Joint Body Definition dialog box is displayed. |
-
Click Add Unspec to
add an unspecified zone in the zones list for the selected
corresponding component.
| A zone should be first selected in the list. |
|
| |
Replacing a Zone
|
|
|
-
Double-click New Joint Body.1 from the specification
tree.
| The BiW Joint Body Definition dialog box is displayed. |
-
Select a zone to replace by another one, either by:
-
selecting
a zone published by the corresponding component in the
specification tree or in the 3D geometry, or
-
selecting
the name of the zone in the combo list.
|
|
|
 |