[ Bottom of Page | Previous Page | Next Page | Contents | Index | Library Home |
Legal |
Search ]
Security Guide
Working with Digital Certificates and the Key Manager
Digital certificates bind an identity to a public key, through which you
can verify the sender or the recipient of an encrypted transfer. Beginning
with AIX 4.3.3, IP Security uses digital certificates to enable public-key cryptography, also known as asymmetric
cryptography, which encrypts data using a private key known only to the
user and decrypts it using an associated public (shared) key from a given
public-private key pair. Key pairs are long strings
of data that act as keys to a user's encryption scheme.
In public-key cryptography, the public key is given to anyone with whom
the user wants to communicate. The sender digitally signs all secure communications
with the corresponding private key for their assigned key pair. The recipient
uses the public key to verify the sender's signature. If the message is successfully
decrypted with the public key, the receiver can verify that the sender was
authenticated.
Public-key cryptography relies on trusted, third parties, known as a certification authorities (CAs),
to issue reliable digital certificates. The recipient specifies which issuing
organizations or authorities are deemed trusted. A certificate is issued for
a specific amount of time; when its expiration date has passed, it must be
replaced.
AIX 4.3.3 and later versions provide the Key Manager tool, which manages
digital certificates. The following sections provide conceptual information
about the certificates themselves. Management tasks for these certificates
are described in Working with Digital Certificates and the Key Manager.
Format of Digital Certificates
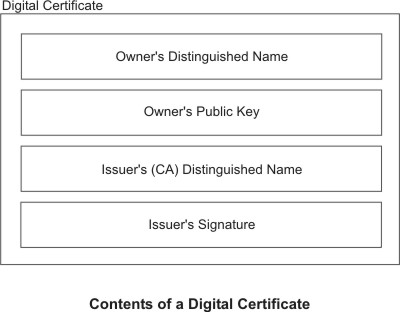
The digital certificate contains specific pieces of information about the
identity of the certificate owner and about the certification authority. See
the following figure for an illustration of a digital certificate.
Figure 10. Contents of a Digital Certificate. This illustration
shows the four entities of a digital certificate. From the top they are, Owner's
Distinguished Name, Owners Public Key, Issuer's (CA) Distinguished Name, and
Issuer's Signature.
The following list further describes the contents of the digital certificate:
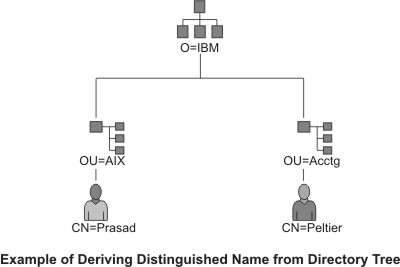
- Owner's Distinguished Name
- Combination of the owner's common name and context (position) in the
directory tree. In the following figure of a simple directory tree, for example,
Prasad is the owner's common name and the context is country=US, organization=ABC,
lower organization=SERV; therefore, the distinguished name is:
/C=US/O=ABC/OU=SERV/CN=prasad.austin.ibm.com
Figure 11. Example of Deriving Distinguished Name from Directory Tree. This illustration is a directory tree with O=ABC at the top level
and branching to two entities on the second level. Level two contains OU=AIX
and OU=Acctg on separate branches; each has a branch leading to a single entity
on the last level.. The last level contains CN=Prasad and CN=Peltier respectively.
- Owner's Public Key
- Used by the recipients to decrypt data.
- Subject Alternate Name
- Can be an identifier such as an IP address, e-mail address, fully qualified
domain name, and so on.
- Issue Date
- Date the digital certificate was issued.
- Expiration Date
- Date the digital certificate expires.
- Issuer's Distinguished Name
- Distinguished name of the Certification Authority.
- Issuer's Digital Signature
- Digital signature used to validate a certificate.
Security Considerations for Digital Certificates
A digital certificate alone cannot prove identity. The digital certificate
only allows you to verify the identity of the digital certificate owner by
providing the public key that is needed to check the owner's digital signature.
You can safely send your public key to another because your data cannot be
decrypted without the other part of the key pair, your private key. Therefore,
the owner must protect the private key that belongs to the public key in the
digital certificate. All communications of the owner of a digital certificate
can be deciphered, if the private key is known. Without the private key, a
digital certificate cannot be misused.
Certification Authorities and Trust Hierarchies
A digital certificate is only as trustworthy as the certification authority
(CA) that issued it. As part of this trust, the policies under which certificates
are issued should be understood. Each organization or user must determine
which certification authorities can be accepted as trustworthy.
The Key Manager tool also allows organizations to create self-signed certificates,
which can be useful for testing or in environments with a small number of
users or machines.
As a user of a security service, you need to know its public key to obtain
and validate any digital certificates. Also, simply receiving a digital certificate
does not assure its authenticity. To verify its authenticity, you need the
public key of the certification authority that issued that digital certificate.
If you do not already hold an assured copy of the CA's public key, then you
might need an additional digital certificate to obtain the CA's public key.
Certificate Revocation Lists (CRLs)
A digital certificate is expected to be used for its entire validity period.
If needed, however, a certificate can be invalidated before its actual date
of expiration. Invalidating the certificate may be necessary, for example,
if an employee leaves the company or if the certificate's private key has
been compromised. To invalidate a certificate, you must notify the appropriate
Certificate Authority (CA) of the circumstances. When a CA revokes a certificate,
it adds the invalid certificate serial number to a Certificate Revocation
List (CRL).
CRLs are signed data structures that are issued periodically and made available
in a public repository. CRLs can be retrieved from HTTP or LDAP servers. Each
CRL contains a current time stamp and a nextUpdate time
stamp. Each revoked certificate in the list is identified by its certificate
serial number.
When configuring an IKE tunnel and using digital certificates as your authentication
method, you can confirm the certificate has not been revoked by selecting
RSA Signature with CRL Checking. If CRL Checking is enabled, the list is located
and checked during the negotiation process to establish the key management
tunnel.
Note: To use this feature of IP Security, your
system must be configured to use a SOCKS server (version 4 for HTTP servers),
an LDAP server, or both. If you know which SOCKS or LDAP server you are using
to obtain CRLs, you can make the necessary configuration selections by using Web-based System Manager.
Select CRL Configuration from the Digital Certificates menu.
Uses for Digital Certificates in Internet Applications
Internet applications that use public-key cryptography systems must use
digital certificates to obtain the public keys. There are many applications
that use public-key cryptography, including the following ones:
- Virtual Private Networks (VPN)
- Virtual Private Networks, also called secure tunnels, can be set up between systems such as firewalls to enable protected
connections between secure networks over unsecured communication links. All
traffic destined to these networks is encrypted between the participating
systems.
The protocols used in tunneling follow the IP Security and IKE
standards, which allow for a secure, encrypted connection between a remote
client (for example, an employee working from home) and a secure host or network.
- Secure Sockets Layer (SSL)
- SSL is a protocol that provides privacy and integrity for communications.
It is used by Web servers for secure connections between Web servers and Web
browsers, by the Lightweight Directory Access Protocol (LDAP) for secure connections
between LDAP clients and LDAP servers, and by Host-on-Demand V.2 for connections
between the client and the host system. SSL uses digital certificates for
key exchange, server authentication, and, optionally, client authentication.
- Secure Electronic Mail
- Many electronic mail systems, using standards such as PEM or S/MIME
for secure electronic mail, use digital certificates for digital signatures
and for the exchange of keys to encrypt and decrypt mail messages.
Digital Certificates and Certificate Requests
A signed digital certificate contains fields for the owner's distinguished
name, the owner's public key, the CA's distinguished name and the CA's signature.
A self-signed digital certificate contains its owner's distinguished name,
public key, and signature.
A certificate request must be created and sent
to a CA to request a digital certificate. The certificate request contains
fields for the requestor's distinguished name, public key, and signature.
The CA verifies the requestor's signature with the public key in the digital
certificate to ensure that:
- The certificate request was not modified in transit between the requestor
and the CA.
- The requestor possesses the corresponding private key for the public key
that is in the certificate request.
The CA is also responsible for verifying to some level the identity of
the requestor. Requirements for this verification can range from very little
proof to absolute assurance of the owner's identity.
The Key Manager tool manages digital certificates, and is located in the gskkm.rte file set on the Expansion Pack.
This section describes how to use Key Manager to do the following tasks:
- Creating a Key Database
- Adding a CA Root Digital Certificate
- Establishing Trust Settings
- Deleting a CA Root Digital Certificate
- Requesting a Digital Certificate
- Adding (Receiving) a New Digital Certificate
- Deleting a Digital Certificate
- Changing a Database Password
- Creating IKE Tunnels using Digital Certificates
To set up digital certificates and signature support, at minimum you must
do tasks 1, 2, 3, 4, 6, and 7. Then, use Web-based System Manager to create an IKE
tunnel and associate a policy with the tunnel that uses RSA Signature as the
authentication method.
You can create and configure a key database from the Web-based System Manager VPN
Overview window by selecting the Managing Digital Certificates option,
or by using the certmgr command to open the Key Manager tool from
the command line.
Creating a Key Database
A key database enables VPN endpoints to connect using valid digital certificates.
The key database (*.kdb) format is used with IP Security VPNs.
The following types of CA digital certificates are provided with Key Manager:
- RSA Secure Server Certification Authority
- Thawte Personal Premium Certification Authority
- Thawte Personal Freemail Certification Authority
- Thawte Personal Basic Certification Authority
- Thawte Personal Server Certification Authority
- Thawte Server Certification Authority
- Verisign Class 1 Public Primary Certification Authority
- Verisign Class 2 Public Primary Certification Authority
- Verisign Class 3 Public Primary Certification Authority
- Verisign Class 4 Public Primary Certification Authority
These signature digital certificates enable clients to attach to servers
that have valid digital certificates from these signers. After you create
a key database, you can use it as created to attach to a server that has
a valid digital certificate from one of the signers.
To use a signature digital certificate that is not on this list, you must
request it from the CA and add it to your key database. See Adding a CA Root Digital Certificate.
To create a key database using the certmgr command, use the following
procedure:
- Start the Key Manager tool by typing:
# certmgr
- Select New from the Key Database File pull down
menu.
- Accept the default value, CMS key database file,
for the Key database type field.
- Enter the following file name in the File Name field:
ikekey.kdb
- Enter the following location of the database in the Location field:
/etc/security
Note
The key database must be named ikekey.kbd and it must be placed in the /etc/security directory. Otherwise, IP Security cannot function correctly.
- Click OK. The Password Prompt screen is
displayed.
- Enter a password in the Password field, and enter it again in
the Confirm Password field.
- If you want to change the number of days until the password expires, enter
the desired number of days in the Set expiration time? field. The
default value for this field is 60 days. If you do not want the password to
expire, clear the Set expiration time? field.
- To save an encrypted version of the password in a stash file, select the Stash the password to a file? field and enter yes.
Note: You must stash the password to enable
the use of digital certificates with IP Security.
- Click OK. A confirmation screen displays, verifying that you
have created a key database.
- Click OK again and you return to the IBM Key Management screen.
You can either perform other tasks or exit the tool.
Adding a CA Root Digital Certificate
After you have requested and received a root digital certificate from a
CA, you can add it to your database. Most root digital certificates are of
the form *.arm, such as the following:
cert.arm
To add a CA root digital certificate to a database, use the following procedure:
- Unless you are already using Key Manager, start the tool by typing:
# certmgr
- From the main screen, select Open from the Key
Database File pull down menu.
- Highlight the key database file to which you want to add a CA root digital
certificate and click Open.
- Enter the password and click OK. When your password
is accepted, you are returned to the IBM Key Management screen. The title
bar now shows the name of the key database file you selected, indicating that
the file is now open and ready to be worked with.
- Select Signer Certificates from the Personal/Signer
Certificates pull down menu.
- Click Add.
- Select a data type from the Data type pull down menu, such as:
Base64-encoded ASCII data
- Enter a certificate file name and location for the CA root digital certificate,
or click Browse to select the name and location.
- Click OK.
- Enter a label for the CA root digital certificate, such as Test CA Root Certificate, and click OK. You are
returned to the Key Management screen. The Signer Certificates field now shows the label of the CA root digital
certificate you just added. You can either perform more tasks or exit the
tool.
Establishing Trust Settings
Installed CA certificates are set to trusted by
default. To change the trust setting, do the following:
- Unless you are already using Key Manager, start the tool by typing:
# certmgr
- From the main screen, select Open from the Key Database
File pull down menu.
- Highlight the key database file in which you want to change the default
digital certificate and click Open.
- Enter the password and click OK. After your password is accepted,
you are returned to the IBM Key Management screen. The title bar shows the
name of the key database file you selected, indicating that the file is now
open.
- Select Signer Certificates from the Personal/Signer
Certificates pull down menu.
- Highlight the certificate you want to change and click View/Edit, or double-click on the entry. The Key Information screen is
displayed for the certificate entry.
- To make this certificate a trusted root certificate, select the box next
to Set the certificate as a trusted root and click OK. If the certificate is not trusted, clear the check box instead and
click OK.
- Click OK from the Signer Certificates screen. You
are returned to the IBM Key Management screen. You can either perform other
tasks or exit the tool.
Deleting a CA Root Digital Certificate
If you no longer want to support one of the CAs in your signature digital
certificate list, you must delete the CA root digital certificate.
Note: Before deleting a CA root digital certificate,
create a backup copy in case you later want to re-create the CA root.
To delete a CA root digital certificate from a database, use the following
procedure:
- Unless you are already using Key Manager, start the tool by typing:
# certmgr
- From the main screen, select Open from the Key Database File pull down menu.
- Highlight the key database file from which you want to delete a CA root
digital certificate and click Open.
- Enter the password and click OK. After your password
is accepted, you are returned to the Key Management screen.
The title bar shows the name of the key database file you selected, indicating
that the file is now open and ready to be edited.
- Select Signer Certificates from the Personal/Signer Certificates pull down menu.
- Highlight the certificate you want to delete and click Delete. The Confirm screen is displayed.
- Click Yes. You are returned to the IBM Key Management
screen. The label of the CA root digital certificate no longer appears in
the Signer Certificates field. You can either perform other tasks
or exit the tool.
Requesting a Digital Certificate
To acquire a digital certificate, generate a request using Key Manager
and submit the request to a CA. The request file you generate is in the PKCS#10
format. The CA then verifies your identity and sends you a digital certificate.
To request a digital certificate, use the following procedure:
- Unless you are already using Key Manager, start the tool by typing:
# certmgr
- From the main screen, select Open from the Key Database
File pull down menu.
- Highlight the /etc/security/ikekey.kdb key database
file from which you want to generate the request and click Open.
- Enter the password and click OK. After your password
is accepted, you are returned to the IBM Key Management screen. The title
bar shows the name of the key database file you selected, indicating that
the file is now open and ready to be edited.
- Select Personal Certificate Requests from the Personal/Signer
Certificates pull down menu (in AIX Version 4) or select Create --> New Certificate Request (beginning in AIX 5.1).
- Click New.
- From the following screen, enter a Key Label for
the self-signed digital certificate, such as:
keytest
- Enter a Common Name (the default is the host name)
and Organization, and then select a Country. For the remaining fields, either accept the default values,
or choose new values.
- Define the Subject Alternate name. The optional
fields associated with Subject Alternate are email address,
IP address, and DNS name. For a tunnel type of IP address, type the same
IP address that is configured in the IKE tunnel into the IP address field.
For a tunnel ID type of user@FQDN, complete the email address field.
For a tunnel ID type of FQDN, type a fully qualified domain name (for example, hostname.companyname.com) in the
DNS name field.
- At the bottom of the screen, enter a name for the file, such as:
certreq.arm
- Click OK. A confirmation screen is displayed, verifying
that you have created a request for a new digital certificate.
- Click OK. You are returned to the IBM Key Management
screen. The Personal Certificate Requests field now
shows the key label of the new digital certificate request (PKCS#10) created.
- Send the file to a CA to request a new digital certificate. You can either
perform other tasks or exit the tool.
Adding (Receiving) a New Digital Certificate
After you receive a new digital certificate from a CA, you must add it
to the key database from which you generated the request.
To add (receive) a new digital certificate, use the following procedure:
- Unless you are already using Key Manager, start the tool by typing:
# certmgr
- From the main screen, select Open from the Key Database
File pull down menu.
- Highlight the key database file from which you generated the certificate
request and click Open.
- Enter the password and click OK. After your password
is accepted, you are returned to the IBM Key Management screen. The title
bar shows the name of the key database file you selected, indicating that
the file is now open and ready to be edited.
- Select Personal Certificate Requests from the Personal/Signer
Certificates pull down menu.
- Click Receive (to add the newly received digital
certificate to your database).
- Select the data type of the new digital certificate from the Data type pull down menu. The default is Base64-encoded
ASCII data.
- Enter the certificate file name and location for the new digital certificate,
or click Browse to select the name and location.
- Click OK.
- Enter a descriptive label for the new digital certificate, such as:
VPN Branch Certificate
- Click OK. You are returned to the IBM Key Management
screen. The Personal Certificates field now shows the
label of the new digital certificate you just added. You can either perform
other tasks or exit the tool.
If there is an error loading the certificate,
check that the certificate file begins with the text -----BEGIN CERTIFICATE----- and ends with the text -----END CERTIFICATE-----.
For example:
-----BEGIN CERTIFICATE-----
ajdkfjaldfwwwwwwwwwwadafdw
kajf;kdsajkflasasfkjafdaff
akdjf;ldasjkf;safdfdasfdas
kaj;fdljk98dafdas43adfadfa
-----END CERTIFICATE-----
If the text does not match, edit the
certificate file so that it starts and ends appropriately.
Deleting a Digital Certificate
Note
Before deleting a digital certificate, create a backup copy
in case you later want to re-create it.
To delete a digital certificate from your database, use the following procedure:
- Unless you are already using Key Manager, start the tool by typing:
# certmgr
- From the main screen, select Open from the Key Database
File pull down menu.
- Highlight the key database file from which you want to delete the digital
certificate and click Open.
- Enter the password and click OK. After your password
is accepted, you are returned to the IBM Key Management screen. The title
bar shows the name of the key database file you selected, indicating that
the file is now open and ready to be edited.
- Select Personal Certificate Requests from the Personal/Signer
Certificates pull down menu.
- Highlight the digital certificate you want to delete and click Delete. The Confirm screen is displayed.
- Click Yes. You are returned to the IBM Key Management
screen. The label of the digital certificate you just deleted no longer appears
in the Personal Certificates field. You can either perform
other tasks or exit the tool.
Changing a Database Password
To change the key database, use the following procedure:
- Unless you are already using Key Manager, start the tool by typing:
# certmgr
- From the main screen, select Change Password from
the Key Database File pull down menu.
- Enter a new password in the Password field, and
enter it again in the Confirm Password field.
- If you want to change the number of days until the password expires, enter
the desired number of days in the Set expiration time? field. The
default value for this field is 60 days. If you do not want the password to
expire, clear the Set expiration time? field.
- To save an encrypted version of the password in a stash file, select the Stash the password to a file? field and enter yes.
Note
You must stash the password to enable the use of digital
certificates with IP Security.
- Click OK. A message in the status bar indicates that the request
completed successfully.
- Click OK again and you return to the IBM Key Management screen.
You can either perform other tasks or exit the tool.
Creating IKE Tunnels Using Digital Certificates
To create IKE tunnels that use digital certificates, you must use Web-based System Manager and
the Key Manager tool.
To enable the use of digital certificates when defining the key management
IKE tunnel policies, you must configure a transform that uses signature mode.
Signature mode uses an RSA signature algorithm
for authentication. IP Security provides the Web-based System Manager dialog "Add/Change
a Transform" to allow you to select an authentication method of RSA Signature
or RSA Signature with CRL Checking.
At least one endpoint of the tunnel must have a policy defined that uses
a signature mode transform. You can also define other transforms using signature
mode through Web-based System Manager.
The IKE key management tunnel types (the Host Identity
Type field on the Identification tab) supported by IP Security are as
follows:
- IP address
- Fully Qualified Domain Name (FQDN)
- user@FQDN
- X.500 Distinguished Name
- Key identifier
Use Web-based System Manager to select host-identity types
on the Key Management Tunnel Properties - Identification tab. If you select IP Address, FQDN, or user@FQDN, you
must enter values in Web-based System Manager and then provide these values to the CA.
This information is used as the Subject Alternate Name in the personal digital
certificate.
For example, if you choose a host identity type of X.500
Distinguished Name from the Web-based System Manager pull-down list on the Identification tab, and you enter the Host identity as /C=US/O=ABC/OU=SERV/CN=name.austin.ibm.com, the following are the exact values that you
must enter in Key Manager when creating a digital certificate request:
- Common name: name.austin.ibm.com
- Organization: ABC
- Organizational unit: SERV
- Country : US
The X.500 Distinguished Name entered is the name
set up by your system or LDAP administrator. Entering an organizational unit
value is optional. The CA then uses this information when creating the digital
certificate.
For another example, if you choose a host identity type of IP Address from the pull-down list, and you enter the host identity as 10.10.10.1, the following are the exact values you must
enter in the digital certificate request:
- Common name: name.austin.ibm.com
- Organization: ABC
- Organizational unit: SERV
- Country : US
- Subject alternate IP address field: 10.10.10.1
After you create the digital certificate request with this information,
the CA uses this information to create the personal digital certificate.
When requesting a personal digital certificate, the CA needs the following
information:
For specific steps using the Key Manager tool to create a certificate
request, see Requesting a Digital Certificate.
Before activating the IKE tunnel, you must add the personal digital certificate
you received from the CA into the Key Manager database, ikekey.kdb. For more information, see Adding (Receiving) a New Digital Certificate.
IP Security supports the following types of personal digital certificates:
- Subject DN
- The Subject Distinguished Name must be in the following format and order:
/C=US/O=ABC/OU=SERV/CN=name.austin.ibm.com
The Key Manager tool allows only one OU value.
- Subject DN and Subject Alternate Name as an IP address
- The Subject Distinguished Name and Subject Alternate Name can be designated
as an IP address, as shown in the following:
/C=US/O=ABC/OU=SERV/CN=name.austin.ibm.com and 10.10.10.1
- Subject DN and Subject Alternate Name as FQDN
- The Subject Distinguished Name and Subject Alternate Name can be designated
as a fully qualified domain name, as shown in the following:
/C=US/O=ABC/OU=SERV/CN=name.austin.ibm.com and bell.austin.ibm.com.
- Subject DN and Subject Alternate Name as user@FQDN
- The Subject Distinguished Name and Subject Alternate Name can be designated
as a user address (user_ID@fully_qualified_domain_name), as shown in the following:
/C=US/O=ABC/OU=SERV/CN=name.austin.ibm.com and name@austin.ibm.com.
- Subject DN and multiple Subject Alternate Names
- The Subject Distinguished Name can be associated with multiple Subject
Alternate Names, as shown in the following:
/C=US/O=ABC/OU=SERV/CN=name.austin.ibm.com and bell.austin.ibm.com, 10.10.10.1, and user@name.austin.ibm.com.
[ Top of Page | Previous Page | Next Page | Contents | Index | Library Home |
Legal |
Search ]