The topics in this section provide diagnostics and recovery procedures to use if you encounter one of the following:
If your disk drive is running out of available space, see Getting More Space on a Disk Drive. If you suspect a disk drive is mechanically failing or has failed, run diagnostics on the disk use the following procedure:
smit diag
Based on the diagnostics results, you should be able to determine the condition of the disk:
If you run out of space on a disk drive, there are several ways to remedy the problem. You can automatically track and remove unwanted files, restrict users from certain directories, or mount space from another disk drive.
You must have root user, system group, or administrative group authority to execute these tasks.
Use the skulker command to clean up file systems by removing unwanted files. Type the following from the command line:
skulker -p
The skulker command is used to periodically purge obsolete or unneeded files from file systems. Candidates include files in the /tmp directory, files older than a specified age, a.out files, core files, or ed.hup files.
The skulker command is typically run daily, as part of an accounting procedure run by the cron command during off-peak hours. For more information about using the skulker command in a cron process, see Fix Disk Overflows.
For information on typical cron entries, see Setting Up an Accounting System.
Another way to release disk space and possibly to keep it free is to restrict and monitor disk usage.
chmod 655 DirName
This command sets read and write permissions for the owner (root) and sets read-only permissions for the group and others. DirName is the full path name of the directory you want to restrict,
0 2 * * 4 /usr/sbin/acct/dodisk
This line executes the dodisk command at 2 a.m. (0 2) each Thursday (4). The dodisk command initiates disk-usage accounting. This command is usually run as part of an accounting procedure run by the cron command during off-peak hours. See Setting Up an Accounting System for more information on typical cron entries.
Another way to get more space on a disk drive is to mount space from another drive. You can mount space from one disk drive to another in the following ways:
mount -n nodeA -vnfs /usr/spool /usr/myspool
The mount command makes a file system available for use at a specific location.
For more information about mounting file systems, see Mount a JFS or JFS2.
If you repair a bad disk and place it back in the system without reformatting it, you can let the system automatically activate and resynchronize the stale physical partitions on the drive at boot time. A stale physical partition contains data your system cannot use.
If you suspect a stale physical partition, type the following on the command line:
lspv -M PhysVolName
Where PhysVolName is the name of your physical volume. The lspv command output will list all partitions on your physical volume. The following is an excerpt from example output:
hdisk16:112     lv01:4:2        stale
hdisk16:113     lv01:5:2        stale
hdisk16:114     lv01:6:2        stale
hdisk16:115     lv01:7:2        stale
hdisk16:116     lv01:8:2        stale
hdisk16:117     lv01:9:2        stale
hdisk16:118     lv01:10:2       stale
The first column displays the physical partitions and the second column displays the logical partitions. Any stale physical partitions are noted in the third column.
This section describes how to recover data from a failed disk drive when you must reformat or replace the failed disk.
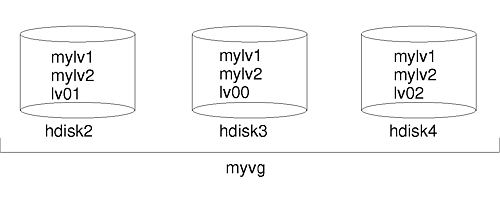
The following procedure uses a scenario in which the volume group called myvg contains three disk drives called hdisk2, hdisk3, and hdisk4. In this scenario, hdisk3 goes bad. The nonmirrored logical volume lv01 and a copy of the mylv logical volume is contained on hdisk2. The mylv logical volume is mirrored and has three copies, each of which takes up two physical partitions on its disk. The failing hdisk3 contains another copy of mylv, and the nonmirrored logical volume called lv00. Finally, hdisk4 contains a third copy of mylv as well as a logical volume called lv02. The following figure shows this scenario.
This procedure is divided into the following key segments:
Before replacing or reformatting your failed or failing disk:
lspv -M -n hdisk4 hdisk3
The lspv command displays information about a physical volume within a volume group. The output looks similar to the following:
hdisk3:1        mylv:1
hdisk3:2        mylv:2
hdisk3:3        lv00:1
hdisk3:4-50
The first column displays the physical partitions, and the second column displays the logical partitions. Partitions 4 through 50 are free.
In the scenario, lv00 on the failing disk hdisk3 is a single-copy file system. To unmount it, type the following:
unmount /dev/lv00
If you do not know the name of the file system, assuming the /etc/filesystems file is not solely located on the failed disk, type mount on the command line to list all mounted file systems and find the name associated with your logical volume. You can also use the grep command on the /etc/filesystems file to list only the file system names, if any, associated with your logical volume. For example:
grep lv00 /etc/filesystems
The output looks similar to the following:
dev             = /dev/lv00
log             = /dev/loglv00
rmfs /FSnameThe rmlvcopy command removes copies from each logical partition. For example, type:
rmlvcopy mylv 2 hdisk3
By removing the copy on hdisk3, you reduce the number of copies of each logical partition belonging to the mylv logical volume from three to two (one on hdisk4 and one on hdisk2).
sysdumpdev -P -p /dev/sysdumpnull
The sysdumpdev command changes the primary or secondary dump device location for a running system. When you reboot, the dump device returns to its original location.
rmps PSname
Where PSname is the name of the paging space to be removed, which is actually the name of the logical volume on which the paging space resides.
If the rmps command is not successful, you must use the smit chps fast path to deactivate the primary paging space and reboot before continuing with this procedure. The reducevg command in step 10 can fail if there are active paging spaces.
rmlv -f lv00
reducevg -df myvg hdisk3
If you cannot execute the reducevg command or if the command is unsuccessful, the procedure in step 13 can help clean up the VGDA/ODM information after you reformat or replace the drive
Replacing or reformatting your failed or failing disk:
smit diag
After the disk is reformatted, continue with step 12.
After replacing or reformatting your failed or failing disk:
exportvg VGName
Where VGName is the name of your volume group.
varyonvg VGName
The system displays a message about a missing or unavailable disk, and the new (or reformatted) disk is listed. Note the physical volume identifier (PVID) of the new disk, which is listed in the varyonvg message. It is the 16-character string between the name of the missing disk and the label PVNOTFND. For example:
hdisk3 00083772caa7896e PVNOTFND
Type:
varyonvg -f VGNameThe missing disk is now displayed with the PVREMOVED label. For example:
hdisk3 00083772caa7896e PVREMOVED
Then, type the command:
reducevg -df VGName PVID
Where PVID is the physical volume identifier (in this scenario, 00083772caa7896e).
extendvg myvg hdisk3
mklv -y lv00 myvg 1 hdisk3
This example recreates the lv00 logical volume on the hdisk3 drive. The 1 means that this logical volume is not mirrored.
crfs -v jfs -d lv00 -m /dev/lv00
mklvcopy mylv 3 hdisk3
This example creates a mirrored third partition of the mylv logical volume on hdisk3.
syncvg -p hdisk3
At this point, all mirrored file systems should be restored and up-to-date. If you were able to back up your single-copy file systems, they will also be ready to use. You should be able to proceed with normal system use.
To recover from a failed disk drive, back out the way you came in; that is, list the steps you went through to create the volume group, and then go backwards. The following example is an illustration of this technique. It shows how a mirrored logical volume was created and then how it was altered, backing out one step at a time, when a disk failed.
mkvg -y workvg hdisk1
extendvg workvg hdisk2

extendvg workvg hdisk3
mklv -y testlv workvg 10

mklvcopy testlv 3
After Jane created the mirrored workvg volume group, hdisk2 failed. Therefore, she took the following steps to recover:
rmlvcopy testlv 2 hdisk2
reducevg workvg hdisk2
rmdev -l hdisk2 -d
shutdown -F
Because you have a new disk (the system sees that there is a new PVID on this disk), the system chooses the first open hdisk name. Because the -d flag was used in step 3, the name hdisk2 was released, so the system chose hdisk2 as the name of the new disk. If the -d flag had not been used, hdisk4 would have been chosen as the new name.
extendvg workvg hdisk2
mklvcopy testlv 3
The Logical Volume Manager automatically placed the third logical volume copy on the new hdisk2.
The procedure to recover from disk failure using the hot removability feature is, for the most part, the same as described in Recovering a Disk Drive without Reformatting, with the following exceptions:
If you can access a disk that is going bad as part of a volume group, use one of the following procedures:
If the disk is bad and cannot be accessed, follow these steps:
This section contains possible problems with and solutions for physical or logical volume errors.
If you notice performance degradation when accessing logical volumes, you might have hot spots in your logical volumes that are experiencing too much disk I/O. For more information, see AIX 5L Version 5.2 System Management Concepts: Operating System and Devices and Enabling and Configuring Hot Spot Reporting.
The logical volume control block (LVCB) is the first 512 bytes of a logical volume. This area holds important information such as the creation date of the logical volume, information about mirrored copies, and possible mount points in the JFS. Certain LVM commands are required to update the LVCB, as part of the algorithms in LVM. The old LVCB is read and analyzed to see if it is a valid. If the information is valid LVCB information, the LVCB is updated. If the information is not valid, the LVCB update is not performed, and you might receive the following message:
Warning, cannot write lv control block data.
Most of the time, this message results when database programs bypass the JFS and access raw logical volumes as storage media. When this occurs, the information for the database is literally written over the LVCB. For raw logical volumes, this is not fatal. After the LVCB is overwritten, the user can still:
There are limitations to deleting LVCBs. A logical volumes with a deleted LVCB might not import successfully to other systems. During an importation, the LVM importvg command scans the LVCBs of all defined logical volumes in a volume group for information concerning the logical volumes. If the LVCB does not exist, the imported volume group still defines the logical volume to the new system that is accessing this volume group, and the user can still access the raw logical volume. However, the following typically happens:
In the design of Logical Volume Manager (LVM), each logical partition maps to one physical partition (PP). And, each physical partition maps to a number of disk sectors. The design of LVM limits the number of physical partitions that LVM can track per disk to 1016. In most cases, not all of the 1016 tracking partitions are used by a disk. When this limit is exceeded, you might see a message similar to the following:
0516-1162 extendvg: Warning, The Physical Partition Size of PPsize requires the
creation of TotalPPs partitions for PVname.  The limitation for volume group
VGname is LIMIT physical partitions per physical volume.  Use chvg command
with -t option to attempt to change the maximum Physical Partitions per
Physical volume for this volume group.
Where:
This limitation is enforced in the following instances:
If the installation code detects that the rootvg drive is larger than 4 GB, it changes the mkvg -s value until the entire disk capacity can be mapped to the available 1016 tracks. This installation change also implies that all other disks added to rootvg, regardless of size, are also defined at that physical partition size.
For systems using a redundant array of identical disks (RAID), the /dev/hdiskX name used by LVM may consist of many non-4 GB disks. In this case, the 1016 requirement still exists. LVM is unaware of the size of the individual disks that really make up /dev/hdiskX. LVM bases the 1016 limitation on the recognized size of /dev/hdiskX, and not the real physical disks that make up /dev/hdiskX.
A system malfunction can cause the device configuration database to become inconsistent with the LVM. When this happens, a logical volume command generates such error messages as:
0516-322 The Device Configuration Database is inconsistent ...
OR
0516-306 Unable to find logical volume LVname in the Device
Configuration Database.
(where the logical volume called LVname is normally available).
To synchronize the device configuration database with the LVM information, with root authority, type the following on the command line:
synclvodm -v VGNameWhere VGName is the name of the volume group you want to synchronize.
If the importvg command is not working correctly, try refreshing the device configuration database. See Synchronizing the Device Configuration Database.
When you choose to forcibly vary-on a volume group by overriding the absence of a quorum, the PV STATE of all physical volumes that are missing during this vary-on process will be changed to removed. This means that all the VGDA and VGSA copies are removed from these physical volumes. After this is done, these physical volumes will no longer take part in quorum checking, nor are they allowed to become active within the volume group until you return them to the volume group.
Under one or more of the following conditions, you might want to override the vary-on failure so that the data on the available disks in the volume group can be accessed:
Use the following procedure to avoid losing quorum when one disk is missing or might soon fail and requires repair:
chpv -vr PVnameWhen this command completes, the physical
volume PVname is no longer factored in quorum checking.
However, in a two-disk volume group, this command fails if you try the chpv command on the disk that contains the two VGDA/VGSAs.
The command does not allow you to cause quorum to be lost.chpv -v PVname
In some instances, the user experiences a problem adding a new disk to an existing volume group or in creating of a new volume group. The message provided by LVM is:
0516-1163 extendvg: VGname already has maximum physical volumes.  With the maximum
number of physical partitions per physical volume being LIMIT, the maximum
number of physical volumes for volume group VGname is MaxDisks.
Where:
You can modify the image.data file and then use alternate disk installation, or restore the system using the mksysb command to re-create the volume group as a big volume group. For more information, see the AIX 5L Version 5.2 Installation Guide and Reference.
On older AIX versions when the limit was smaller than 32 disks, the exception to this description of the maximum VGDA was the rootvg. To provide users with more free disk space, when rootvg was created, the mkvg -d command used the number of disks selected in the installation menu as the reference number. This -d number is 7 for one disk and one more for each additional disk selected. For example, if two disks are selected, the number is 8 and if three disks are selected, the number is 9, and so on.