Although 32-bit Internet addresses provide machines an efficient means of identifying the source and destination of datagrams sent across an internetwork, users prefer meaningful, easily remembered names. Transmission Control Protocol/Internet Protocol (TCP/IP) provides a naming system that supports both flat and hierarchical network organizations.
The topics discussed in this section are:
Naming in flat networks is very simple. Host names consist of a single set of characters and generally are administered locally. In flat TCP/IP networks, each machine on the network has a file (/etc/hosts) containing the name-to-Internet-address mapping information for every host on the network. The administrative burden of keeping each machine naming file current grows as the TCP/IP network grows. When TCP/IP networks become very large, as on the Internet, naming is divided hierarchically. Typically, the divisions follow the network organization. In TCP/IP, hierarchical naming is known as the domain name system (DNS) and uses the DOMAIN protocol. The DOMAIN protocol is implemented by the named daemon in TCP/IP.
As in naming for flat networks, the domain name hierarchy provides for the assignment of symbolic names to networks and hosts that are meaningful and easy for users to remember. However, instead of each machine on the network keeping a file containing the name-to-address mapping for all other hosts on the network, one or more hosts are selected to function as name servers. Name servers translate (resolve) symbolic names assigned to networks and hosts into the efficient Internet addresses used by machines. A name server has complete information about some part of the domain, referred to as a zone, and it has authority for its zone.
In a flat network, all hosts in the network are administered by one central authority. This form of network requires that all hosts in the network have unique host names. In a large network, this requirement creates a large administrative burden on the central authority.
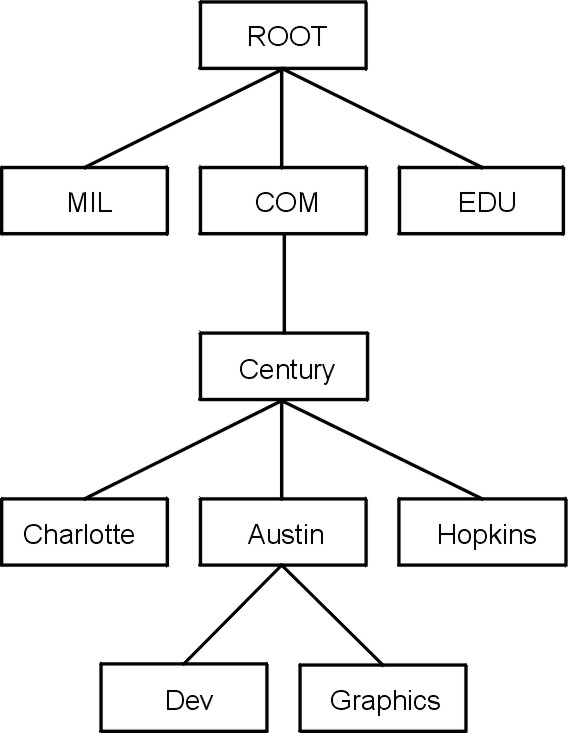
In a domain network, groups of hosts are administered separately within a tree-structured hierarchy of domains and subdomains. In this case, host names need to be unique only within the local domain, and only the root domain is administered by a central authority. This structure allows subdomains to be administered locally and reduces the burden on the central authority. For example, the root domain of the Internet consists of such domains as com (commercial organizations), edu (educational organizations), gov (governmental organizations), and mil (military groups). New top-level domains can only be added by the central authority. Naming at the second level is delegated to designated agents within the respective domains. For example, in the following figure, com has naming authority for all commercial organization subdomains beneath it. Likewise, naming at the third level (and so on) is delegated to agents within that level. For example, in the Domain Structure of the Internet figure, Century has naming authority for its subdomains Austin, Hopkins, and Charlotte.
Figure 3-21. Domain Structure of the Internet. This figure illustrates the hierarchical structure of the internet. It begins at the top with the root and branches to the next level containing the mil, com, and edu domains. Below the com domain is another level containing Charlotte, Austin, and Hopkins. Below Austin is Dev and Graphics.
|
Century's Austin subdomain might also be divided into zones, for example, Dev and Graphics. In this case, the zone austin.century.com has all the data contained in the domain austin.century.com, except that which was delegated to Dev and Graphics. The zone dev.century.com would contain only the data delegated to Dev; it would know nothing about Graphics, for example. The zone austin.century.com (as opposed to the domain of the same name) would contain only that data not delegated to other zones.
In the hierarchical domain name system, names consist of a sequence of case-insensitive subnames separated by periods with no embedded blanks. The DOMAIN protocol specifies that a local domain name must be fewer than 64 characters and that a host name must be fewer than 32 characters in length. The host name is given first, followed by a period (.), a series of local domain names separated by periods, and finally the root domain. A fully specified domain name for a host, including periods, must be fewer than 255 characters in length and in the following form:
host.subdomain1.[subdomain2 . . . subdomain].rootdomain
Since host names must be unique within a domain, you can use an abbreviated name when sending messages to a host within the same domain. For example, instead of sending a message to smith.eng.lsu.edu, a host in the eng domain could send a message to smith. Additionally, each host can have several aliases that other hosts can use when sending messages.
The purpose of using names for hosts is to provide a quick, easy, and unambiguous way to refer to the computers in your network. Internet system administrators have discovered that there are good, as well as poor, choices for host names. These suggestions are intended to help you avoid common pitfalls in choosing host names.
The following are some suggestions for choosing unambiguous, easy to remember host names:
The following are some examples of poor choices. In general, these are poor choices because they are difficult to remember or are confusing (either to humans or computers):
In a flat name space, all names must be kept in the /etc/hosts file on each host on the network. If the network is very large, this can become a burden on the resources of each machine.
In a hierarchical network, certain hosts designated as name servers resolve names into Internet addresses for other hosts. This has two advantages over the flat name space. It keeps the resources of each host on the network from being tied up in resolving names, and it keeps the person who manages the system from having to maintain name resolution files on each machine on the network. The set of names managed by a single name server is known as its zone of authority.
Note: Although the host machine that performs the name resolution function for a zone of authority is commonly referred to as a name server host, the process controlling the function, the named daemon, is the actual name server process.
To further reduce unnecessary network activity, all name servers cache (store for a period of time) name-to-address mappings. When a client asks a server to resolve a name, the server checks its cache first to see if the name has been resolved recently. Because domain and host names do change, each item remains in the cache for a limited length of time specified by the TTL of the record. In this way, authorities can specify how long they expect the name resolution to be accurate.
Within any autonomous system there can be multiple name servers. Typically, name servers are organized hierarchically and correspond to the network organization. Referring to the "Domain Structure of the Internet" figure, each domain might have a name server responsible for all subdomains within the domain. Each subdomain name server communicates with the name server of the domain above it (called the parent name server), as well as with the name servers of other subdomains.
Figure 3-22. Domain Structure of the Internet. This figure illustrates the hierarchical structure of the internet. It begins at the top with the root and branches to the next level containing the mil, com, and edu domains. Below the com domain is another level containing Charlotte, Austin, and Hopkins. Below Austin is Dev and Graphics.
|
For example, in the "Domain Structure of the Internet" figure, Austin, Hopkins, and Charlotte are all subdomains of the domain Century. If the tree hierarchy is followed in the network design, the Austin name server communicates with the name servers of Charlotte and Hopkins as well as with the parent Century name server. The Austin name server also communicates with the name servers responsible for its subdomains.
There are several types of name servers:
| Master Name Server | Loads its data from a file or disk and can delegate authority to other servers in its domain. |
| Slave Name Server | Receives its information at system startup time for the given zone of authority from a master name server, and then periodically asks the master server to update its information. On expiration of the refresh value in the start of authority (SOA) Resource Record on a slave name server, or on receipt of a Notify message from the master name server, the slave reloads the database from the master if the serial number of the database on the master is greater than the serial number in the current database on the slave. If it becomes necessary to force a new zone transfer from the master, simply remove the existing slave databases and refresh the named daemon on the slave name server. |
| Stub Name Server | Although its method of database replication is similar to that of the slave name server, the stub name server only replicates the name server records of the master database rather than the whole database. |
| Hint Server | Indicates a name server that relies only on the hints that it has built from previous queries to other name servers. The hint name server responds to queries by asking other servers that have the authority to provide the information needed if a hint name server does not have a name-to-address mapping in its cache. |
| Forwarder or Client Server | Forwards queries it cannot satisfy locally to a fixed list of forwarding servers. Forwarding-only servers (a forwarder that obtains information and passes it on to other clients, but that is not actually a server) does not interact with the master name servers for the root domain and other domains. The queries to the forwarding servers are recursive. There can be one or more forwarding servers, which are tried in turn until the list is exhausted. A client and forwarder configuration is typically used when you do not want all the servers at a given site to interact with the rest of the Internet servers, or when you want to build a large cache on a select number of name servers. |
| Remote Server | Runs all the network programs that use the name server without the name server process running on the local host. All queries are serviced by a name server that is running on another machine on the network. |
One name server host can perform in different capacities for different zones of authority. For example, a single name server host can be a master name server for one zone and a slave name server for another zone.
The process of obtaining an Internet address from a host name is known as name resolution and is done by the gethostbyname subroutine. The process of translating an Internet address into a host name is known as reverse name resolution and is done by the gethostbyaddr subroutine. These routines are essentially accessors into a library of name translation routines known as resolvers.
Resolver routines on hosts running TCP/IP normally attempt to resolve names using the following sources:
When NIS+ is installed, lookup preferences are set using the irs.conf file. For more information, see AIX 5L Version 5.1 Network Information Services (NIS and NIS+) Guide.
To resolve a name in a domain network, the resolver routine first queries the domain name server database, which might be local if the host is a domain name server or on a foreign host. Name servers translate domain names into Internet addresses. The group of names for which a name server is responsible is its zone of authority. If the resolver routine is using a remote name server, the routine uses the domain name protocol (DOMAIN) to query for the mapping. To resolve a name in a flat network, the resolver routine checks for an entry in the local /etc/hosts file. When NIS or NIS+ is used, the /etc/hosts file on the master server is checked.
By default, resolver routines attempt to resolve names using the above resources. BIND/DNS is tried first. If the /etc/resolv.conf file does not exist or if BIND/DNS could not find the name, NIS is queried if it is running. NIS is authoritative over the local /etc/hosts, so the search ends here if it is running. If NIS is not running, then the local /etc/hosts file is searched. If none of these services can find the name, then the resolver routines return with HOST_NOT_FOUND. If all of the services are unavailable, then the resolver routines return with SERVICE_UNAVAILABLE.
The default order described above can be overwritten by creating the /etc/irs.conf configuration file and specifying the desired order. Also, both the default and /etc/irs.conf orderings can be overwritten with the environment variable, NSORDER. If either the /etc/irs.conf file or NSORDER environment variable are defined, then at least one value must be specified along with the option.
To specify host ordering with the /etc/irs.conf file:
hosts value [ continue ]
The order is specified with each method indicated on a line by itself. The value is one of the listed methods and the continue keyword indicates that another resolver method follows on the next line.
To specify host ordering with the NSORDER environment variable:
NSORDER=value,value,value
The order is specified on one line with values separated by commas. White spaces are permitted between the commas and the equal sign.
For example, if the local network is organized as a flat network, then only the /etc/hosts file is needed. Given this example, the /etc/irs.conf file contains the following line:
hosts local
Alternatively, the NSORDER environment variable can be set as:
NSORDER=local
If the local network is a domain network using a name server for name resolution and an /etc/hosts file for backup, then both services should be specified. Given this example, the /etc/irs.conf file contains the following lines:
hosts dns continue
hosts local
The NSORDER environment variable is set as:
NSORDER=bind,local
Note: The values listed must be in lowercase.
When following any defined or default resolver ordering, the search algorithm continues from one resolver to the next only if:
If the /etc/resolv.conf file does not exist, then BIND/DNS is considered not set up or running, and therefore it is not available. If the getdomainname and yp_bind subroutines fail, then the NIS service is considered not set up or running, and therefore it is not available. If the /etc/hosts file could not be opened, then a local search is impossible, and therefore the file and service are unavailable.
When a service is listed as authoritative, it means that this service is the expert of its successors and has all pertinent names and addresses. Resolver routines do not try successor services, because successors might contain only a subset of the information in the authoritative service. Name resolution ends at service listed as authoritative, even if it does not find the name (in which case, the resolver routine returns HOST_NOT_FOUND). If an authoritative service is not available, then the next service specified is queried.
An authoritative source is specified with the string =auth directly behind a value. The entire word, authoritative can be typed in, but only the auth string is used. For example, if the NSORDER environment variable contains the following:
hosts = nis=auth,dns,local
The search ends after the NIS query (if NIS is running), regardless of whether the name was found. If NIS is not running, then the next source is queried, which is DNS.
TCP/IP name servers use caching to reduce the cost of searching for names of hosts on remote networks. Instead of searching for a host name each time a request is made, a name server first looks at its cache to see if the host name has been resolved recently. Since domain and host names do change, each item remains in the cache for a limited length of time specified by the time-to-live (TTL) value of the record. In this way, name servers can specify how long they expect their responses to be considered authoritative.
In a DNS environment, a host name that is set using the hostname command from the command line or in the rc.net file format must be the official name of the host as returned by the name server. Generally, this name is the full domain name of the host in the form:
host.subdomain.subdomain.rootdomain
Note: Resolver routines require the default domain to be set. If the default domain is not set in the hostname command, then it must be set in the /etc/resolv.conf file.
If the host name is not set up as a fully qualified domain name, and if the system is set up to use a domain name server in conjunction with the sendmail program, the sendmail configuration file (/etc/sendmail.cf) must be edited to reflect this official host name. In addition, the domain name macros in this configuration file must be set for the sendmail program to operate correctly.
Note: The domain specified in the /etc/sendmail.cf file takes precedence over the domain set by the hostname command for all sendmail functions.
For a host that is in a DOMAIN network but is not a name server, the local domain name and domain name server are specified in the /etc/resolv.conf file. In a DOMAIN name server host, the local domain and other name servers are defined in files read by the named daemon when it starts.
The Reverse Address Resolution Protocol (RARP) translates unique hardware addresses into Internet addresses on the Ethernet local area network (LAN) adapter (Ethernet protocol only). Standard Ethernet protocol is supported with the following restrictions:
The system administrator must manually build and maintain a table of permanent ARP entries using the arp command. A specific ARP table entry must be added on the server for each host that requires RARP replies from an authoritative source.
Configure the /etc/hosts file if your network is small, and you are using a flat naming scheme. Even if you are using a hierarchical (or domain) naming scheme with name servers, you might want to configure the /etc/hosts file to identify hosts that are not known by the name servers.
Configure your system for local host resolution using the Web-based System
Manager, the System Management Interface Tool (SMIT), or commands. If
you choose the command method, be sure to preserve the format of the
/etc/hosts file, as described in Hosts File Format
for TCP/IP in the AIX 5L Version 5.1 Files
Reference.
| Local Name Resolution Tasks | |||
|---|---|---|---|
| Task | SMIT Fast Path | Command or File | Web-based System Manager Management Environment |
| List All the Hosts | smit lshostent | view /etc/hosts | Software --> Network --> TCPIP (IPv4 and IPv6) --> TCPIP Protocol Configuration --> TCP/IP --> Configure TCP/IP --> Advanced Methods --> Hosts File --> Contents of /etc/hosts file. |
| Add a Host | smit mkhostent | edit /etc/hosts | Software --> Network --> TCPIP (IPv4 and IPv6) --> TCPIP Protocol Configuration --> TCP/IP --> Configure TCP/IP --> Advanced Methods --> Hosts File. In Add/Change host entry, complete the following fields: IP Addresses, Host name, Alias(es), and Comment. Click Add/Change Entry --> OK. |
| Change/Show Characteristics of a Host | smit chhostent | edit /etc/hosts | Software --> Network --> TCPIP (IPv4 and IPv6) --> TCPIP Protocol Configuration --> TCP/IP --> Configure TCP/IP --> Advanced Methods --> Hosts File. Select a host in Contents of /etc/hosts/file, and change data in Add/Change host entry. Click Add/Change Entry --> OK. |
| Remove a Host | smit rmhostent | edit /etc/hosts | Software --> Network --> TCPIP (IPv4 and IPv6) --> TCPIP Protocol Configuration --> TCP/IP --> Configure TCP/IP --> Advanced Methods --> Hosts File. Select a host in Contents of /etc/hosts/file, and click Delete Entry --> OK. |
If you are part of a larger internetwork, coordinate setting up your domain and name servers with the central authority.
The following suggestions can help you plan your own DOMAIN name resolution system:
>Changing a name is much more difficult than setting up the initial one. Obtain consensus from your organization on network, gateway, name server, and host names before you set up your files.
If you cannot set up redundant name servers, be sure to set up slave and hint name servers so you have some type of backup.
objectclass container
        requires
                objectclass,
                cn
objectclass hosts
        requires
                objectclass,
                hname
        allows
                addr
                halias,
                comment
In a hierarchical network, certain hosts are designated as name servers. These hosts resolve names into Internet addresses for other hosts. The named daemon controls the name server function and, therefore, must be run on a name server host.
Before you configure a name server, decide which type or types best fit the network it will serve. There are several types of name servers.
A master name server actually stores the database containing name-to-address mapping information. It loads its data from a file or disk and can delegate authority to other servers in its domain. A slave name server or stub name server receives its information at system startup time for a given zone of authority from a master name server, and then periodically asks the master server to update its information. A hint name server responds to requests to resolve names by querying other servers that have the authority to provide the information needed.
Note: Previous generations of the named name server specified the master name server as the primary name server, the slave name server as the secondary name server, and the hint name server as the caching-only name server. Any reference to the named.conf file in this documentation is specific to AIX 4.3.2 and later versions.
Keep in mind that a name server can function in different capacities for different zones of authority. For example, one name server host can be a master name server for one zone and a slave name server for another zone. If your system has NIS or NIS+ installed, these services can also provide name resolution. For more information, see AIX 5L Version 5.1 Network Information Services (NIS and NIS+) Guide.
There are several files involved in configuring name servers.
| conf | This file is read when the named daemon starts. The records in the conf file tell the named daemon which type of server it is, which domains it has authority over (its zones of authority), and where to get the data for initially setting up its database. The default name of this file is /etc/named.conf. However, you can change the name of this file by specifying the name and path of the file on the command line when the named daemon is started. If you intend to use the /etc/named.conf as the conf file and it does not exist, a message is generated in syslog file and named terminates. However, if an alternative conf file is specified, and the alternative file does not exist, an error message is not generated and named continues. |
| cache | Contains information about the local cache. The local cache file contains the names and addresses of the highest authority name servers in the network. The cache file uses the Standard Resource Record Format. The name of the cache file is set in the conf file. |
| domain data | There are three typical domain data files, also referred to as the
named data files. The named local file
contains the address resolution information for local loopback. The
named data file contains the address resolution data for
all machines in the name server zone of authority. The
named reverse data file contains the reverse address
resolution information for all machines in the name server zone of
authority. The domain data files use the Standard Resource Record
Format. Their file names are user definable and are set in the
conf file. By convention, the names of these files generally
include the name of the daemon (named), and the type of
file and name of the domain is given in the extension. For example, the
name server for the domain abc might have the following
files:
named.abc.data
named.abc.rev
named.abc.local
When modifying the named data files the serial number in the SOA Resource Record must be incremented for slave name servers to properly realize the new zone changes. |
| resolv.conf | The presence of this file indicates to a host to go to a name server to
resolve a name first. If the resolv.conf file does
not exist, the host looks in the /etc/hosts file for name
resolution. On a name server, the resolv.conf file
must exist and can contain the local host address, the loopback address
(127.0.0.1), or be empty.
Note: The resolver routines require the default domain be set. If the default domain is not set in the /etc/resolv.conf file, then it must be set in the hostname. |
Time-to-live (TTL) is specified in resource records. If TTL is not specified in a record, the length of this time period defaults to the minimum field as defined in the start of authority (SOA) record for that zone. TTL is used when data is stored outside a zone (in a cache) to ensure that the data is not retained indefinitely.
To configure a master name server, use the Web-based System Manager, wsm, or use the following procedure, which edits a series of files and then uses the System Management Interface Tool (SMIT) or the command line to start the named daemon.
This file is read each time the named daemon starts. It tells the server which type of server it is, the zone or zones for which it is responsible, and where to get its initial information.
options {
    directory "/usr/local/domain";
};
zone "." IN {
    type hint;
    file "/etc/named.ca";
};
zone "abc.aus.century.com" in {
    type master;
    file "/etc/named.abcdata";
};
zone "201.9.192.in-addr.arpa" in {
    type master;
    file "/etc/named.abcrev";
};
zone "0.0.127.in-addr.arpa" in {
    type master;
    file "/etc/named.local";
};
This file contains the addresses of the servers that are authoritative, which are the root name servers for the domain. For example:
; root name servers.
         1          IN    NS    relay.century.com.
relay.century.com.   3600000    IN    A     129.114.1.2
Note: All lines in this file must be in Standard Resource Record Format.
@ IN SOA venus.abc.aus.cntry.com. gail.zeus.abc.aus.cntry.com.
(
                           1.1     ;serial
                           3600    ;refresh
                           600     ;retry
                           3600000 ;expire
                           86400)  ;minimum
IN NS venus.abc.aus.century.com.
1 IN PTR localhost.
Note: All lines in this file must be in Standard Resource Record Format.
@   IN   SOA   venus   bob.robert.abc.aus.century.com.
(
                           1.1     ;serial
                           3600    ;refresh
                           600     ;retry
                           3600000 ;expire
                           86400)  ;minimum
venus        IN    A        192.9.201.1
venus        IN    A        128.114.100.1
IN    NS       venus.abc.century.com
IN    NS       kronos.xyz.century.com
Note: All lines in this file must be in Standard Resource Record Format.
@  IN  SOA  venus.abc.aus.century.com. bob.robert.abc.aus.century.com.
(
                           1.1     ;serial
                           3600    ;refresh
                           600     ;retry
                           3600000 ;expire
                           86400)  ;minimum
;ABC.AUS.CENTURY.COM Hosts
1                      IN    PTR    venus.abc.aus.century.com.
2                      IN    PTR    kronos.abc.aus.century.com.
Note: All lines in this file must be in Standard Resource Record Format.
touch /etc/resolv.conf
The presence of this file indicates that the host should use a name server, not the /etc/hosts file, for name resolution. This file must exist on a name server host and can contain the local host address, contain the loopback address (127.0.0.1), or be empty.
Alternatively, the /etc/resolv.conf file can contain the following entry:
nameserver 127.0.0.1
The 127.0.0.1 address is the loopback address, which causes the host to access itself as the name server. The /etc/resolv.conf file can also contain an entry similar to the following:
domain domainname
In the previous example, the value for domainname is aus.century.com.
#start /etc/named "$src_running"
This initializes the daemon with each system startup.
startsrc -s named
To configure a slave name server, use the Web-based System Manager, wsm, or use the following procedure which edits a series of files and then uses SMIT or the command line to start the named daemon.
The conf file is read each time the named daemon starts. It tells the server which type of server it is, the zone for which it is responsible, and where to get its initial information.
options {
    directory "/usr/local/domain";
};
zone "." IN {
    type hint;
    file "/etc/named.ca";
};
zone "abc.aus.century.com" IN {
    type slave;
    file "/etc/named.abc.bak";
    masters { 192.9.201.1; 192.9.201.2; };
};
zone "xyz.aus.century.com" IN {
    type slave;
    file "/etc/named.xyz.bak";
    masters { 192.9.201.1; 192.9.201.2; };
};
zone "201.9.192.in-addr.arpa" IN {
    type slave;
    file "named.rev.bak";
    masters { 192.9.201.1; 192.9.201.2; };
};
zone "100.114.128.in-addr.arpa" IN {
    type slave;
    file "named.rev.bak";
    masters { 192.9.201.1; 192.9.201.2; };
};
zone "0.0.127.in-addr.arpa" IN {
    type master;
    file "/etc/named.local";
};
This file contains the addresses of the servers that are authoritative name servers (NS) for the root domain of the network. For example:
; root name servers.
         1          IN    NS    relay.century.com.
relay.century.com.   3600000    IN    A     129.114.1.2
Note: All lines in this file must be in Standard Resource Record Format.
@ IN SOA venus.abc.aus.cntry.com. gail.zeus.abc.aus.cntry.com.
(
                           1.1     ;serial
                           3600    ;refresh
                           600     ;retry
                           3600000 ;expire
                           86400)  ;minimum
IN NS venus.abc.aus.century.com.
1 IN PTR localhost.
Note: All lines in this file must be in Standard Resource Record Format.
touch /etc/resolv.conf
The presence of this file indicates that the host should use a name server, not the /etc/hosts file, for name resolution. Optionally, you can want to enter records to specify the name, domain, and address of the name server.
#start /etc/named "$src_running"
This initializes the daemon with each system startup.
startsrc -s named
To configure a hint, or cache-only, name server, use the Web-based System Manager, wsm, or use the following procedure, which edits a series of files and then uses SMIT or the command line to start the named daemon.
Configure a hint name server according to the following steps:
zone "0.0.127.in-addr.arpa" IN {
    type master;
    file "/etc/named.local";
};
zone "." IN {
    type hint;
    file "/etc/named.ca";
};
This file contains the addresses of the servers that are authoritative name servers for the root domain of the network. For example:
; root name servers.
         1          IN    NS    relay.century.com.
relay.century.com.   3600000    IN    A     129.114.1.2
Note: All lines in this file must be in Standard Resource Record Format.
@ IN SOA venus.abc.aus.cntry.com. gail.zeus.abc.aus.cntry.com.
(
                           1.1     ;serial
                           3600    ;refresh
                           600     ;retry
                           3600000 ;expire
                           86400)  ;minimum
IN NS venus.abc.aus.century.com.
1 IN PTR localhost.
Note: All lines in this file must be in Standard Resource Record Format.
touch /etc/resolv.conf
The presence of this file indicates that the host should use a name server, not the /etc/hosts file, for name resolution. You might want to enter records to specify the name, domain, and address of the name server.
#start /etc/named "$src_running"
This initializes the daemon with each system startup.
startsrc -s named
Configuring a domain mail server provides users external to your organization a simple method for addressing mail to your users. That is, without a domain mail server, the mail address must specify a particular host in your organization. For example sam@orange.widget.com, where widget.com is your organization's domain name, and orange is the host that sam uses. But with a domain mail server, users outside your organization can simply specify the user name and domain name, without having to know which host the user uses, for example, sam@widget.com.
To configure a domain mail server, use the Web-based System Manager, wsm, or use one of the following procedures.
widget.com           IN    MX     10 black.widget.com
widget.com           IN     A     192.10.143.9
black.widget.com     IN     A     192.10.143.9
Cw $w $?D$w.$D$. widget.com
DRblack.widget.com
sam:sam@orange.widget.com
david:david@green.widget.com
judy:judy@red.widget.com
Note: Mailbox (MB) records can serve the same function.
There are other methods to configure a domain mail server. The following procedures use mailbox (MB), mail rename (MR), and mail group (MG) records.
sam IN MB orange.widget.com.
to the /etc/named.data file on host brown.widget.com. These entries identify to the mail server black.widget.com where to send mail for each user in the domain.
sammy IN MR sam
This record causes all mail addressed to sammy to be delivered to sam. Each MR record should be entered on a line by itself.
users IN HINFO users-request widget.com
users IN MG sam
users IN MG david
users IN MG judy
This example causes all mail addressed to users@widget.com to be delivered to sam, david, and judy. Enter each MG record on a line by itself.
Note: Users sam, david, and judy must have MB records defined.
purple.widget.com IN MX 0 post.office.widget.
You must specify both host and machine names when using MX records. Enter each MG record on a line by itself. You can use wildcards, for example:
*.widget.com IN MX 0 post.office.widget.
This example causes mail to an unknown host (a host without an explicit MX record) in the widget.com domain to be forwarded to post.office.widget.
Note: Wildcard MX records are not appropriate for use on the Internet.
To configure a forwarder server, use the Web-based System Manager, wsm, or use the following procedure, which edits a series of files and then uses SMIT or the command line to start the named daemon.
options {
    ...
    forwarders { 192.100.61.1; 129.35.128.222; };
    ...
};
zone "." IN {
    type hint;
    file "/etc/named.ca";
};
This file contains the addresses of the servers that are authoritative name servers for the root domain of the network. For example:
; root name servers.
         1          IN    NS    relay.century.com.
relay.century.com.   3600000    IN    A     129.114.1.2
Note: All lines in this file must be in Standard Resource Record Format.
@ IN SOA venus.abc.aus.cntry.com. gail.zeus.abc.aus.cntry.com.
(
                           1.1     ;serial
                           3600    ;refresh
                           600     ;retry
                           3600000 ;expire
                           86400)  ;minimum
IN NS venus.abc.aus.century.com.
1 IN PTR localhost.
Note: All lines in this file must be in Standard Resource Record Format.
touch /etc/resolv.conf
The presence of this file indicates that the host should use a name server, not the /etc/hosts file, for name resolution.
Alternatively, the /etc/resolv.conf file might contain the following entry:
nameserver 127.0.0.1
The 127.0.0.1 address is the loopback address, which causes the host to access itself as the name server. The /etc/resolv.conf file may also contain an entry like the following:
domain domainname
In the previous example, the domainname value is austin.century.com.
#start /etc/named "$src_running"
This initializes the daemon with each system startup.
startsrc -s named
To configure a forward only name server, use the Web-based System Manager, wsm, or use the following procedure, which edits a series of files and then uses SMIT or the command line to start the named daemon.
Note: You can achieve a similar configuration without running a forward only name server. Instead, create an /etc/resolv.conf file that contains name server lines that point to the forwarders you wish to use.
options {
    ...
    forwarders { 192.100.61.1;  129.35.128.222; };
    forward only;
    ...
};
; root name servers.
         1          IN    NS    relay.century.com.
relay.century.com.   3600000    IN    A     129.114.1.2
Note: All lines in this file must be in Standard Resource Record Format.
@ IN SOA venus.abc.aus.cntry.com. gail.zeus.abc.aus.cntry.com.
(
                           1.1     ;serial
                           3600    ;refresh
                           600     ;retry
                           3600000 ;expire
                           86400)  ;minimum
IN NS venus.abc.aus.century.com.
1 IN PTR localhost.
Note: All lines in this file must be in Standard Resource Record Format.
touch /etc/resolv.conf
The presence of this file indicates that the host should use a name server, not the /etc/hosts file, for name resolution.
Alternatively, the /etc/resolv.conf file might contain the following entry:
nameserver 127.0.0.1
The 127.0.0.1 address is the loopback address, which causes the host to access itself as the name server. The /etc/resolv.conf file can also contain an entry such as:
domain domainname
In the previous example, the domainname value is austin.century.com.
#start /etc/named "$src_running"
This initializes the daemon with each system startup.
startsrc -s named
To configure a host to use a name server, use the Web-based System Manager, wsm, or use the following procedure.
host hostname
Use the name of a host that should be resolved by the name server to see if the process is working. The output you receive should appear similar to the following:
brown.abc.aus.century.com is 129.35.145.95
Other configuration tasks are shown in the following table.
| Configuring a Host to Use Name Server Tasks | |||
|---|---|---|---|
| Task | SMIT Fast Path | Command or File | Web-based System Manager Management Environment |
| Create an /etc/resolv.conf File | smit stnamerslv2 | create and edit /etc/resolv.conf1 |
|
| List All the Name Servers Used by a Host | smit lsnamerslv | view /etc/resolv.conf | Software --> Network --> TCPIP (IPv4 and IPv6) --> TCPIP Protocol Configuration --> TCP/IP --> Configure TCP/IP --> Advanced Methods --> Hosts File --> Contents of /etc/hosts file. |
| Add a Name Server | smit mknamerslv | edit /etc/resolv.conf2 | Software --> Network --> TCPIP (IPv4 and IPv6) --> TCPIP Protocol Configuration --> TCP/IP --> Configure TCP/IP --> Advanced Methods --> DNS. In the Name Server IP Address field, type the IP Address. Click Add --> OK. |
| Remove a Name Server | smit rmnamerslv | edit /etc/resolv.conf | Software --> Network --> TCPIP (IPv4 and IPv6) --> TCPIP Protocol Configuration --> TCP/IP --> Configure TCP/IP --> Advanced Methods --> DNS. Select a name server in Name server to search. Click Delete --> OK. |
| Start/Restart Using Domain Name Resolution | smit stnamerslv |
| Software --> Network --> TCPIP (IPv4 and IPv6) --> TCPIP Protocol Configuration --> TCP/IP --> Configure TCP/IP --> Advanced Methods --> DNS. Select the Enable domain name resolution using Domain Name Service (DNS) check box. Click OK. |
| Stop Using Domain Name Resolution | smit spnamerslv |
| Software --> Network --> TCPIP (IPv4 and IPv6) --> TCPIP Protocol Configuration --> TCP/IP --> Configure TCP/IP --> Advanced Methods --> DNS. Clear the Enable domain name resolution using Domain Name Service (DNS) check box. Click OK. |
| Change/Show the Domain | smit mkdomain | edit /etc/resolv.conf | Software --> Network --> TCPIP (IPv4 and IPv6) --> TCPIP Protocol Configuration --> TCP/IP --> Configure TCP/IP --> Advanced Methods --> DNS. --> Domain name to search. Click Add --> OK. |
| Remove the Domain | smit rmdomain | edit /etc/resolv.conf | Software --> Network --> TCPIP (IPv4 and IPv6) --> TCPIP Protocol Configuration --> TCP/IP --> Configure TCP/IP --> Advanced Methods --> DNS. Select a domain in the Domain search list. Click Delete --> OK. |
Notes:
- On the first line of the /etc/resolv.conf file, type the word domain followed by the full name of the domain that this host is in. For example:
domain abc.aus.century.com- On any blank line below the domain line, type the word nameserver, followed by at least one space, followed by the dotted decimal Internet address of the name server that this host is to use (the name server must serve the domain indicated by the domain statement). You can have up to 16 name server entries. For example, your /etc/resolv.conf file might contain the entries:
nameserver 192.9.201.1
nameserver 192.9.201.2
The system queries the name servers in the order listed.
The named command allows for dynamic updates. The named database and configuration files need to be configured to allow for client machines to issue updates. A zone can be set to dynamic or static. The default zone is static.
To make a zone dynamic, you must add the keyword allow-update to that zone's stanza in the /etc/named.conf file. The allow-update keyword specifies an Internet address match list that defines hosts allowed to submit updates. See the named.conf File Format for TCP/IP in the AIX 5L Version 5.1 Files Reference for more information and a detailed example of a conf file. In the following example, all hosts are allowed to update the dynamic zone:
zone "aoot.austin.ibm.com" IN {
    type master;
    file "named.data";
    allow-update { any; };
};
After a zone is marked dynamic, three modes of security can be
initiated:
| Unsecured | Allows anyone at anytime to update any information in the zone.
Attention: Use of this mode is not recommended. It can lead to data loss, data interception, and user frustration. At the least, an unsecured zone should be limited to updates only from specific Internet addresses. |
| Controlled | Allows for the creation of new information and the replacement of existing information. This is probably the easiest mode to use for a secure transition environment. This mode also requires that all incoming updates be timestamped and have keyed signatures. |
| Presecured | Requires all updates to existing information be replaced with similar information. This mode also requires that all incoming updates be timestamped and have keyed signatures. |
A dynamic zone defaults to unsecured mode. To use one of the other modes, type controlled or presecured after the keyword update-security in the zone stanza of the /etc/named.conf file. This tells the named server the level of security to use with that zone. For example:
zone "aoot.austin.ibm.com" IN {
    type master;
    file "named.boot";
    allow-update { any; };
    update-security controlled;
};
After a mode is selected, the actual data files must be modified for your level of security. In unsecured mode, the data files are used "as is." For controlled or presecured mode, you must generate a set of master server/hostname key pairs for each name in the zone. This is done with the nsupdate command using the -g option. This command generates the key pair (a private and a public key). These keys are needed to authentically sign for updates. After generating all the keys for your list of zone names, you need to add them to the data file. The KEY format is as follows:
Index ttl Class Type KeyFlags Protocol Algorithm KeyData
where:
| Index | Specifies the name used to reference the data in the zone. |
| ttl | Specifies the time-to-live (TTL) for this data. This is an optional field. |
| Class | Specifies the class of the data. This is dependent on the zone, but usually it is IN. |
| Type | Indicates the type of the record. In this case, it is KEY. |
| KeyFlags | Gives named information about the key. 0x0000 defines the typical key record used for a host. 0x0100 defines the key record associated with the zone name. |
| Protocol | Specifies the protocol to use. Currently, there is only one, 0. |
| Algorithm | Specifies the algorithm of the key. Currently, there is only one, 1. This is the MD5 Private/Public authentication method. |
| KeyData | Indicates the key in base64 representation. The nsupdate command generates both the public and private keys in base64 representation. The public key is listed last in the output file. |
To ensure security over a host name in a dynamic zone, a line similar to the following needs to be added to the zone file for the zone containing the hostname.
bears 4660 IN KEY 0x0000 0 1 AQOtg......
The above example indicates that bears has a KEY record defined. Someone wanting to update bears would have to sign his update with the private key matching the public key in the database. For the nsupdate command to succeed, the private key needs to be placed on the client in a keyfile (defaults to /etc/keyfile). It should follow the format:
hostname mastername base64 key
A similar KEY entry is required in the zone definition section. A zone key is required for both presecured and controlled modes or the mode is considered to be unsecured. This can be done as shown in the previous bears example, but the private key is left for the administrator to use with the nsupdate command's administrative mode.
To generate a key pair using the nsupdate command, type:
nsupdate -g -h ZoneName -p ServerName -k AdminKeyFile
This generates a key for the zone. Place the last key of the pair in the beginning section for the zone as follows:
IN KEY 0x0100 0 1 Key
The zone is ready to be loaded. The administrator should use the zone key to apply updates and maintenance operations on the zone.
The Lightweight Directory Access Protocol (LDAP) is an open industry standard that defines a method for accessing and updating information in a directory. An LDAP schema defines the rules for ordering data. The ibm-HostTable object class, part of the IBM SecureWay Directory schema, can be used to store the name-to-Internet-address mapping information for every host on the network.
The ibm-HostTable object class is defined as follows:
Object Class name:     ibm-HostTable
Description:           Host Table entry which has a collection of hostname to
                       IP address mappings.
OID:                   TBD
RDN:                   ipAddress
Superior object class: top
Required Attributes:   host, ipAddress
Optional Attributes:   ibm-hostAlias, ipAddressType, description
The attribute definitions follow:
Attribute Name: ipAddress
Description:    IP Address of the hostname in the Host Table
OID:            TBD
Syntax:         caseIgnoreString
Length:         256
Single Valued:  Yes
Attribute Name: ibm-hostAlias
Description:    Alias of the hostname in the Host Table
OID:            TBD
Syntax:         caseIgnoreString
Length:         256
Single Valued:  Multi-valued
Attribute Name: ipAddressType
Description:    Address Family of the IP Address (1=IPv4, 2=IPv6)
OID:            TBD
Syntax:         Integer
Length:         11
Single Valued:  Yes
Attribute Name: host
Description:    The hostname of a computer system.
OID:            1.13.18.0.2.4.486
Syntax:         caseIgnoreString
Length:         256
Single Valued:  Multi-valued
Attribute Name: description
Description:    Comments that provide a description of a directory object entry.
OID:            2.5.4.13
Syntax:         caseIgnoreString
Length:         1024
Single Valued:  Multi-valued
Use the following procedure to configure the LDAP server to store the name-to-Internet-address mapping host information.
dn: cn=hosts
objectclass: top
objectclass: container
cn: hosts
dn: ipAddress=1.1.1.1, cn=hosts
host: test
ipAddress: 1.1.1.1
objectclass: ibm-HostTable
ipAddressType: 1
ibm-hostAlias: e-test
ibm-hostAlias: test.austin.ibm.com
description: first ethernet interface
dn: ipAddress=fe80::dead, cn=hosts
host: test
ipAddress: fe80::dead
objectclass: ibm-HostTable
ipAddressType: 2
ibm-hostAlias: test-ll
ibm-hostAlias: test-ll.austin.ibm.com
description: v6 link level interface
To configure the client to access the hosts database on the LDAP server, use the following procedure: