Before starting the font utility, ensure you are running under the AIXwindows environment.
Note: Many users often change certain visual aspects of an interface in order to suit their individual needs and taste. However, when using the fontutil utility users must not change, edit, or delete the Fontutil resource file. For example, attempting to customize the font of this interface may cause serious problems with the display of menu messages. Therefore, users must not delete the /usr/lib/X11/fonts/6x13.snf file or change the line defining the fixed font in the /usr/lib/X11/fonts/fonts.alias file. If any changes are made to the Fontutil resource file, the font utility program becomes corrupted or does not run at all.
To use the font utility perform the following steps:
To begin the font utility, enter the start-up command as follows:
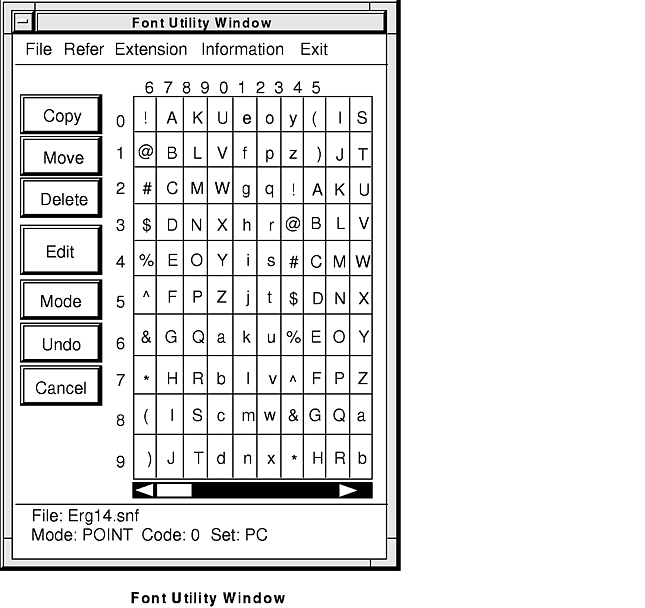
After entering the start-up command, the Font Utility window appears. See the figure for an illustration of the Font Utility window.
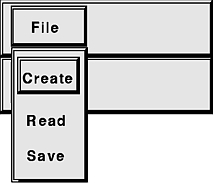
Select the File option from the Font Utility window menu bar. See the figure for an illustration of the suboptions available under the File option. Choose either to create a font file or to read a font file.
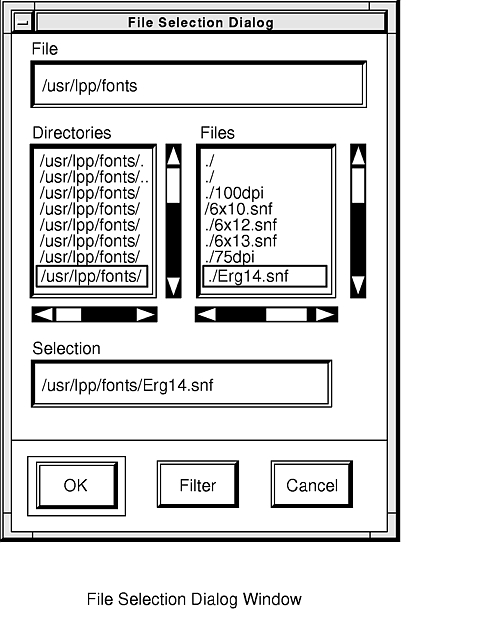
If you choose to create a font file, the File Selection Dialog window pops up. See the figure for an illustration of the File Selection Dialog window. Specify a font file from which to copy header information, then click on OK or press the Enter key. To return to the Font Utility window, select Cancel.
Note: On starting the font utility, you must enter a path name or directory where font files can be found. Enter this path name in the File Filter box in the File Selection Dialog window. Two such path names are /usr/lib/X11/fonts and /usr/lpp/fonts. The following are examples of files within these directories that you can use to create a new font file: Bld*.snf, Erg*.snf, Itl*.snf, and Rom*.snf.
If you click on OK, the Header Information window pops up for your file type. Verify the header information and click on OK or press the Enter key. To return to the File Selection Dialog window, click on Cancel.
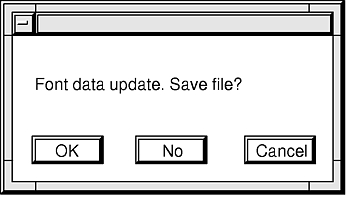
If you choose to create a new file but have made changes to another file that you have not saved, a window is displayed that prompts whether to save the updated file. Choose OK to update the file, No to close the file and lose your current work, or Cancel to return to the Font Utility window. See the figure for an illustration of the window that reminds you to save an updated file.
If you select OK, the File Selection Dialog window appears. See the figure for an illustration of the File Selection Dialog window.
Enter the name of the file to be saved in the Selection box. (To save a font file, one of the following file name extensions must be used: .snf, .bdf, .sym, .xgsl.) Then click on OK or press the Enter key. To return to the Font Utility window, select Cancel.
If you select OK, the Header Information window pops up for your file type. Verify the header information and click on OK or press the Enter key. To return to the File Selection Dialog window, click on Cancel.
If you choose to read a font file, the File Selection Dialog window is displayed. See the figure for an illustration of the File Selection Dialog window that is displayed.
Choose a file name from the list in the Files box. Then click on OK or press the Enter key. To return to the Font Utility window, select Cancel. If you select OK, the Header Information window is displayed for your file type. Verify the header information and click on OK or press the Enter key. To return to the File Selection Dialog window, click on Cancel.
If you choose to read a font file but have made changes to another file that you have not saved, a window is displayed that prompts whether to save the updated file. The utility never allows you to open or edit more than one font file at the same time.
The following file name extensions determine which font editor is used:
| .snf | Determines that the raster editor is used. |
| .bdf | Determines that the raster editor is used. |
| .sym | Determines that the vector editor is used. |
| .xgsl | Determines that the vector editor is used. |
When you create or read a file, a window pops up to display the header information for the font file you selected in the File Selection Dialog window. Do not make any changes to the information listed in the Header Information window; only verify that you chose the type of file you need. If you make an incorrect choice, you can cancel the verification and choose another font file or you can convert the font format.
If you want to change the header information on your new or existing file, make those changes by selecting the Format suboption from the Extension option in the Font Utility window. See the figure for an illustration of the suboptions available under the Extension option.
Use the raster or vector editor to edit and save your image. See "Using the Raster Editor Window" and "Using the Vector Editor Window" for more information.
From the Font Utility window menu bar, select the File option and choose the Save suboption.
Note: To save a file, you must use one of the following file name extensions: .snf, .bdf, .sym, .xgsl.
From the Font Utility window menu bar, select the Exit option. Select the Exit suboption to leave the font utility. If you made changes and did not save the file, the utility gives you the option to save the file.