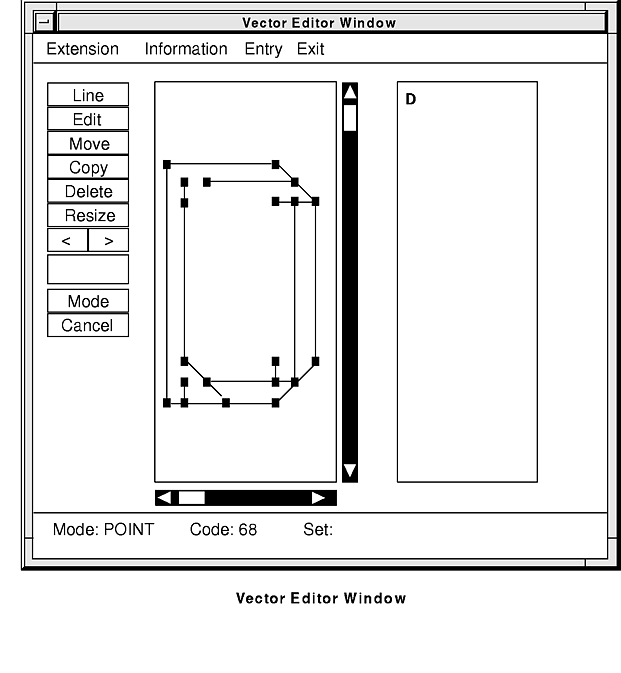
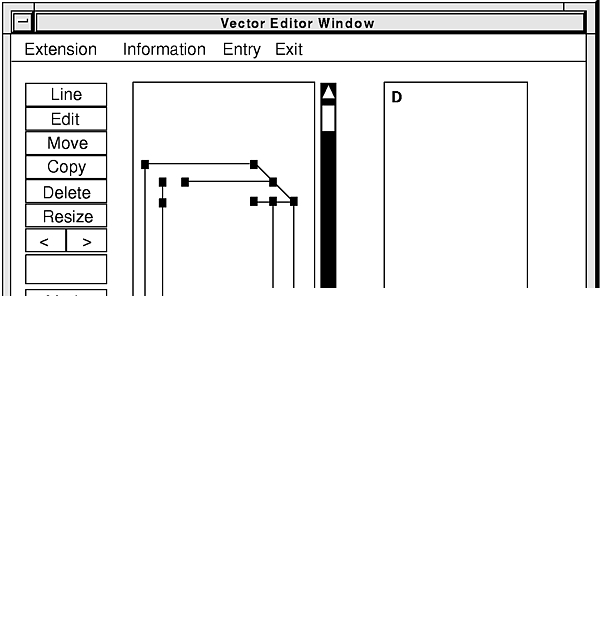
The Vector Editor window is the window for editing character images with the vector editor. The vector editor is called by the font utility to edit characters within font files that have a suffix of .sym or .xgsl (are set to graPHIGS_FORMAT or XGSL_FORMAT).
When you select the Edit function and a character from the display area in the Font Utility window (and are working with a vector font file), the Vector Editor window is displayed. See the following figure for an illustration of the Vector Editor window. Read the following to learn more about the Vector Editor window and the four main areas found within.
The menu bar appears across the top of the window. The menu options are (left to right) Extension, Information, Entry, and Exit.
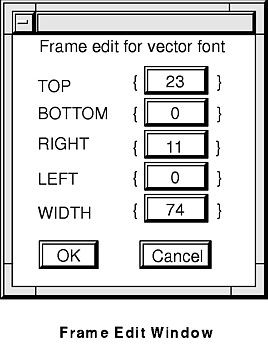
The Extension option has one suboption, Frame Edit. The Frame Edit suboption changes the frame information for the character in the editing area. See the figure for an illustration of the Frame Edit window.
The TOP, Bottom, Right, Left, and WIDTH of the frame can be changed. Click on the item that you wish to change, and enter the new value. Then click on OK or press the Enter key. The editing area will be changed accordingly. To return to the Vector Editor window without making changes, click on Cancel.
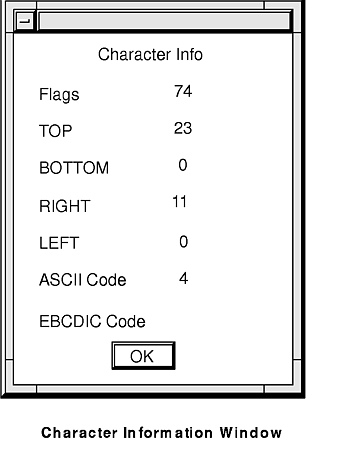
Click on the Information option to view the character information of the character image displayed in the editing area. See the figure for an illustration of the window that displays character information. The FLAGS, TOP, BOTTOM, RIGHT, LEFT, ASCII Code, and EBCDIC Code fields are shown.
The Entry option has one suboption, Image Entry.
The Image Entry suboption saves the image of the character in the editing area to the Font Utility window. See the figure for an illustration of the first window that is displayed when you select Image Entry.
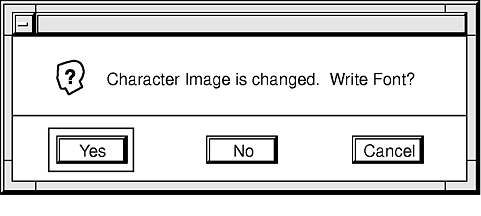
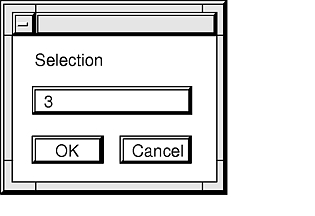
The code of the character image displayed in the editing area automatically appears in the Selection box when the window is displayed. Enter the code that appears in the Selection box by clicking OK or pressing the Enter key. To cancel the function and return to the Vector Editor window, click on Cancel. If you enter the code, a window is displayed that prompts whether the character data for the character you are saving has changed. See the figure for an illustration of the second window that is displayed when you select Image Entry.
Select Yes to save the edited version of the character image, or select No to save the image in its original form.
The Exit option has two suboptions: Exit and Cancel.
The Exit suboption exits the vector editor. If you have changed the character image displayed in the editing area and have not saved it, a window pops up that allows you to save your work. See the figure for an illustration of the window that allows you to save an altered character image.
Select Yes to save your changes, No to close the Vector Editor window and lose your current work, or Cancel to return to the Vector Editor window. If you select Yes, a window is displayed in which you specify the code of the altered character image. See the figure for an illustration of this window.
The code of the character image displayed in the editing area automatically appears in the Selection box when the window is displayed. Enter the code that appears in the Selection box by clicking OK or pressing the Enter key. To cancel the function and return to the Vector Editor window, click on Cancel.
The control panel runs down the left side of the window and has several functions, displayed in the following order:
The Line function forms or edits a straight line in the editing area. The mouse functions as follows:
The Move function moves the specified area within the editing area. What is moved depends on the mode that is set. If the Mode option is set to AREA, select the area you want to move by holding down the left mouse button and moving the mouse so the area is enclosed in the box that is displayed. Once the area you want to move is enclosed, release the left mouse button, and then click it one more time. The lines in the area selected now move as you move the mouse. Click the left mouse button when the lines are in the position you want. If the Mode option is set to POINT, click on any single end point and move the mouse to reposition the end point. Click the left mouse button when the end point is positioned where you want it.
The Copy function copies the specified area within the editing area. What is copied depends on the mode that is set. If the Mode option is set to AREA, select the area you want to copy by holding down the left mouse button and moving the mouse so the area is enclosed in the box that is displayed. Once the area you want to copy is enclosed, release the left mouse button and click it one more time. The lines in the area selected are now copied and move as you move the mouse. Click the left mouse button when the lines are in the position you want. You can copy individual lines by setting the Mode option to POINT and clicking on the middle of any line with the left mouse button. The line is copied and you can position it by clicking the left mouse button.
The Delete function removes specified lines from the editing area. What is removed depends on the mode that is set. If the Mode option is set to AREA, select the area you want to delete by holding down the left mouse button and moving the mouse so the area is enclosed in the box that is displayed. Once the area you want to delete is enclosed, release the left mouse button and click it one more time. The lines in the area selected are deleted. If the Mode option is set to POINT, click on any end point in the screen of the editing area with the left mouse button and that endpoint is deleted. If the Mode option is set to TOTAL AREA, click in the editing buffer area with the left mouse button and the lines there (as well as in the editing area) are deleted.
The Resize function allows you to reduce or enlarge specified lines in the editing area. Set the Mode option to AREA, and select the area you want to resize by holding down the left mouse button and moving the mouse so the area is enclosed in the box that is displayed. Once the area you want to resize is enclosed, release the left mouse button and click it one more time. The lines in the area selected now become smaller or larger (depending on the starting point you select) as you move the mouse. When the lines are the size you want, click the left mouse button to set them at that size.
The < (previous code) function retrieves the previous code of the font you are editing. That is, each time you click on the < (less than sign) with the left mouse button, the character that precedes the one you are editing is displayed in the editing area. This function allows you to continue editing character images within the same font file without having to return to the Font Utility window to select each character individually.
If you have changed the displayed character image and do not perform an Image Entry before you select the < (previous code) function, a window is displayed that informs you the character image has been changed and prompts whether you want to save it. See the figure for an illustration of this window.
If you select No, the displayed character is not saved and the image changes to its original design. If you select Yes, another window is displayed that prompts you to specify the code for the character image. Once the code is specified and you verify that the character data has changed, the edited version of the character image is saved.
The > (forward code) function retrieves the forward code of the font you are editing. That is, each time you click on the > (greater than sign) with the left mouse button, the character that follows the one you are editing is displayed in the editing area. This function allows you to continue editing character images within the same font file without having to return to the Font Utility window to select each character individually.
If you have changed the displayed character image and do not perform an Image Entry before you select the > (forward code) function, a window is displayed that informs you the character image has been changed and prompts whether you want to save it. See the figure for an illustration of this window.
If you select No, the displayed character is not saved and the image changes to its original design. If you select Yes, another window is displayed that prompts you to specify the code for the character image. Once the code is specified and you verify that the character data has changed, the edited version of the character image is saved.
The Mode option changes the mode. The mode that is set determines how the other functions operate. Three values can be set: POINT, AREA, or TOTAL AREA. You can switch among these three modes by clicking through the selections with the left mouse button. Each time you click, the next mode is displayed. After the TOTAL AREA mode, the selection goes back to POINT mode.
The Undo function undoes the last function selected (for example, Copy or Move). This option is available only when the last command entered has completed.
The Cancel function cancels the currently running command.
This area is a coordinate grid in the center of the window. End points can appear on or off each coordinate. The editing area has two scroll bars, moving buttons (located at either end of the scroll bars), a cap line, a base line, and a center line. See the figure for an illustration of the Vector Editor window and its editing area.
To the right of the editing area is the editing buffer area. The editing buffer area provides extra space in which to create and edit character images and displays the actual size of character images. The editing buffer area contains a character box. The area that is enclosed in the character box is the same area that appears in the editing area.
Use the scroll bars surrounding the editing area to move the character box in the editing buffer. You can also move the character box, and thus change the focus of the editing area, by clicking on the top left corner of the box with the left mouse button. Now you can position the character box anywhere within the editing buffer area by clicking the left mouse button. After positioning the character box with either method, you can return to the editing area and create or edit a new character.
The moving buttons move the focus of the editing area in single increments to the right or left, or up or down. This becomes important when editing characters that may be too large to be displayed (in their entirety) within the screen limitations of the editing area. The base line, cap line, and center line are parameters for graPHIGS API character images.
The message area appears across the bottom of the screen and has two lines. The top line lists the current mode, code, and set. The bottom line displays any current messages.