The Basic Network Utilities (BNU) is a group of programs, directories, and files that can be used to communicate with any UNIX system on which a version of the Unix-to-Unix Copy Program (UUCP) is running.
Note: To use baud rates higher than 38400, specify a baud rate of 50 in the /etc/uucp/Devices file for the desired tty, then change the SMIT configuration for that tty to reflect the actual baud rate desired.For example. to run the cu command on tty0 with a baud rate of 115200, use the following procedure:
- Ensure the hardware supports the baud rate.
- Edit /etc/uucp/Devices to include the following line:
Direct tty0 - 50 direct- Enter the smit chtty fast path.
- Select tty0.
- Change the baud rate to 115200.
- Exit SMIT.
The following sections contain information about BNU:
Before users on the system can run BNU programs, BNU must be installed and configured.
BNU is controlled by a set of configuration files that determine whether remote systems can log in to the local system and what they can do after they log in. These configuration files must be set up according to the requirements and resources of each system.
BNU must also be maintained. To maintain BNU, users must read and remove log files periodically and check the BNU queues to ensure jobs are transferring to remote systems properly. Users must also periodically update the configuration files to reflect changes in the system or remote systems.
BNU establishes communications between computer systems on local and remote networks and is on of the Extended Services programs that can be installed with the AIX base operating system.
BNU is a version of UUCP, which was developed by AT&T and modified as part of the Berkeley Software Distribution (BSD).
BNU provides commands, processes, and a supporting database for connections to local and remote systems. Communication networks such as token-ring and Ethernet are used to connect systems on local networks. A local network can be connected to a remote system by hardwire or a telephone (modem) configuration. Commands and files can then be exchanged between the local network and the remote system.
BNU uses a set of hardware connections and software programs to communicate between systems. A structure of directories and files tracks BNU activities. This structure includes a set of public directories, a group of administrative directories and files, configuration files, and lock files. Most of the directories for BNU are created during the installation process. Some of the administrative directories and files are created by various BNU programs.
With the exception of the remote login commands, BNU works as a batch system. When a user requests a job sent to a remote system, BNU stores the information needed to complete the job. This is known as queuing the job. At scheduled times, or when a user instructs it to do so, BNU contacts various remote systems, transfers queued work, and accepts jobs. These transfers are controlled by the configuration files on each system and those of the remote system.
All BNU commands, except uucpadm, are available for National Language Support (NLS). User names need not be in ASCII characters. However, all system names must be in ASCII characters. If a user attempts to schedule a transfer or a remote command execution involving non-ASCII system names BNU returns an error message.
BNU uses a structure of directories and files to keep track of their activities. This structure includes:
Most of the directories for BNU are created during the installation process. Some of the administrative directories and files are created by various BNU programs as they run.
The BNU public directory, /var/spool/uucppublic, stores files that have been transferred to the local system from other systems. The files wait in the public directory until users claim them with the uupick command. The public directory is created when BNU is installed. Within the public directory, BNU creates a subdirectory for each remote system that sends files to the local system.
The BNU configuration files, also known as the BNU supporting database, reside in the /etc/uucp directory. The files must be configured specifically for your system. They are owned by the UUCP login ID and can be edited only with root authority. The configuration files contain information about:
Some configuration files also specify limits on BNU activities which prevents the local host from becoming overloaded. The BNU configuration files include:
| Devices | Contains information about available devices, including both modems and direct connections. |
| Dialcodes | Contains dialing code abbreviations, which allow the user to shorten phone numbers in the Systems file. |
| Dialers | Specifies calling command syntax for a specific modem type (dialer). |
| Maxuuscheds | Limits simultaneous scheduled jobs. |
| Maxuuxqts | Limits simultaneous remote command executions. |
| Permissions | Contains access permission codes. This file is the primary file for determining the security for BNU. |
| Poll | Specifies when the BNU program should poll remote systems to initiate tasks. |
| Systems | Lists accessible remote systems and information needed to contact them, including the device to use and the user name and password combinations the user needs to log in. Also specifies the times when the systems can be contacted. |
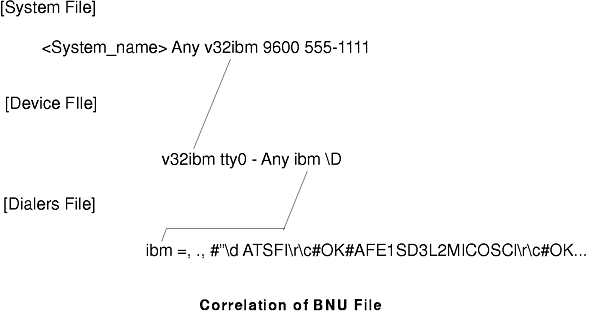
The configuration files cross-reference each other when BNU is in use (see the following figure). For example the:
Entries in the BNU configuration files depend on the types of connections between the user's host system and each remote system. For example, special entries must be made if TCP/IP or direct connections are used to contact other systems. If modems are used to contact other systems, the modems must be defined in the Dialers file.
The Systems, Devices, and Permissions files must be configured on the user's host system before they can contact remote systems using BNU. Other configuration files enable the user to use BNU capabilities, such as automatic polling. Many of the configuration files must be modified periodically to reflect changes to the user's host or remote systems.
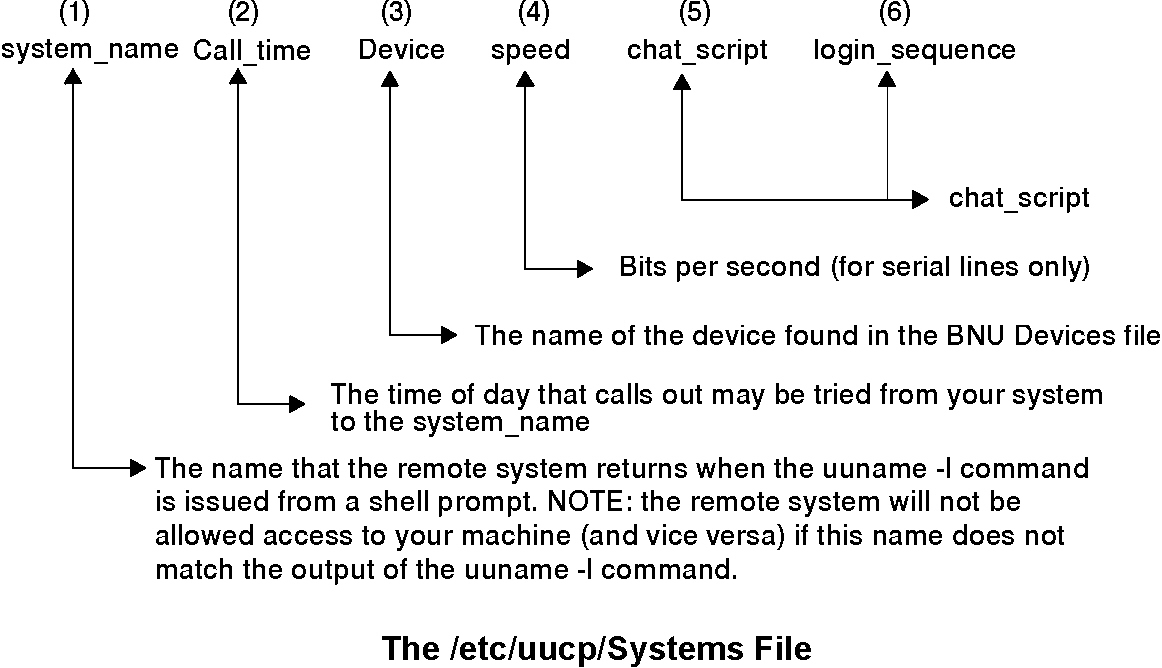
The /etc/uucp/Systems file contains the primary information that is used by the uucico program to connect to the various systems. Users should consider this file the database of systems where their machine can connect. The following figure shows the Systems file entries and format.
When uucico calls the remote system, it will actually login (like any other user) into a special user account that will invoke as its login shell. When the remote system invokes its login shell, it will present its uuname (see the uuname command) to the system calling in.
That uuname must match the name in the Systems file of the host calling in. If they do not match, the system calling in will report a WRONG MACHINE NAME message and the call will fail.
in:--in: username word: password
If I don't get this within my default time out period, send the characters between the dashes (-) plus a carriage return and then wait for in: again. In the following example, wait for in: . If we don't see it, send hello and wait for howdy: in response:
in:-hello-howdy:
The next part of the chat sequence is the username of the remote site's UUCP account. This can be any login account the remote system administrator wants to set up to do UUCP, but the default program that it calls MUST be /usr/sbin/uucp/uucico.
Some sites accomplish this by creating a normal user and making the first line of the user's .profile call uucico, but it is not recommended. The default directory of this user is usually /usr/spool/uucppublic but it is not a requirement.
The next part of the chat sequence is word: which is the last five characters of the password: prompt. If the remote system were to say Enter your secret code: instead of prompting for the password: , this entry would be code: in the chat sequence.
The last entry in the chat sequence is usually the actual password of the account you will be using for UUCP on the remote system. This entry should result in a completed login and direct access to the uucico program. Some systems have two (or more) passwords per account, so the user would simply add more expect - send entries onto the chat sequence to show this.
Refer to "Security and the Systems and remote.unknown Files" for more information on the Systems file.
Note: For quickest setup, it is probably easiest to copy the existing sample entry in the Systems file, and replace the system name, phone number, and account specific information (login name and password) from this default entry.
The /usr/lib/uucp/Permissions file is used to create security control over machines attempting to communicate with the local host. This file has two distinct entries each of which does a different job. It should be noted that although the entries appear together in the file, they are not related to one another.
The first entry in the Permissions file is the MACHINE= entry. This entry is used to establish the base permissions for a given sitename as shown in the following figure.
Several system names may be separated by colons (:) on one entry (all systems entered this way will have the same permissions, as dictated by the rest of the entry's fields).
An answer of yes means that remote users may spool up jobs for this system, and request files be transferred to and from this system. For added security, it is recommended that REQUEST=no be used so that only this machine can initiate job requests.
Note: Giving the remote system read access to the root directory (/) will allow it to read only those directories accessible to the UUCP account.
If the intention is to restrict access to only the uucppublic directory and the tmp directory, the READ= field would resemble the following:
READ=/var/spool/uucppublic:/tmp
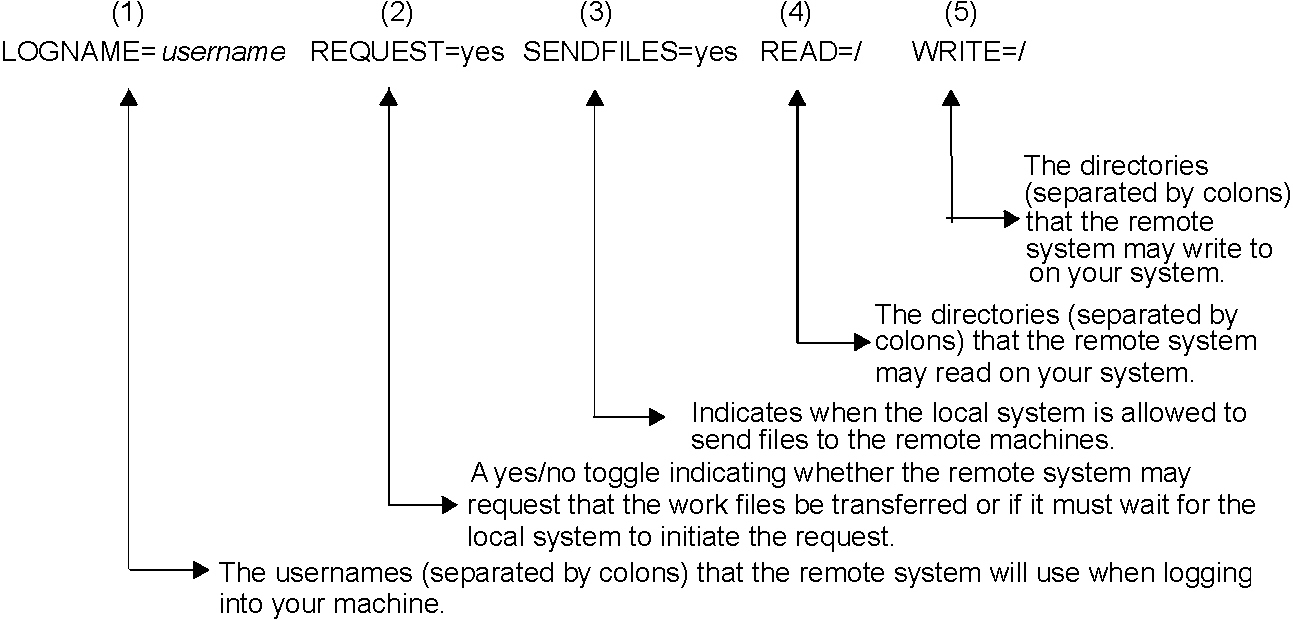
The second line type in the Permissions file is used to establish the permissions for the login account that the remote system is using. Several of the fields for this line are the same as the MACHINE= fields of the same name.
The primary difference is that these entries are specific to the login account that the remote system is using, while the MACHINE= fields are specific to the remote system's uuname. This field is the LOGNAME= entry and it has the format as shown in the following figure.
When the field is set to call, the local system may only send files or jobs when the local system initiates the call.
In other words with SENDFILES= set to call this system can only receive files when the remote machine calls in. With this setting the local system can send and receive files only when it initiates the call to the remote machine.
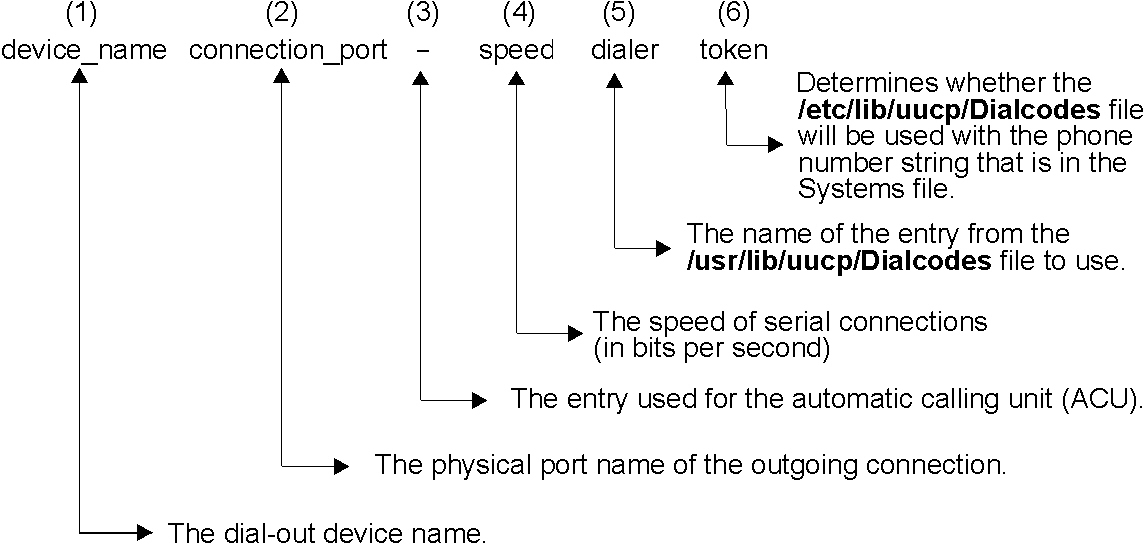
The /etc/uucp/Devices file is used by several programs (including uucico) to determine which device on the system to use for a given connection attempt. For example, the cu program uses entries in this file for Direct access to the tty port, Serial Line Internet Protocol (SLIP) uses the Devices file for determining access to tty's for TCP/IP connections over serial line, and ECS (the IBMLINK connection facility) uses the Devices file to make modem connections to IBMLINK.
The basic purpose of the Devices file is to define the device type, location, speed, and other communication parameters necessary for the dial-out programs (it is only used for dial-out connections). The following figure shows the Devices file format.
By standardization the device_name ACU is used for modem dial-out connections. The name ACU stands for Automatic Calling Unit. An ACU device used to be required for autodialing the telephone numbers for modems. The device would be attached to a second line and would dial the phone for the modem, and then attach the telephone line to the modem for communication with the remote modem/system.
hayes, penril, ventel, rixon, vadic, micom, TCP, and direct
Each dialer specifies a different command set to use when attempting to dial the modem. Although several dialers are listed, the most commonly used entries are: hayes, direct, and TCP.
The default hayes entry, shown below, seems cryptic at first, but it can easily be translated using the information provided.
hayes =,-, "" \dAT\r\c OK \pATDT\T\r\c CONNECT
Escape Characters for the UUCP Dialers File
System administrators who are familiar with modem configuration could use these escape characters to build a command string capable of programming even the most complicated modems. The following Dialers entry is an example of one such string used to program a Hayes-compatible, 9600 baud modem.
Note: The following lines should be combined into a single line:
HayesProgrm9600 =,-, "" \d\dAT\r\c OK AT&F\r\c OK
ATM1\r\c OK AT&D3\r\c OK AT&K3&C1\r\c OK ATL0E0Q2\r\c OK
ATS0=1\r\c OK AT&W\r\c OK
The direct dialer is only a dummy entry, in that it does not specify any command set. Use of the direct dialer is limited to direct (non-modem) serial connections only.
The TCP dialer is effectively the same as the direct dialer, but is a keyword that TCP/IP and UUCP connections look for when making a call.
The Dialcodes file is used to make standardized names for certain parts of a phone number. For example, if you made a lot of calls to a certain area code in San Francisco, you could create a Dialcodes entry that reads: SFO 9,1415 . Which would be used in the phone number dial string like this: instead of - 9,14155551111 , you would use - SFO5551111 . The SFO would be changed by the Dialcodes file for automatically.
It should be noted that users often include the \D token even though the Dialcodes file is rarely used by UUCP administrators.
The BNU administrative directories and files are in subdirectories of the /var/spool/uucp directory. These directories and files contain two types of information:
Under the var/spool/uucp directory, BNU creates the following seven directories:
Directories are also created under the /var/spool/uucp directory which contain the system_name of each remote system the host contacts. Note that the names of all the above directories start with a period (.). This means that they cannot be found with an ls or li command unless the -a flag is used. When the daemon is started, it searches the /var/spool/uucp directory for work files and transfers the files from any directory that is not hidden. The daemon sees only the system_name directories, not the other administrative directories.
The files in the hidden directories are owned by the UUCP login ID. These files can be accessed only with root authority or with a login ID which has a user ID (UID) of 5.
The BNU lock files are stored in the /etc/locks directory. When BNU uses a device to connect to a remote computer, it places a lock file for that device in the /etc/locks directory. When another BNU program or any other program needs the device, that program checks the /etc/locks directory for a lock file. If a lock file exists, the program waits until the device is available or uses another device for the communication.
In addition, the daemon places lock files for remote systems in the /etc/locks directory. Before contacting a remote system, the daemon checks the /etc/locks directory for a lock file for that system. These files prevent other instances of the daemon from establishing duplicate connections to the same remote system.
Because other systems contact the user's system to login, transfer files, and execute commands, BNU provides a means to establish security. BNU security enables the user to restrict what users of remote systems can do on the local host. BNU runs several daemons to complete its activities and uses administrative directories to store the files it needs. BNU also keeps a log of its own activities.
BNU security works on several levels. When the user configures BNU, they can determine:
When BNU is installed, all of the configuration files, daemons, and many of the commands and shell procedures are owned by the UUCP login ID. The UUCP login ID has a user ID (UID) of 5 and a group IDD (GID) of 5. The cron daemon reads the /var/spool/cron/crontabs/uucp file to schedule automatic jobs for BNU.
Usually, logging in as user UUCP is not allowed. To change files that are owned by the UUCP login ID, log in with root authority.
Note: Allowing remote systems to log in to the local system with the UUCP login ID seriously jeopardizes the security of the local system. Remote systems logged in with the UUCP ID can display and possibly modify the local Systems and Permissions files depending on the other permissions specified in the LOGNAME entry. It is strongly recommended that the UUCP administrator create other BNU login IDs for remote systems and reserve the UUCP login ID for the person responsible for administering BNU on the local system. For the best security, each remote system that contacts the local system should have a unique login ID with a unique UID number.
The startup shell for BNU login IDs is the daemon /usr/sbin/uucp/uucico. When remote systems call your system, they automatically start the daemon on your system. Login IDs for BNU have a UUCP group ID of 5.
Login IDs used by remote systems need passwords. To prevent security from prompting a new BNU login ID for a new password when the remote system logs in, you must set the password as soon as you create the account. To do this, use the passwd command followed by the pwdadm command.
To set a password for the login ID nuucp , log in as the root user and enter the following commands:
passwd nuucp
pwadm -f NOCHECK nuucp
The system prompts you for a password for the nuucp login ID. Completing these steps allows the remote system to log in without being immediately prompted for a new password (which the batch-oriented nuucp login cannot provide).
After creating the login ID for a remote system, notify that system's BNU administrator and give them the login ID and password to access your system.
A user with root authority can set up a BNU administrative login ID. This is useful if you wish to delegate BNU administration duties to a user without root authority. The BNU administrative login ID should have password security, a UID of 5, and be in a UUCP group with an ID of 5.
The login shell for the administrative login should be the /usr/bin/sh program (instead of the daemon). Giving the BNU administrative login a UID of 5 causes it to have the same privileges as the UUCP login ID. Thus, for security, remote systems should not be allowed to login as the BNU administrator.
User configuration stanzas in the /etc/security/login.cfg file provide configuration information for programs that change user attributes or add new users. There are two stanzas of this type:
pw_restrictions
usw
Note: In AIX Version 4 the pw_restrictions stanza is no longer available in the login.cfg file.
The shells attribute in the usw stanza defines the valid shells on the system. The value is a list of comma-separated full path names such as:
/usr/bin/sh,/usr/bin/bsh,/usr/bin/csh,/usr/bin/ksh
Before using the System Management Interface Tool (SMIT) to add a new BNU user, add the program name /usr/sbin/uucp/uucico to the usw shells stanza. The new program name should be separated from the last entry by a comma and no blanks.
/usr/bin/sh,/usr/bin/bsh,/usr/bin/csh,/usr/bin/ksh,/usr/sbin/uucp/uucico
Note: SMIT will fail when specifying /usr/sbin/uucp/uucico as a user's login shell if the program name is not added to the login.cfg file located in the /etc/security directory.
On most BNU systems, only remote systems listed in the /etc/uucp/Systems file can log in to the local system. The /usr/sbin/uucp/remote.unknown script is executed whenever an unknown system attempts to call the local system. This script refuses to let the unknown system log in, and makes an entry in the /var/spool/uucp/.Admin/Foreign file recording the time of the login attempt.
With root authority, or as a BNU administrator, you can modify the remote.unknown shell procedure to log more information about the remote system or to store the information in a different file. For example, you can modify the shell procedure to send mail to the BNU administrator whenever an unknown system tries to log in.
By taking away execute permissions on the remote.unknown shell procedure you enable unknown machines to log in. In this case, you should add a MACHINE=OTHER entry to the /etc/uucp/Permissions file to establish permissions for the unknown machines.
Your system can contact only remote systems listed in the Systems file. This prevents users on your system from contacting unknown systems.
The /etc/uucp/Permissions file determines:
The /etc/uucp/Permissions file contains two type of entries:
Options in the Permissions file enable you to establish various levels of security for each remote system. For example, if many remote systems share one login ID on the local system, use the VALIDATE options to require each remote system to use a unique login ID. The SENDFILES , REQUEST , and CALLBACK options specify which system has control, keeping the local system in control of transactions if necessary.
The READ , WRITE , NOREAD , and NOWRITE options define access to specific directories on the local system. These options also control where on your system remote users can place data. The COMMANDS option limits the number of commands users on remote systems can execute on the local system. The COMMANDS=ALL option allows total privileges to remote systems but seriously jeopardizes the security of your system; it should therefore be used only when necessary.
The BNU software includes four daemons stored in the /usr/sbin/uucp directory:
uucico, uusched, and uuxqt are started by the cron daemon according to a schedule set by the BNU administrator. With root authority, you can also start these daemons manually. The uucpd daemon should be started by the TCP/IP inetd daemon.
The uucico daemon transports the files required to send data from one system to another. The uucp and uux commands start the daemon to transfer command, data, and execute files to the designated system. The uucico daemon is also started periodically by the BNU scheduler, the uusched daemon. When started by the uusched daemon, the daemon attempts to contact other systems and execute the instructions in the command files.
To run the instructions in the command files, the uucico daemon first checks the /etc/uucp/Systems file for the system to be called. The daemon then checks the Systems file entry for a valid time to call. If the time is valid, the daemon checks the Type and Class fields and accesses the /etc/uucp/Devices file for a device that matches.
After finding a device, the uucico daemon checks the /etc/locks directory for a lock file for the device. If one exists, the daemon checks for another device of the requested type and speed.
When no device is available, the uucico daemon returns to the Systems file for another entry for the remote system. If one exists, the daemon repeats the process of searching for a device. If another entry is not found, the daemon makes an entry in the /var/spool/uucp/.Status/SystemName file for that remote system and goes on to the next request. The command file remains in the queue. The daemon attempts the transfer again at a later time. The later attempt is called a retry.
When the uucico daemon reaches the remote system, it uses the instructions in the Systems file to log in. This causes an instance of the daemon to be invoked on the remote system as well.
The two daemons, one on each system, work together to make the transfer. The daemon on the calling system controls the link, specifying the requests to be performed. The daemon on the remote system checks the local permissions for whether they allow the request to be performed. If so, the file transfer starts.
After the daemon on the calling system has finished transferring all requests it has for the remote system, it sends a hangup request. When the remote daemon has transactions to send to the calling system, it denies the hangup request, and the two daemons reverse roles.
Note: Either the /etc/uucp/Permissions file on the local system or the /etc/uucp/Permissions file on the remote system can forbid the daemons to reverse roles, In this case, the remote system must wait to transfer files until it calls the local system.
When nothing is left to be transferred in either direction, the two daemons hang up. At this point, the uuxqt daemon is called to execute remote command requests.
Throughout the transfer process, the daemons on both systems log messages in the BNU log and error files.
The uusched daemon schedules the transfer of files that are queued in the spooling directory on the local system. The spooling directory is /var/spool/uucppublic. When the uusched daemon is invoked, it scans the spooling directory for command files, then randomizes the files and starts the daemon. The daemon transfers the files.
When a user issues the uux command to run a specified command on a designated system, the uuxqt daemon executes the command. After creating the necessary files, the uux command starts the daemon, which transfers those files to the public spooling directory on the specified system.
The uuxqt daemon periodically searches the spooling directory for command-execution requests on every connected system. When it locates such a request, the uuxqt daemon checks for necessary files and permissions. Then, if permitted, the daemon executes the specified command.
The uucpd daemon must be runnable on the remote system before BNU can establish communications with a remote computer with Transmission Control Protocol/Internet Protocol (TCP/IP). The uucpd daemon is a subserver of the TCP/IP inetd daemon and is started by the inetd daemon.
By default, the inetd daemon is configured to start the uucpd daemon. However, if this has been changed on your system, you may need to reconfigure the inetd daemon to start the uucpd daemon.
To configure UUCP on your system, perform the following steps:
ALTERNATE METHOD:
The UUCP login herald may also be customized for a specific tty port. The system's default herald contains control sequences which may cause a uucico process to terminate login attempt. UUCP errors such as Enough already may indicate such a problem.
To avoid this situation the administrator should make the herald as short as possible. Use the following steps to accomplish this:
uucpadm:!:5:5::/usr/lib/uucp:/bin/kshThis creates a user with the same group and user ID as UUCP which is helpful for BNU administration and debugging.
Umicrtk:!:105:5:micrtk
uucp:/usr/spool/uucppublic:/usr/lib/uucp/uucico
Ufloydl:!:106:5:floydl
uucp:/usr/spool/uucppublic:/usr/lib/uucp/uucico
Uicus:!:107:5:icus
uucp:/usr/spool/uucppublic:/usr/lib/uucp/uucico
Urisctkr:!:108:5::/usr/spool/uucppublic:/usr/lib/uucp/uucico
If you want to have one set of permissions and do not want to maintain separate control for any of the UUCP connections, you can have a single login for all the machines. For example:
nuucp:!:6:5::/usr/spool/uucppublic:/usr/lib/uucp/uucicoField requirements:
The user ID (the third colon-separated field) must be unique to avoid would be a security risk. The group ID (the fourth colon-separated field) must be a 5, which is the same group as UUCP. You can change the home directory (the sixth field) to any valid directory, but the login shell (the seventh field) must be /usr/lib/uucp/uucico.
uucp:!:5:uucp,uucpadm,nuucp,luucp,Umicrtk,Ufloydl,Uicus,
Urisctakr,ayalad
Take this time to add any other users to the UUCP group who will be using modems to dial out with programs other than the cu command. The user name ayalad was added at the end of the UUCP group as an example. The user name luucp is added as a login name for systems being granted limited machine access.
passwd UserName
flags = ADMCHGChange it to:
flags =Otherwise, when the remote uucico logs in, it will be prompted to enter a new password, which it cannot do. Hence the login will fail.
crontab -l > /tmp/cron.uucpNext, edit /tmp/cron.uucp to uncomment entries. They should look like following:
20,50 * * * /bin/bsh -c "/usr/lib/uucp/uudemon.poll >/dev/null"
25,55 * * * /bin/bsh -c "/usr/lib/uucp/uudemon.hour> /dev/null"
45,23 * * /bin/bsh -c "/usr/lib/uucp/uudemon.cleanu > /dev/null"
48,8,12,16 * * /bin/bsh -c "/usr/lib/uucp/uudemon.admin > /dev/null"
Changed the entries to suit your needs. Afterwards, read in the edited version into UUCP's crontab with this command:
crontab /tmp/cron.uucp
crontab -lRefer to AIX Version 4.3 System Management Guide: Operating System and Devices for more information on cron.
/usr/sbin/uucp/uucheck -vThe uucheck command verifies that the directories, programs, and support files are set up properly and that the Permissions file entries are consistent. Correct any errors reported by the uucheck command.
The following BNU file entries were made using the examples shown in this chapter. An optional entry is included to show how to program a modem (a Telebit T3000 in this case).
Umicrtk Any ACU 9600 9,15551111 "" \d\r in:--in: nuucp word: nuucp
Ufloydl Any ACU 9600 9,15551234 "" \d\r in:--in: nuucp word: nuucp
Uicus Any ACU 9600 9,15554321 "" \d\r in:--in: luucp word: luucp
Urisctkr Any ACU 2400 9,15559876 ""\d\r in:--in: luucp word: luucp
telebit Nvr TELEPROG 19200
ACU tty1 - 9600 hayes \D
ACU tty1 - 2400 hayes \D
TELEPROG tty1 - 19200 TelebitProgram
hayes =, -, "" \dAT\r\c OK \pATDT\T\r\c CONNECT
# NOTE: The following 4 lines should be made into one long line:
TelebitProgram =,-, "" \dAT&F\r\c OK ats0=1s2=255s7=60s11=50s41=2s45=255s51=252s63=1s58=2s64=1\r\c OK
ATs69=2s105=0s111=30s255=0M0&C1Q2&D3&Q0&R3&S1&T5\r\c OK ATE0X12&W\r\c OK 00
MACHINE=Umicrtk:Ufloydl REQUEST=yes READ=/ WRITE=/ COMMANDS=ALL MACHINE=Uicus:Urisctkr REQUEST=yes READ=/ WRITE=/  \ COMMANDS=vi:ls:rm
LOGNAME=nuucp REQUEST=yes SENDFILES=yes READ=/ WRITE=/
LOGNAME=luucp REQUEST=yes SENDFILES=yes  \ READ=/usr/spool/uucppublic:/tmp  \
WRITE=/usr/spool/uucppublic:/tmp
BNU uses the cron daemon to start BNU daemons and to monitor BNU activity. The cron daemon reads the /var/spool/cron/crontabs/uucp file for instructions about when to start BNU procedures.
To enable BNU to poll remote systems for jobs, list the systems in the /etc/uucp/Poll file. In addition, run the uudemon.hour and uudemon. poll commands periodically.
BNU will now automatically poll the systems listed in the Poll file at the times you have specified.
BNU must be maintained to work properly on your system. The following checks should be performed in order to maintain the Basic Network Utilities:
In addition, occasionally check with administrators of remote systems to keep up with changes on their systems that may affect your configuration. For example, if the supervisor of system venus changes your system's password, you will need to put the new password in the /etc/uucp/Systems file before your system can log in to system venus .
BNU creates log files and error files to track its own activities. These files must be checked and removed periodically to keep them from filling the storage space on your system. BNU provides several commands for use in cleaning log files:
Run these commands manually or use entries in the /var/spool/cron/crontabs/uucp files to run the commands by the cron daemon.
BNU creates individual log files in the /var/spool/uucp/.Log directory. A log file is created for each accessible remote system, using the uucp, uuto, or uux command. BNU places status information about each transaction in the appropriate log file each time someone on the system uses BNU. When more than one BNU process is running the system cannot access the log file. Instead, it places the status information in a separate file with a .Log prefix.
The uulog command displays a summary of uucp or uux requests, by user or by system. The uulog command displays the files. However, you can also have BNU automatically combine the log files into a primary log file. This is called compacting the log files, and can be done with the /usr/lib/uucp/uudemon.cleanu command (usually run by the cron daemon).
The cron daemon runs the uudemon.cleanu command, which combines the uucico and uuxqt log files on the local system and stores them in the /var/spool/uucp/.Old directory. By default, the uudemon.cleanu command saves log files that are two days old.
If storage space is a problem, consider reducing the number of days that files are kept. To track BNU transactions over a longer period of time, consider increasing the number of days that files are kept. To change the default time for saving log files, modify the shell procedure for the uudemin.cleanu command. This script is stored in the /usr/sbin/uucp directory and can be modified with root authority.
BNU also collects information and stores it in the /var/spool/uucp/.Admin directory. This directory contains the errors, xferstats, Foreign, and audit files. These files must be checked and removed occasionally to save storage space. BNU creates each file when it is needed.
When another system contacts your system with the uucico daemon's debugging mode on, it invokes the uucico daemon on your system with debugging turned on. The debugging messages generated by the daemon on the local system are stored in the audit file. This file can get quite large. Check and remove the audit file often.
The errors file records errors encountered by the uucico daemon. Checking this file can help you correct problems such as incorrect permissions on BNU work files.
The xferstats file contains information about the status of every file transfer. Check and remove this file occasionally.
The Foreign file is important to the security of your system. Whenever an unknown system attempts to log in to the local system, BNU calls the remote.unknown shell procedure. This shell procedure logs the attempt in the Foreign file. The Foreign file contains the names of the systems that have attempted to call the local system and been refused. If a system has been attempting frequent calls, use this information when considering whether to allow that system access.
Because many BNU processes need root authority to complete their tasks, BNU creates frequent entries in the /var/spool/sulog log file. Similarly, using the cron daemon to schedule BNU tasks creates multiple entries in the /var/spool/cron/log file. When using BNU, check and clean these files.
The Basic Networking Utilities contain several commands for monitoring BNU activities and cleaning BNU directories and files.
BNU contains three commands that clean directories and remove files that have not been sent:
Deletes all files older than a specified number of hours, from the BNU administrative directories. Use the uuclean command to specify a directory to be cleaned or a type of file to be deleted. You can also instruct the command to notify the owners of the deleted files. The uuclean command is the Berkeley equivalent of the uucleanup command.
Performs functions similar to the uuclean command. However, the uucleanup command checks the age of files based on days rather than hours. Use the uucleanup command to send a warning message to users whose files have not been transferred, notifying them that the files are still in the queue. The uucleanup command also removes files relating to a specified remote system.
A shell procedure that issues the uulog and uucleanup commands to compress the BNU log files and remove log and work files over three days old. The uudemon.cleanu command is run by the cron daemon.
BNU also provides five commands for checking the status of transfers and log files:
Displays jobs currently in the BNU job queue. Use the uuq command to display the status of a specified job or of all jobs. With root authority, you can use the uuq command to delete a job from the queue.
Provides information similar to that provided by the uuq command, but in a different format. Use the uustat to check the status of jobs and delete jobs you own. With root authority, you can also delete jobs belonging to other users.
Displays a summary of uucp or uux requests, by user or by system. The uulog command displays the file names. See "Working with BNU Log Files".
Forces a poll of a remote system. This is helpful when work for that system is waiting in the queue and needs to be transferred, before the system is scheduled to be called automatically.
Displays a very brief summary of BNU status. For each remote system, this command shows the number of files awaiting transfer. However, it does not show how long they have been waiting. The uusnap command is the Berkeley equivalent of the uustat command.
BNU is delivered with two shell procedures used for maintenance:
Is discussed under "Cleanup Commands"
Issues the uustat command. The uustat command reports the status of BNU jobs. It sends the results to the UUCP login ID as mail. You can modify the uudemon.admin shell procedure to send the mail elsewhere, or use a mail program to reroute all mail for the UUCP login ID to the user responsible for BNU administration.
These shell procedures are stored in the /usr/sbin/uucp directory. If you wish to change what they do, copy the procedures and modify the copy. Run the procedures from the command line or schedule them to be run by the cron daemon.
To automatically run the uudemon.cleanu and uudemon.admin commands, remove the comment characters (#) from the beginning of the relevant lines in the /var/spool/cron/crontabs/uucp file.
The Uutry command can help monitor the uucico daemon process if users at the local site report file-transfer problems.
uustat -qA status report similar to the following is displayed:
venus 3C (2) 05/09-11:02 CAN'T ACCESS DEVICE
hera 1C 05/09-11:12 SUCCESSFUL
merlin 2C 5/09-10:54 NO DEVICES AVAILABLE
This report indicates that three command (C.*) files intended for remote system venus have been in the queue for two days. There could be several reasons for this delay. For example, perhaps system venus has been shut down for maintenance or the modem has been turned off.
/usr/sbin/uucp/Uutry -r venusThis command starts the uucico daemon with a moderate amount of debugging and the instruction to override the default retry time. The Uutry command directs the debugging output to a temporary file, /tmp/venus.
Conversation Complete: Status SUCCEEDED"If the connection is successful, assume that the temporary file transfer problems are now resolved. Issue the uustat command again to make certain that the files in the spooling directory have been transferred successfully to the remote system. If they have not, use the steps in Monitoring a BNU File Transfer to check for file transfer problems between the local system and the remote system.
mchFind called (venus)
conn (venus)
getto ret -1
Call Failed: CAN'T ACCESS DEVICE
exit code 101
Conversation Complete: Status FAILED
Check the physical connections between the local and remote systems. Make sure that the remote computer is turned on and that all cables are properly connected, that the ports are enabled or disabled (as needed) on both systems, and that the modems (if any) are working.
If the physical connections are correct and secure, then verify all the relevant configuration files on both the local and remote systems, including the following:
Use this procedure to monitor a file transfer to a remote system. Monitoring a file transfer is useful when transmission of files to the remote system is failing for unknown reasons. The debugging information produced by the uucico daemon (called by the Uutry command) can help determine the point of failure.
Use the following procedure to monitor file transfers.
uucp -r test1 venus!~/test2The -r flag instructs the BNU program to place the test1 file in the queue but not to start the uucico daemon.
/usr/sbin/uucp/Uutry -r venusThis instructs the uucico daemon to contact the remote system venus overriding the default retry time. The daemon contacts system venus , logs in, and transfers the file while the Uutry command produces debugging output that monitors the uucico process. Press the interrupt key sequence to stop the debugging output and return to the command prompt.
The Uutry command also stores the debugging output in the /tmp/SystemName file.
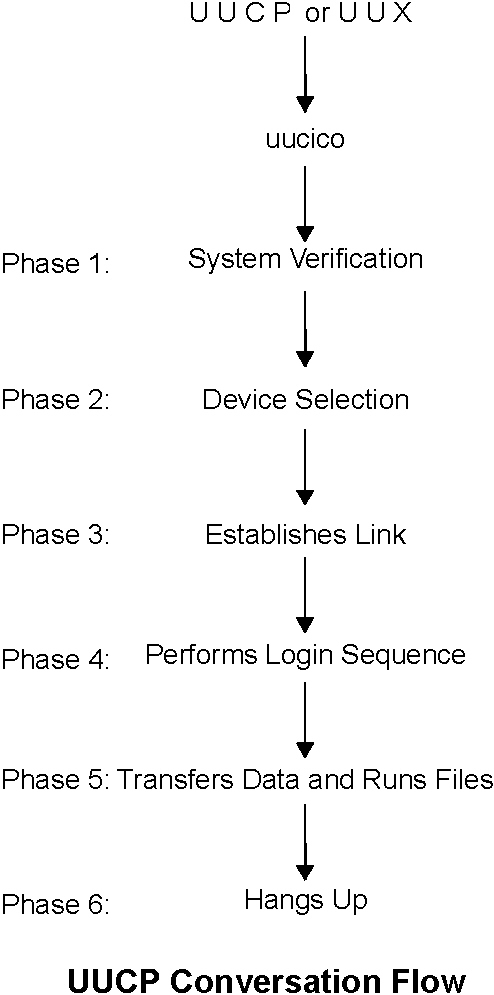
UUCP error messages can be linked to a specific phase in the conversation flow. Use the following diagram and the message descriptions on the following pages to help diagnose your UUCP problems. Some of the messages described may not be sent from AIX's UUCP (BNU) version but are included in case another UUCP version is in use on a different system platform.
| Chat Script Parameters | ||
|---|---|---|
| Parameters | Version Type | Description |
| " " | ( ) | Null string. |
| \N | (H) | Null character. |
| \b | (H) | Backspace character. |
| \c | ( ) | Suppress carriage return sent at the end of every send string. |
| \d | (H) | Delay 2 seconds. |
| \d | (B) | Delay 1 second. |
| \e | ( ) | Disable echo checking. |
| \E | ( ) | Enable echo checking. |
| \p | (H) | Pause for approximately 1/4 second. |
| \K | (H) | Send a break. |
| \n | ( ) | Newline character. |
| \N | (H) | Send a null character. Use \0 on the other UUCP versions. |
| \p | (B) | |
| \r | ( ) | Carriage return character. |
| \s | ( ) | Space character. |
| \t | (H) | Tab character. |
| \ \ | ( ) | Backslash character. |
| ABORT | (B) | Arm abort trap in expect string. |
| BREAK | ( ) | Generate break signal (approximately 1/4 second). |
| BREAKn | (B) | Generate n/10 seconds break signal. |
| CR | (B) | Carriage return character. |
| EOT | (H) | Send Ctrl-D newline Ctrl-D newline. |
| EOT | (B) | Send Ctrl-D newline. |
| NL | (B) | Newline character. |
| PAUSE | (B) | Delay for 3 seconds. |
| PAUSEn | (B) | Delay for n seconds. |
| P_ODD | (B) | Use odd parity for future send strings. |
| P_ONE | (B) | Use parity 1 for future send strings. |
| P_EVEN | (B) | Use even parity for future send strings. |
| P_ZERO | (B) | Use parity 0 for future send strings. |
| \ddd | ( ) | Send octal character. |
| \M | (H) | Open dial-out port with O_NDELAY (clocal on). |
| \m | (H) | Reopen port with clocal off. |