The Asynchronous Terminal Emulation (ATE) program enables terminals on the AIX system to emulate a terminal, thus allowing users a means of connecting to most other systems which support asynchronous terminals. ATE accomplishes this by making the remote system see a terminal either as a system's display or as a DEC VT100 terminal. The VT100 option allows the user to log in to systems that do not support their terminal, but do support VT100 terminals.
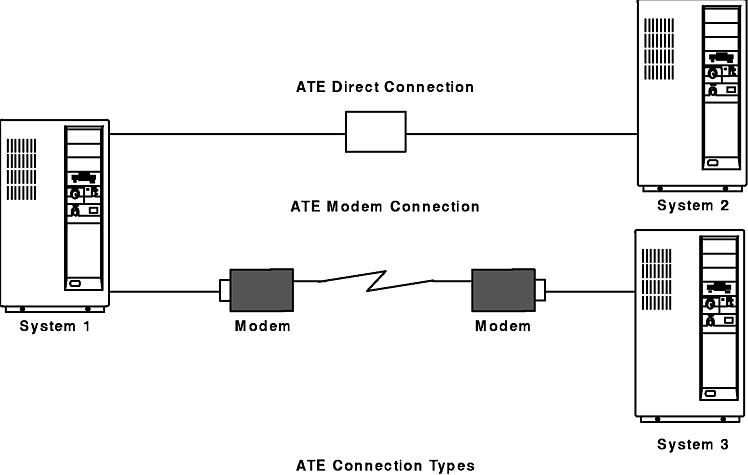
ATE uses both direct (cabled) and modem connections to communicate between the user's system and a remote system. (See the following figure.) Depending upon the connection type used, the user can configure ATE to connect either to a system in the next room or to a system across the country.
For a direct connection, the user must know the port to use on their system. For a modem connection, users must know the port to use on his system and the telephone number of the remote system. Users must also have a login ID and password on the remote system.
This section includes the following information about ATE:
Before running ATE, the system administrator must install the proper software (if needed) and configure the tty ports and connections. ATE uses both direct (cabled) connections and modem connections. Local RS-232C connections allow a maximum distance of 15 meters (50 feet) between machines, and RS-422A connections allow up to 1200 meters (4000 feet) between machines.
Before using ATE to call a remote system, verify that the remote system's tty device is ready to accept a call.
lslpp -h | more   <return>
/bos.net.ate      <return>
If ATE is not available on your system, install the bos.net.ate image from the installation media (tape, diskette, or network server).
lslpp -f | more   <return>
/bos.net.ate      <return>
To prepare ATE to run on the system, perform the following steps:
Select the terminal type to emulate with ATE and make the necessary adjustments for the environment. The most common changes are line speed, parity settings, number of bits per character, and whether the line is to be driven as a remote or local line. Use bpc 8 and no parity if National Language Support (NLS) is required.
pdisable tty1To set up a port so that others can call in, use the penable command. For example, to let other systems call in to the tty2 port, enter:
penable tty2
ATE creates the ate.def default file in the current directory the first time the user runs ATE. Edit the ate.def file to customize various aspects of ATE. For example, the user can change the name of the dialing directory file, the type of transfer protocols used to send and receive files from the remote system, and the baud rate ATE expects the modem to use. Refer to "Changing the Default Files" for more information on the ate.def file.
Users can also make temporary changes to certain aspects of ATE with the modify and alter subcommands. These subcommands can change all of the ATE default values except the control key sequences (which can only be changed by editing the default file) and the name of the dialing directory (which can be changed with the directory subcommand or by editing the default file). Any changes made with the modify, alter, or directory subcommands are effective only for that session of ATE. The next time the user runs ATE, the settings used are those defined in the default file.
When using a modem with ATE, the user can create a dialing directory of up to 20 phone numbers. The directory subcommand displays the telephone numbers in menu form and allows the user to select the desired system to call. Refer to "The ATE Dialing Directory File" section for more information.
By using a dialing directory, the user avoids having to look up the telephone number when calling a particular system. The user can also specify certain data transmission characteristics in the dialing directory file. This is useful if some connections use characteristics that differ from the ATE defaults.
The ate.def file sets the defaults for use in asynchronous connections and file transfers. This file is created in the current directory during the first run of ATE. The ate.def file contains the default values in the ATE program uses for the following:
The first time the ATE program is run from a particular directory, it creates an ate.def file in that directory.
LENGTH         8
STOP           1
PARITY         0
RATE           1200
DEVICE         tty0
INITIAL        ATDT
FINAL
WAIT           0
ATTEMPTS       0
TRANSFER       p
CHARACTER      0
NAME           kapture
LINEFEEDS      0
ECHO           0
VT100          0
WRITE          0
XON/XOFF       1
DIRECTORY      /usr/lib/dir
CAPTURE_KEY    002
MAINMENU_KEY   026
PREVIOUS_KEY   022
Edit the ate.def file with any ASCII text editor to permanently change the values of these characteristics. Temporarily change the values of these characteristics with the ATE alter and modify subcommands, accessible from the ATE Main Menu.
Type parameter names in uppercase letters in the ate.def file. Spell the parameters exactly as they appear in the original default file. Define only one parameter per line. An incorrectly defined value for a parameter causes ATE to return a system message. However, the program continues to run using the default value. These are the ate.def file parameters:
Options:  7 or 8
Default:  8
Options:  1 or 2
Default:  1
For example, if the user selects even parity, when the number of 1 bits in the character is odd, the parity bit is turned on to make an even number of 1 bits.
Options: 0 (none), 1 (odd), or 2 (even)
Default: 0.
Options: 50,75,110,134,150,300,600,1200,1800,2400,4800,9600,19200
Default: 1200
Options: Locally created port names.
Default: tty0.
Options: ATDT, ATDP, or others, depending on the type of modem.
Default: ATDT.
Options: Blank (none) or a valid modem suffix.
Default: No default.
Options: 0 (none) or a positive integer designating the number of seconds to wait.
Default: 0
Options: 0 (none) or a positive integer designating the number of attempts.
Default: 0
Options: p (pacing), x (xmodem)
Default: p.
When the send subcommand encounters a line-feed character while transmitting data, the subcommand waits to receive the pacing character before sending the next line.
When the receive subcommand is ready to receive data, it sends the pacing character, then waits 30 seconds to receive data. The receive subcommand sends a pacing character again whenever it finds a carriage return character in the data. The receive subcommand ends when it receives no data for 30 seconds.
Options: any character
Default: 0
Default: 0.
Options: A valid file name less than 40 characters long.
Default: kapture
Options: 1 (on) or 0 (off).
Default: 0.
Options: 1 (on) or 0 (off).
Default: 0.
Options: 1 (on) or 0 (off).
Default: 0.
The CAPTURE_KEY (usually the Ctrl-B key sequence) can be used to toggle capture mode on or off during a connection.
Options: 1 (on) or 0 (off).
Default: 0.
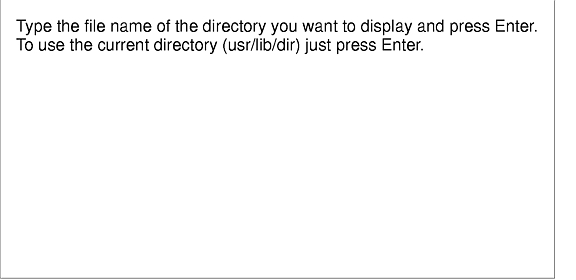
Default: the /usr/lib/dir file.
Options: Any ASCII control character.
Default: ASCII octal 002 (STX).
Options: Any ASCII control character.
Default: ASCII octal 026 (SYN).
Options: Any ASCII control character.
Default: ASCII octal 022 (DC2).  The ASCII control character is mapped to the interrupt signal.
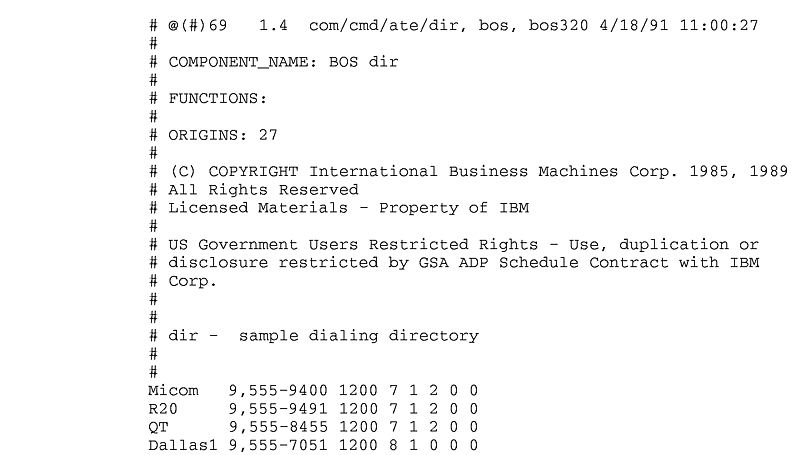
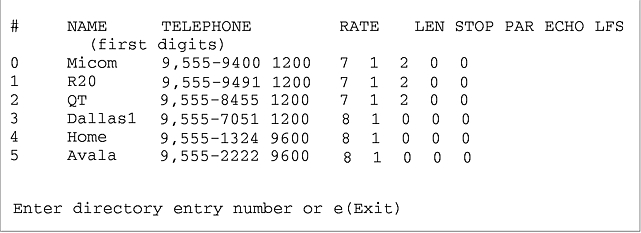
The ATE dialing directory file lists phone numbers that the ATE program uses to establish remote connections by modem. Users name the dialing directory file with any valid file name and place it in any directory where read and write access is owned. Edit the dialing directory file with any ASCII text editor. The default dialing directory information for the ATE program is contained in the /usr/lib/dir file. (See the following figure.)
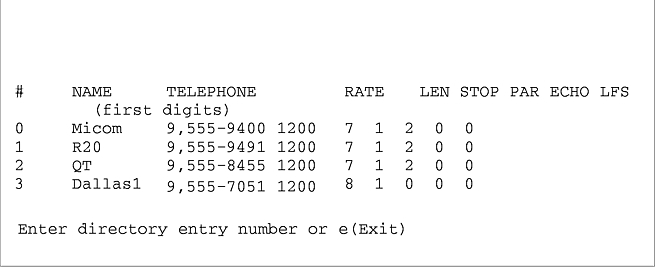
Users can access the dialing directory information from within ATE by using the directory subcommand available in the "UNCONNECTED MAIN MENU." The following figure shows the directory information as it would appear from within the ATE program.
Users can have more than one dialing directory. To change the dialing directory file the ATE program uses, the user must modify the ate.def file in the current directory.
Note: The dialing directory file can contain up to 20 lines (one entry per line). ATE ignores subsequent lines.
The dialing directory file is similar to a page in a telephone book that contains entries for the remote systems called with the ATE program. The format of a dialing directory entry is:
Name Phone Rate Length StopBit Parity Echo Linefeed
The fields must be separated by at least one space. More spaces can be used to make each entry easier to read. The fields are:
Although the telephone number can be up to 40 characters long, the directory subcommand displays only the first 26 characters.
50, 75, 110, 134, 150, 300, 600, 1200, 1800, 2400, 4800, 9600, or 19200.
For non-POSIX baud rates, setting the rate at 50 causes the ATE to use the configured baud rate set through SMIT for that device.
Notes:
- Changing or remapping may be necessary if control keys conflict across applications. For example, if the control keys mapped for the ATE program conflict with those in a text editor, remap the ATE control keys.
- The ASCII control character selected may be in octal, decimal, or hexadecimal format, as follows:
- octal
- 000 through 037. The leading zero is required.
- decimal
- 0 through 31.
- hexadecimal
- 0x00 through 0x1F. The leading 0x is required. The x may be uppercase or lowercase.
Create an ate.def file that defines those characteristics to change characteristics of ATE emulation. For example, to change the RATE to 300 bps, the DEVICE to tty3, the TRANSFER mode to x (xmodem protocol), and the DIRECTORY to my.dir, create an ate.def with the following entries, in the directory running the ATE program:
RATE          300
DEVICE        tty3
TRANSFER      x
DIRECTORY     my.dir
The program uses the defined values from time the ATE program starts from that directory.
Use the following procedure to dial out of a system using ATE and a customized /usr/lib/dir dialing directory file.
The user should verify that all of the following prerequisites and conditions are met before attempting to dial out.
ate
Use the following procedure to transfer a file from a local host to the remote system.
xmodem -r newfilewhere r is the Xmodem flag to receive and newfile is the name of the file to be received. This name does not need to be the same as the file being transferred.
ate: 0828-005 The system is ready to receive file newfile. Use Ctrl-X to stop xmodem.If the message is not displayed, the system may not have the xmodem program installed or located in its command PATH.
Type the name of the file you wish to send and press Enter. To use the last file name (), just press Enter.
ate: 0828-024 The program is ready to send file newfile. You will receive another message when the file transfer is complete.
ate: 0828-025 The system is sending block 1.
ate: 0828-025 The system is sending block 2.
ate: 0828-015 The file transfer is complete.
ate: 0828-040 Press Enter
Use the following procedure to receive a file transferred from a remote host.
xmodem -s newfilewhere s is the xmodem command to send and newfile is the name and full path of the file to be transferred.
ate: 0828-005 The system is ready to send file newfile. Use ctrl-X to stop xmodem.If the message is not displayed, the system may not have the xmodem program installed or located in its command PATH.
Type the name of the file you wish to store the received data in and press Enter. To use the last file name (), just press Enter.
ate: 0828-020 The program is ready to receive file newfile. You will receive another message when the file transfer is complete.
ate: 0828-028 The system is receiving block 1.
ate: 0828-028 The system is receiving block 2.
ate: 0828-040 Press Enter.
ate: 0828-008 The system tried to open port /dev/tty0 but failed.  If the port name is not correct, change it  using the Alter menu.  Or, take the action indicated by the system message shown below.

Connect: The file access permissions do not allow the specified action.
ate: 0828-040 Press Enter.
ate: 0828-008 The system tried to open port /dev/tty0 but failed. If the port name is not correct, change it using the Alter menu. Or, take the action indicated by the system message shown below.

Connect: A file or directory in the path name does not exist.
ate: 0828-040 Press Enter.