
Managing Shared Disks
This section tells how to maintain twin-tailed Logical Volume Manager (LVM)
components shared by two nodes in an SP system running the IBM Recoverable
Virtual Shared Disk software. It includes procedures for volume groups,
logical volumes, and physical volumes.
Some of the definitions you need to understand are:
- twin-tailed volume group
- A volume group consisting of supported disks that are all twin-tailed to
the same nodes.
- twin-tailed physical volume
- A disk in a twin-tailed volume group.
- twin-tailed logical volume
- A logical volume in a twin-tailed volume group.
The twin-tailed components must have the same definition on both
twin-tailed nodes. Any change to an LVM component must be
reflected in the Object Data Manager (ODM) definitions on both nodes.
Follow the procedures in this chapter carefully in the order given to keep
the LVM ODM definitions on both nodes synchronized.
- Note:
- Do not reboot or issue ha_vsd reset until you have completed all the
steps in a task.
The overall procedure for modifying a twin-tailed LVM component is the same
for all tasks. In general, you export the volume group from a secondary
node, make the change on the primary node, and then reimport the volume group
on the secondary node. Specific operations, however, have unique
steps. They are described in the following sections.
The table below summarizes the steps you must complete on the primary node
and the secondary node to change a twin-tailed LVM component in a recoverable
virtual shared disk system. Perform all the steps in the correct order
so the data does not become corrupted.
Table 11. General Procedure for Changing a Twin-tailed LVM Component
| Step Number
| Primary Node
| Secondary Node
|
| Step 1
| Complete prerequisite tasks
| Complete prerequisite tasks
|
| Step 2
|
| Export a volume group
|
| Step 3
| Vary on a volume group
|
|
| Step 4
| Make changes to the twin-tailed LVM component
|
|
| Step 5
| Vary off the volume group
|
|
| Step 6
|
| Import a volume group
|
| Step 7
|
| Change a volume group to remain dormant at start up
|
| Step 8
|
| Vary off the volume group
|
| Step 9
| Complete follow-up tasks
| Complete follow-up tasks
|
The prerequisite tasks, while not directly involved in modifying LVM
components, must be completed before you begin to make the change.
- Note:
- You must suspend, stop, and unconfigure all virtual shared disks on all nodes
in the volume group to be changed before changing a twin-tailed LVM
component.
The prerequisite tasks can vary for the different operations. The
descriptions for each operation on the following pages have a list of specific
prerequisite tasks.
Maintaining twin-tailed volume groups requires the following administrative
tasks:
The table below summarizes the steps you must complete on the primary node
and the secondary node to create a twin-tailed volume group. Perform
all the steps in the correct order so the data does not become
corrupted.
- Note:
- Twin-tailed disks that have SCSI IDs must have a different ID on the
secondary than the one on the primary.
Table 12. Steps to Create a Twin-tailed Volume Group
| Step Number
| Primary Node
| Secondary Node
|
| Step 1
| Complete prerequisite tasks
| Complete prerequisite tasks
|
| Step 2
| Create a twin-tailed volume group
|
|
| Step 3
| Create logical volumes
|
|
| Step 4
| Vary off the volume group
|
|
| Step 5
|
| Import a volume group
|
| Step 6
|
| Change a volume group to remain dormant at startup
|
| Step 7
|
| Vary off the volume group
|
| Step 8
| Complete follow-up tasks
| Complete follow-up tasks
|
Complete the following steps to create a twin-tailed volume group.
- The physical volumes (hdisks) should be installed, configured,
named, and available.
- Make sure the primary and the secondary nodes are active.
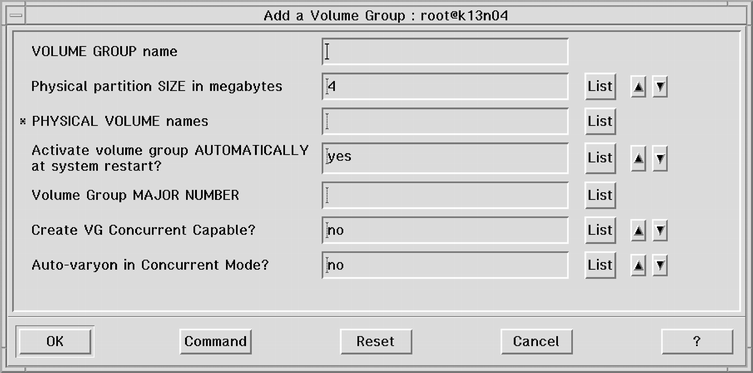
Use the smit mkvg fastpath to create a volume group.
- As the root user at the primary node, enter:
smit mkvg
SMIT returns a screen similar to the following:
 View figure.
- Enter field values as follows:
- VOLUME GROUP name
- Enter the name of the twin-tailed volume group.
- Physical partition size in megabytes
- Accept the default value, unless your site has another specific
partitioning requirement.
- PHYSICAL VOLUME names
- Enter the names of all the disks to be used in the volume group.
You can click on List to display all available physical volumes.
. Click on OK when you have selected all the entries you want.
The physical volumes you selected are automatically entered in the PHYSICAL
VOLUME names field.
- Activate volume group AUTOMATICALLY at system restart?
- Set the field to no so that the volume group can be activated as
appropriate by the IBM Recoverable Virtual Shared Disk recovery
scripts.
- ACTIVATE volume group after it is created?
- Set this field to yes.
- Volume Group MAJOR NUMBER
- Use the default, the next available number in the valid range.
- Create VG Concurrent Capable?
- Accept the default of no. Do not specify
yes.
- Auto-varyon in Concurrent Mode?
- Accept the default of no. Do not specify
yes.
- Click on OK. The system asks if you are sure. Check and
correct your entries, if needed.
- Create logical volumes. Refer to the LVM reference pages.
- After the command completes, press F12 to exit SMIT and return to the
command line.
Use the smit mklv fastpath to create logical volumes.
Create the logical volumes you want for this virtual shared disk.
Use the varyoffvg command to quiesce the affected volume
group.
To vary off the volume group so that it can be activated as appropriate by
the IBM Recoverable Virtual Shared Disk recovery scripts, enter:
varyoffvg volume_group_name
You now return to the secondary node. First, import the volume group
onto the secondary node. Importing the volume group onto the secondary
node synchronizes the ODM definition of the volume group on both nodes.
- To use the smit importvg fastpath to import the volume group,
enter:
smit importvg
SMIT returns a screen similar to the following:
View figure.
- Enter field values as follows:
- VOLUME GROUP name
- Enter the name of the volume group that you are importing. Make
sure the volume group name is the same name that you used on the primary
node.
- PHYSICAL VOLUME name
- Enter the name of one of the physical volumes that resides in the volume
group. Note that a disk can have a different physical name on different
nodes. Make sure that you use the disk name as it is defined on the
secondary node. Every hdisk has an ID. If
you know that the name of a disk on the primary node is hdisk01, use
the name that matches that ID on the secondary node. You can use the
lspv command to determine the name.
- ACTIVATE volume group after it is imported?
- Set the field to yes.
- Volume Group MAJOR NUMBER
- Use the default, the next available number in the valid range.
- Make this VG Concurrent Capable?
- Accept the default of no. Do not specify
yes.
- Make default varyon of VG Concurrent?
- Accept the default of no. Do not specify
yes.
- Click on OK.
- Press F12 to exit SMIT and return to the command line.
By default, a volume group that was just imported is configured to
automatically become active at system restart. However, a recoverable
virtual shared disk volume group should be varied on as appropriate by the IBM
Recoverable Virtual Shared Disk recovery scripts. Therefore, after
importing a volume group, use the SMIT Change a Volume Group screen to
reconfigure the volume group to remain dormant at start up.
- To use the smit chvg fastpath to change the characteristics of a
volume group, enter:
smit chvg
SMIT prompts you to select the volume group.
- Enter the name of the volume group you just imported, or click on List and
select the name from the display. Click on OK.
SMIT returns a screen similar to the following: The first field
contains the volume group name you specified.
View figure.
- Enter remaining field values as follows:
- ACTIVATE volume group automatically at system restart?
- Set this field to no.
- A QUORUM of disks required to keep the volume group on-line?
- Accept the default, yes.
- Convert this VG to Concurrent Capable?
- Accept the default no. Do not specify yes.
- Autovaryon VG in Concurrent Mode?
- Accept the default no. Do not specify yes.
- Click on OK.
- Press F12 to exit SMIT and return to the command line.
Use the varyoffvg command to quiesce the affected volume group
after making the change.
To vary off the volume group so that it can be activated as appropriate by
the IBM Recoverable Virtual Shared Disk recovery scripts, enter:
varyoffvg volume_group_name
Once you have created the volume group, do the following tasks:
- Make sure the primary and secondary nodes are active.
- Use the vsdvg command to define the twin-tailed volume
groups.
- Use defvsd to define virtual shared disks on all the twin-tailed
nodes.
- Use the cfgvsd command for all the virtual shared disks in this
volume group at all the nodes.
- Use the startvsd command at all the virtual shared disk nodes to
start these new virtual shared disks.
The following table summarizes the steps you do on both the primary and
secondary nodes to extend (add one or more physical volumes to) a twin-tailed
volume group. Perform all the steps in the correct order so the data
does not become corrupted.
Table 13. Procedure for Extending a Twin-tailed LVM Component
| Step Number
| Primary Node
| Secondary Node
|
| Step 1
| Complete prerequisite tasks
| Complete prerequisite tasks
|
| Step 2
|
| Export a volume group
|
| Step 3
| Vary on a volume group
|
|
| Step 4
| Extend a twin-tailed volume group
|
|
| Step 5
| Vary off the volume group
|
|
| Step 6
|
| Import a volume group
|
| Step 7
|
| Change a volume group's characteristics
|
| Step 8
|
| Vary off the volume group
|
| Step 9
| Complete follow-up tasks
| Complete follow-up tasks
|
- The physical volumes (hdisks) should be installed, configured,
named, and available.
- Suspend, stop, and unconfigure all virtual shared disks in the volume
group involved in the change on all nodes.
Before making any changes to the LVM elements on the primary node, you must
export the appropriate volume group from the secondary node. Exporting
the volume group deletes the information about this volume group from the
ODM.
To use the exportvg command to export the volume group containing
the component you are going to change on the secondary node, enter:
exportvg volume_group_name
To use the varyonvg command to activate the affected volume group
after making the change, enter:
varyonvg volume_group_name
Use the smit extendvg fastpath to extend a volume group.
- As the root user at the primary node, enter:
smit extendvg
SMIT returns a screen similar to the following:
View figure.
- Enter field values as follows:
- VOLUME GROUP name
- Enter the name of the volume group that you are extending.
- PHYSICAL VOLUME names
- Enter the names of the physical volumes you are adding to the volume
group.
- Click on OK to extend the volume group.
- After the command completes, press F12 to exit SMIT and return to the
command line.
- Create new logical volumes or extend existing ones.
Use the varyoffvg command to quiesce the affected volume group
after making the change.
To vary off the volume group so that it can be activated as appropriate by
the IBM Recoverable Virtual Shared Disk recovery scripts, enter:
varyoffvg volume_group_name
You now return to the secondary node. First, import the volume group
onto the secondary node. Importing the volume group onto the secondary
node synchronizes the ODM definition of the volume group with the primary
node.
- To use the smit importvg fastpath to import the volume group,
enter:
smit importvg
SMIT returns a screen similar to the following:
View figure.
- Enter field values as follows:
- VOLUME GROUP name
- Enter the name of the volume group that you are importing. Make
sure the volume group name is the same name that you used on the primary
node.
- PHYSICAL VOLUME name
- Enter the name of one of the physical volumes that resides in the volume
group. Note that a disk can have a different physical name on different
nodes. Make sure that you use the disk name as it is defined on the
secondary node. Every hdisk has an ID. If
you know that the name of a disk on the primary node is hdisk01, use
the name that matches that ID on the secondary node. You can use the
lspv command to determine the name.
- Volume Group MAJOR NUMBER
- Use the default, the next available number in the valid range.
- Make this VG Concurrent Capable?
- Accept the default of no. Do not specify
yes.
- Make default varyon of VG Concurrent?
- Accept the default of no. Do not specify
yes.
- Click on OK.
- Press F12 to exit SMIT and return to the command line.
By default, a volume group that was just imported is configured to
automatically become active at system restart. However, a recoverable
virtual shared disk volume group should be varied on as appropriate by the IBM
Recoverable Virtual Shared Disk recovery scripts. Therefore, after
importing a volume group, use the SMIT Change a Volume Group screen to
reconfigure the volume group to remain dormant at start up.
- To use the smit chvg fastpath to change the characteristics of a
volume group, enter:
smit chvg
SMIT prompts you to select the volume group.
- Enter the name of the volume group you just imported, or click on List and
select the name from the display. Click on OK.
SMIT returns a screen similar to the following. The first field
contains the volume group name you specified.
View figure.
- Enter remaining field values as follows:
- ACTIVATE volume group automatically at system restart?
- Set this field to no.
- A QUORUM of disks required to keep the volume group on-line?
- Accept the default, yes.
- Convert this VG to Concurrent Capable?
- Accept the default no. Do not specify yes.
- Autovaryon VG in Concurrent Mode?
- Accept the default no. Do not specify yes.
- Click on OK.
- Press F12 to exit SMIT and return to the command line.
Use the varyoffvg command to quiesce the affected volume group
after making the change.
To vary off the volume group so that it can be activated as appropriate by
the IBM Recoverable Virtual Shared Disk recovery scripts, enter:
varyoffvg volume_group_name
Once the you have extended the volume group, do the following tasks:
- Make sure the primary and secondary nodes are active.
- Use defvsd to define any new virtual shared disks.
- Use the cfgvsd command for all the virtual shared disks in this
volume group at all the nodes.
- Use the startvsd command at all the virtual shared disk nodes to
start these new virtual shared disks.
The following table summarizes the steps you do on both the primary and
secondary nodes to add or remove logical volumes to or from a twin-tailed
volume group. Perform all the steps in the correct order so the data
does not become corrupted.
Table 14. Procedure for Extending a Twin-tailed LVM Component
| Step Number
| Primary Node
| Secondary Node
|
| Step 1
| Complete prerequisite tasks
| Complete prerequisite tasks
|
| Step 2
|
| Export a volume group
|
| Step 3
| Create or remove logical volumes
|
|
| Step 4
| Vary off the volume group
|
|
| Step 5
|
| Import a volume group
|
| Step 6
|
| Change a volume group's characteristics
|
| Step 7
|
| Vary off the volume group
|
| Step 8
| Vary on the volume group
|
|
| Step 9
| Complete follow-up tasks
| Complete follow-up tasks
|
- Shutdown your applications using the volume group to ensure data
consistency and ODM integrity.
- Suspend, stop, and unconfigure all virtual shared disks on all the virtual
shared disk nodes.
- Undefine virtual shared disks on any logical volumes being removed.
Ensure all data is moved from the logical volumes before removing.
Before making any changes to the LVM elements on the primary node, you must
export the appropriate volume group from the secondary node. Exporting
the volume group deletes the information about this volume group from the
ODM.
To use the exportvg command to export the volume group containing
the component you are going to change on the secondary node, enter:
exportvg volume_group_name
To create the logical volumes, use the fastpath invocation to the SMIT
panel:
smit mklv
Alternatively, you can use the command line interface to create the
logical volumes:
mklv
To remove the logical volumes, use the fastpath invocation to the SMIT
panel:
smit rmlv
Alternatively, you can use the command line interface to remove the
logical volumes:
rmlv
Use the varyoffvg command to quiesce the affected volume group
after making the change.
To vary off the volume group so that it can be activated as appropriate by
the IBM Recoverable Virtual Shared Disk recovery scripts, enter:
varyoffvg volume_group_name
You now return to the secondary node. First, import the volume group
onto the secondary node. Importing the volume group onto the secondary
node synchronizes the ODM definition of the volume group with the primary
node.
- To use the smit importvg fastpath to import the volume group,
enter:
smit importvg
By default, a volume group that was just imported is configured to
automatically become active at system restart. However, a recoverable
virtual shared disk volume group should be varied on as appropriate by the IBM
Recoverable Virtual Shared Disk recovery scripts. Therefore, after
importing a volume group, use the SMIT Change a Volume Group screen to
reconfigure the volume group to remain dormant at start up.
To use the smit chvg fastpath to change the characteristics of a
volume group, enter:
smit chvg
For more information, refer to Step 7: Change volume group characteristics on the secondary node.
Alternatively, to use the command line interface to change the volume group
to remain dormant at startup, enter:
chvg -a `n' -Q`y' volume_group_name
Use the varyoffvg command to quiesce the affected volume group
after making the change.
To vary off the volume group so that it can be activated as appropriate by
the IBM Recoverable Virtual Shared Disk recovery scripts, enter:
varyoffvg volume_group_name
Use the varyonvg command to quiesce the affected volume group
after making the change.
To vary on the volume group so that it can be activated as appropriate by
the IBM Recoverable Virtual Shared Disk recovery scripts, enter:
varyonvg volume_group_name
Once the you have extended the volume group, do the following tasks:
- Make sure the primary and secondary nodes are active.
- Use defvsd to define any new virtual shared disks.
- Use the cfgvsd command for all the virtual shared disks in this
volume group at all the nodes.
- Use the startvsd command at all the virtual shared disk nodes to
start these new virtual shared disks.
The following table summarizes the steps you do on both the primary and
secondary nodes to reduce (remove one or more physical volumes from) a
twin-tailed volume group:
Table 15. Procedure for Reducing a Twin-Tailed Volume Group
| Step Number
| Primary Node
| Secondary Node
|
| Step 1
| Complete prerequisite tasks
| Complete prerequisite tasks
|
| Step 2
|
| Export a volume group
|
| Step 3
| Vary on a volume group
|
|
| Step 4
| Remove data from the physical volume
|
|
| Step 5
| Reduce a twin-tailed volume group
|
|
| Step 6
| Vary off the volume group
|
|
| Step 7
|
| Import volume group
|
| Step 8
|
| Change volume group characteristics
|
| Step 9
|
| Vary off the volume group
|
| Step 10
| Complete follow-up tasks
| Complete follow-up tasks
|
Complete the following tasks to reduce a twin-tailed volume group.
- Both the primary and secondary nodes must be up and in the active
group.
- Suspend, stop, and unconfigure virtual shared disks in the affected volume
group on all nodes.
Before making any changes to the LVM elements on the primary node, you must
export the appropriate volume group from the secondary node. Exporting
the volume group deletes the information about this volume group from the
ODM.
To use the exportvg command to export the volume group containing
the component you are going to change on the secondary node, enter:
exportvg volume_group_name
To use the varyonvg command to verify that the affected volume
group is varied on after making the change, enter:
varyonvg volume_group_name
Use the smit migratepv fastpath to move data on the physical
volume being removed from the volume group to a different physical
volume. If you do not, data will be lost.
- As the root user on the primary node, enter:
smit migratepv
SMIT returns a screen similar to the following:
View figure.
- Enter the names of the physical volumes being moved in the SOURCE physical
volume name field or click on List and select the names from the
display. Click on OK.
SMIT returns a screen similar to the following. The physical volumes
being migrated are entered in the SOURCE physical volume names field.
View figure.
- Enter field values as follows:
- DESTINATION physical volumes
- Enter the names of the physical volumes to which you want to move the
data.
- Move only data belonging to this LOGICAL VOLUME?
- Set this field to no.
- Click on OK to migrate the physical volumes.
- After the command completes, press F12 to exit SMIT and return to the
command line.
Use the smit reducevg fastpath to reduce a volume group.
- As the root user at the primary node, enter:
smit reducevg
SMIT returns a screen similar to the following:
View figure.
- Select the Remove a Physical Volume from a Volume Group option
and click on OK.
SMIT returns a screen similar to the following:
View figure.
- Enter the name of the volume group from which you are removing the
physical volumes in the VOLUME GROUP name field. Click on OK.
SMIT returns a screen similar to the following. The name of the
volume group you specified in the preceding screen is entered.
View figure.
- Enter field values as follows:
- PHYSICAL VOLUME names
- Enter the name of the physical volumes to remove from the volume
group.
- FORCE deallocation of all partitions on this physical volume?
- Set this field to no.
- Click on OK to remove the designated physical volumes from the volume
group.
- After the command completes, press F12 to exit SMIT and return to the
command line.
Use the varyoffvg command to quiesce the affected volume group
after making the change.
To vary off the volume group so that it can be activated as appropriate by
the IBM Recoverable Virtual Shared Disk recovery scripts, enter:
varyoffvg volume_group_name
You now return to the secondary node. First, import the volume group
on the secondary node. Importing the volume group onto the secondary
node synchronizes the ODM definition of the volume group on the node.
- To use the smit importvg fastpath to import the volume group,
enter:
smit importvg
SMIT returns a screen similar to the following:
View figure.
- Enter field values as follows:
- VOLUME GROUP name
- Enter the name of the volume group that you are importing. Make
sure the volume group name is the same name that you used on the primary
node.
- PHYSICAL VOLUME name
- Enter the name of one of the physical volumes that resides in the volume
group. Note that a disk can have a different physical name on different
nodes. Make sure that you use the disk name as it is defined on the
secondary node. Every hdisk has an ID. If
you know that the name of a disk on the primary node is hdisk01, use
the name that matches that ID on the secondary node. You can use the
lspv command to determine the name.
- Volume Group MAJOR NUMBER
- Use the default, the next available number in the valid range.
- Make this VG Concurrent Capable?
- Accept the default of no. Do not specify
yes.
- Make default varyon of VG Concurrent?
- Accept the default of no. Do not specify
yes.
- Click on OK.
- Press F12 to exit SMIT and return to the command line.
By default, a volume group that was just imported is configured to
automatically become active at system restart. However, a recoverable
virtual shared disk volume group should be varied on as appropriate by the IBM
Recoverable Virtual Shared Disk recovery scripts. Therefore, after
importing a volume group, use the SMIT Change a Volume Group screen to
reconfigure the volume group to remain dormant at startup.
- To use the smit chvg fastpath to change the characteristics of a
volume group, enter:
smit chvg
SMIT prompts you to select the volume group.
- To select the volume group you just imported, click on OK.
A screen similar to the following appears. The first field contains
the volume group name you specified.
View figure.
- Enter remaining field values as follows:
- ACTIVATE volume group automatically at system restart?
- Set this field to no.
- A QUORUM of disks required to keep the volume group on-line?
- Accept the default, yes.
- Convert this VG to Concurrent Capable?
- Accept the default no. Do not specify yes.
- Autovaryon VG in Concurrent Mode?
- Accept the default no. Do not specify yes.
- Click on OK.
- Press F12 to exit SMIT and return to the command line.
Use the varyoffvg command to quiesce the affected volume group
after making the change.
You vary off the volume group so that it can be activated as appropriate by
the IBM Recoverable Virtual Shared Disk recovery scripts. Enter:
varyoffvg volume_group_name
Once the you have reduced the volume group, complete the following
tasks:
- Make sure the primary and secondary nodes are active.
- Use undefvsd to undefine no longer required virtual shared
disks.
- Use the cfgvsd command for all the virtual shared disks in this
volume group at all the nodes.
- Use the startvsd command at all the virtual shared disk nodes to
start these new virtual shared disks.
See the following table for an overview of the steps needed to remove a
twin-tailed volume group.
Table 16. Steps to Remove a Shared Volume Group
| Step Number
| Primary Node
| Secondary Node
|
| Step 1
| Complete prerequisite tasks
| Complete prerequisite tasks
|
| Step 2
|
| Export volume group information
|
| Step 3
| Vary on a volume group
|
|
| Step 4
|
| Delete a twin-tailed volume group
|
Complete the following steps to remove a twin-tailed volume group.
- Suspend, stop, and unconfigure the active virtual shared disks on this
volume group on all nodes.
- Undefine the volume group with vsdelvg at the control
workstation.
Before making any changes to the LVM elements on the primary node, you must
export the appropriate volume group from the secondary node. Exporting
the volume group deletes the information about this volume group from the
ODM. To use the exportvg command to export the volume group
containing the component you are going to change on the secondary nodes,
enter:
exportvg volume_group_name
To use the varyonvg command to activate the affected volume group
after making the change, enter:
varyonvg volume_group_name
- As the root user at the primary node, enter:
smit reducevg
SMIT returns a screen similar to the following:
View figure.
- Select the Remove a Volume Group option and click on OK.
SMIT returns a screen similar to the following:
View figure.
- Enter the name of the volume group to be removed. Click on
OK.
- When the command completes, press 10 to leave SMIT and return to the
command line.
[ Top of Page | Previous Page | Next Page | Table of Contents | Index ]
 View figure.
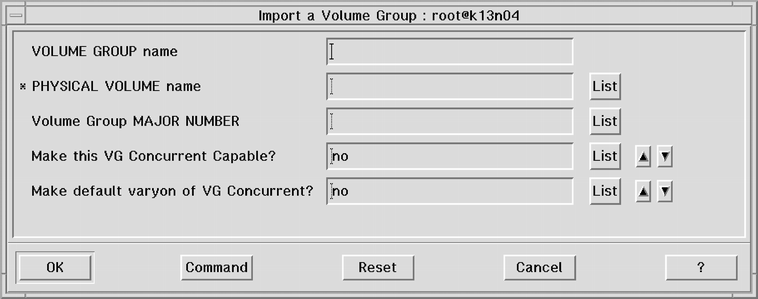 View figure.
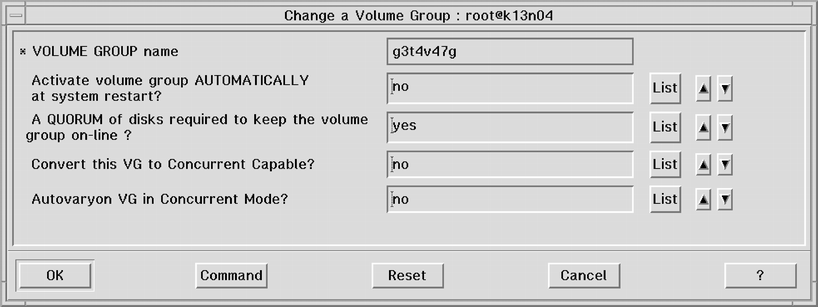 View figure.
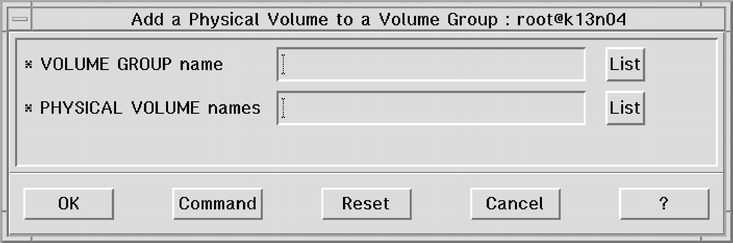 View figure.
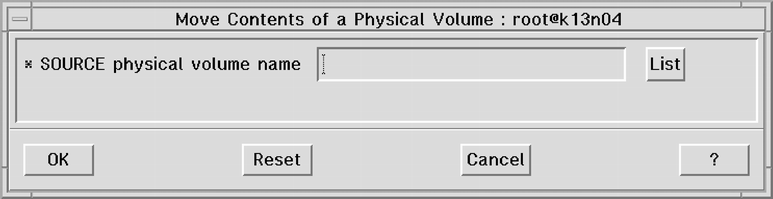 View figure.
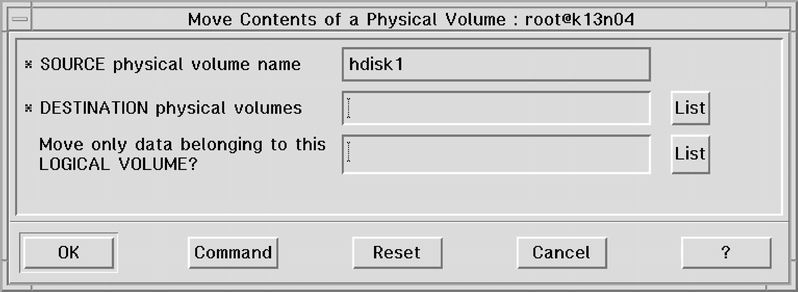 View figure.
 View figure.
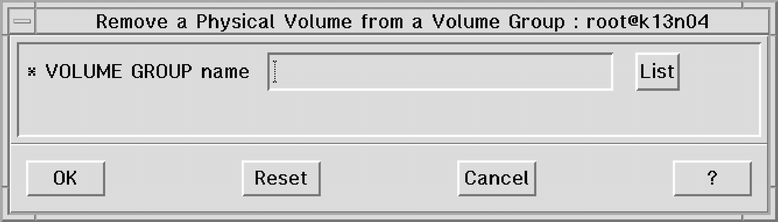 View figure.
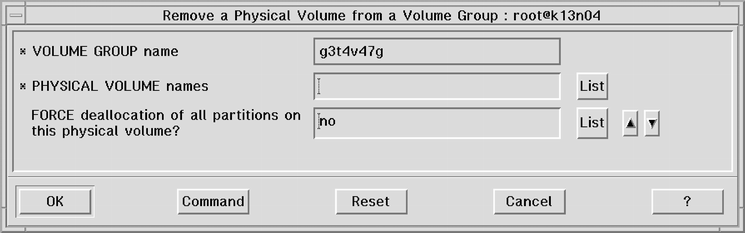 View figure.
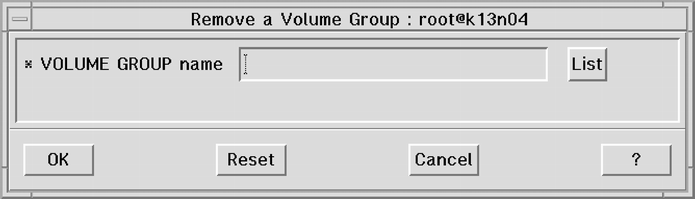 View figure.