![]()
|
|
This task explains how to work with the Clash command and ENOVIA LCA. You can:
To do so, perform the following operations: |
|||||
|
|
Have a DMU V5 session and an ENOVIA LCA session running | |||||
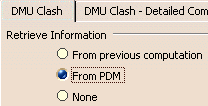
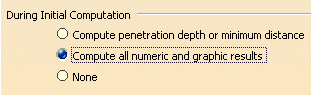
Customizing Clash Settings in DMU V5
|
||||||
|
|
Customizing XML Export Clash Settings
|
|||||
|
|
If you need to export only a few clashes results with pictures in XML format, and if you do not want to select Compute all numeric and graphic results option button, all you need to do is:
|
Double-click each interference to be exported in an XML file in the DMU V5 Check Clash dialog box |
|
|
|
This action enables to retrieve pictures in the generated XML file (same behavior as the Compute all numeric and graphic results option but only for the selected interference)
|
Set the remaining XML Export options accordingly, refer to DMU Clash - Process tab page (Tools > Options > Digital Mockup > DMU Space Analysis)
Click Export As
![]() in the Check Clash dialog box to generate the XML file.
in the Check Clash dialog box to generate the XML file.
Still in DMU V5, select Infrastructure -> Product Structure from the Start menu to launch the Product Structure workbench and establish the connection between DMU V5 and ENOVIA LCA.
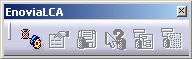
Display the ENOVIA toolbar by clicking Toolbars > ENOVIA LCA from the View menu.
|
|
Click the Connect to ENOVIA LCA icon.
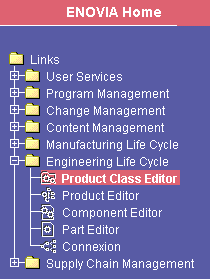
In ENOVIA Home panel, select the Engineering Life Cycle folder and double-click the Product Class Editor bookmark.The Product Class View panel is displayed.
|
|
|
|
|
To create a PRC, please refer to the appropriate ENOVIA LCA documentation. |
Right-click a Product Class Root (PRC) and select Open from the contextual menu.The PRC is opened in the Product Editor panel.
Right the PRC and select Expand from the contextual menu to expand the product. All instances are displayed.
Right-click the instance of your choice and select Send To > CATIA V5 from the contextual menu. The document is displayed in your DMU V5 session.
In DMU V5, switch to the DMU Space Analysis workbench (Start > Digital Mockup -> DMU Space Analysis)
Select Insert > Clash from the menu bar or
click Clash
![]() in the DMU Space Analysis toolbar and run an interference check.
in the DMU Space Analysis toolbar and run an interference check.
|
The Check Clash dialog box expands to show the results. |
|
The dialog box identifies the number of interferences detected along with the type. By default, results are organized by conflict in the List by Conflict tab. Additional information is provided in the Check Clash dialog box to help you compare clash results with those already stored in ENOVIA LCA. |
Identify the results you want to store in ENOVIA LCA in the Keep column of the Check Clash dialog box.
Click OK when done in the Check Clash dialog box.A dialog box appears asking you to confirm that you want to save results in ENOVIA LCA.
Click OK in the dialog box to confirm your save.
|
Clash results are written to ENOVIA LCA and a dialog box informs you whether or not the operation was successful. |
|
|
|
Using ENOVIA LCA search capabilities, check that clash results
have indeed been written to the database. Don't forget to commit changes to the ENOVIA LCA database before exiting your ENOVIA LCA application |
![]()