 |
This task explains how
you can create a specifications catalog and save it in the ENOVIA database.
If you are creating a file based specifications catalog then see Creating a
Specifications Catalog for resolved parts or
parametric parts. |

|
You should read the
task that explains creation of a file based specifications catalog, because
it refers to basic concepts that are not explained in this task.
You can use the method defined for creating a specification catalog in a
file-based environment. However, that will require that you create a parts
list. The method described here - using queries - may require less
preparation for large catalogs.
Note these general conditions:
- Catalog descriptions cannot point directly to a text file.
- Catalog descriptions can only point to the following document types:
CATProduct, CATPart, Catalog.
- All documents that the specifications catalog points to must be
loaded in memory before the catalog is saved in ENOVIA.
- To load documents that are pointed to by the specifications catalog,
click File -> Desk in the menubar, right click on the
resource, and select Load in the drop down menu to load it in
memory.
|
 |
1. |
Open the sample specifications
catalog provided with this application:
PipingSpecifications-Resolved-EV.catalog. It is located in ..\intel_a\startup\EquipmentAndSystems\Piping\Specification. |
|
2. |
Rules are already associated in
the sample catalog. This step shows how to associate rules if they are not
associated. Each rule that is defined under the family must point to a
CATProduct document. This document must contain the design table defining
the rules. The image below shows the rules that are defined in the sample
specifications catalog.
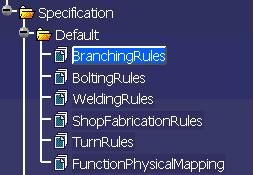
- Make the rule active in the specifications tree. You can activate the
rule by double clicking on it - it is highlighted blue when active, as
you can see above.
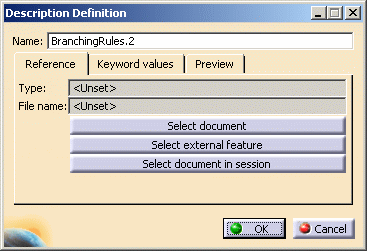
- Associate the corresponding CATProduct document. To do this, click
the Add Component button
 to display the
Description Definition dialog box. to display the
Description Definition dialog box.
- Click the Select Document button. In the File Selection
box that displays navigate to the directory where the design rules tables
are. They are CATProduct type files. The default directory is
intel_a\startup\EquipmentandSystems\XXX\Specification
(where XXX is your application) and then the specification itself, say
Cs150r. Open the Cs150r directory and select the CATProduct that
corresponds to the rule that you double-clicked, in this case
BranchingRules. Click Open on the File Selection box and
OK on the Description Definition box. The CATProduct
will be associated with the rule and display in the Catalog Editor. The
text file defining the rule must be stored within the CATProduct (using
the Duplicate in CATIA option). The text file and the
CATProduct should not have the same name.
- All rules shown in the image above must be associated.
- Make sure that all the CATProduct documents are loaded in memory. You
can do that by using File -> Desk.
- Save the specification catalog (XXXSpecifications-Resolved-EV.catalog)
in ENOVIA. The catalog is saved in ENOVIA along with all the rules (CATProduct
documents) that it points to and the specification
sub-catalogs (if there are any) that it
points to.
|
|
3. |
You need to synchronize the
queries defining the specification catalog, using the master parts catalog.
Since queries may have pointed to a file-based master catalog,
synchronizing them points them to the catalog in session, which in this
case is in ENOVIA. If your queries already point to a catalog in ENOVIA,
you do not need to take this step. (Click here to learn how to
define and resolve
queries.)
- Send the master parts catalog (XXXParts-Resolved.catalog)
from ENOVIA to CATIA. All sub-catalogs will be automatically loaded as
well from ENOVIA. If the sub-catalogs are not loaded, you must load them
using File -> Desk.
- Send the saved specification catalog (XXXSpecifications-Resolved-EV.catalog)
to CATIA.
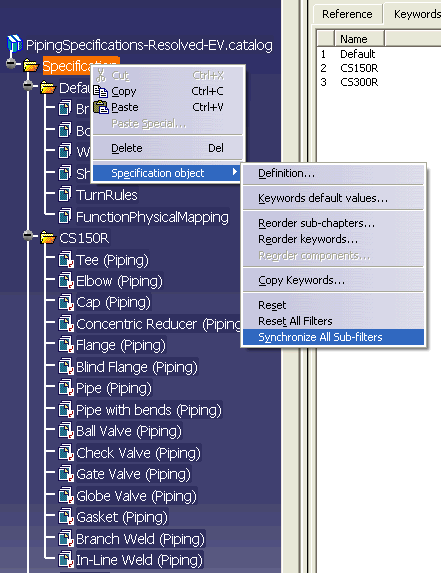
- Right click on the Specification chapter, and select
Synchronize All Sub-filters in the drop down menu.
The Synchronize a Catalog dialog box displays.
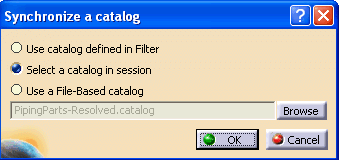
- Check the option Select a Catalog in Session. Click the
Browse button - this displays the catalogs that are loaded in
the session. Select the master parts catalog - in this example it is
PipingParts-Resolved.catalog. Click OK to begin the
synchronization process. A message will display when the process is
complete.
The specifications catalog has been created in ENOVIA. |
 |
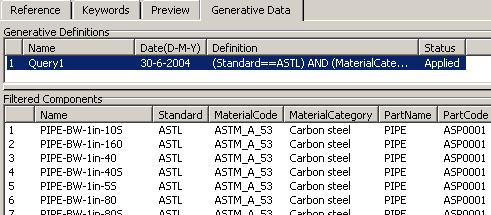
Take the following
step to make sure that the specification sub-catalogs are resolved. Select
the query (select the part family and click the Generative Data
tab) and you should see the result of the query in the form of descriptions
listed in the bottom half of the Result pane. The status of the
query should say Applied. The image below shows part of the
Result pane from the catalog editor, with the query highlighted and
some of the resulting parts displayed.
 |
| |
4. |
You can also use the process given
above to synchronize one sub-catalog, instead of the entire specifications
catalog, as described above. To synchronize one sub-catalog:
- Open the sub-catalog you want to synchronize. It should have been
saved in ENOVIA previously.
- Open the parts catalog that contains the parts that the
specifications catalog points to. This can be the master parts catalog or
a sub-catalog.
- Right click on the specification sub-catalog and select
Synchronize All Sub-filters in the drop down menu, as shown in Step
3 above.
- In the Synchronize a Catalog dialog box, use the Browse
button to open parts catalog or sub-catalog. This catalog should have
been loaded from ENOVIA.
- Make sure that the filter is applied and the descriptions are
associated to the defined filter.
- Save the specifications sub-catalog in ENOVIA.
- To verify that the synchronization is successful, follow the steps
described in the Informational entry above.
|
 |
|
|
 |


