![]()
This task shows you how to customize SpE settings.
![]()
|
|
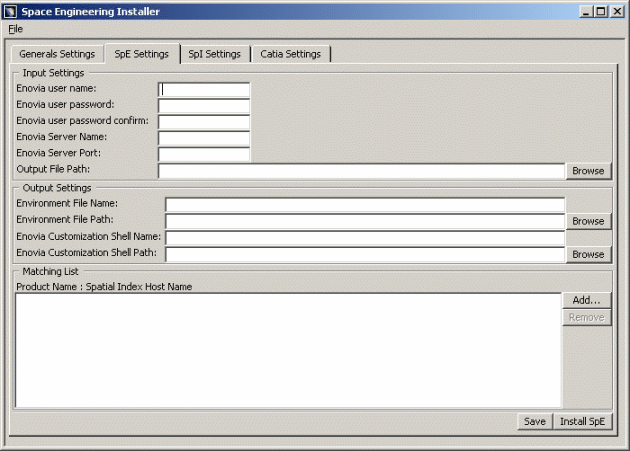
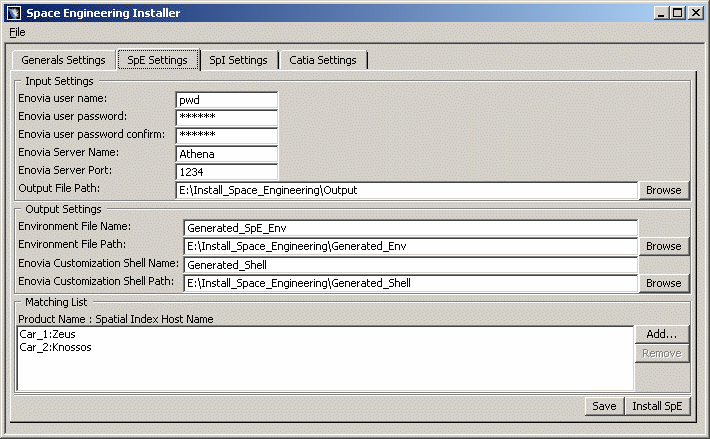
Input Settings
In the Input Settings area, customize the various paths and files as follows:
-
In the Enovia User Name field, enter the administrator user ID.
In our example: pwd -
In the Enovia User Password field, enter the Enovia administrator password (pwdpwd).
-
In the Enovia User Password Confirm field, type the Enovia administrator password and confirm this password (pwdpwd).
-
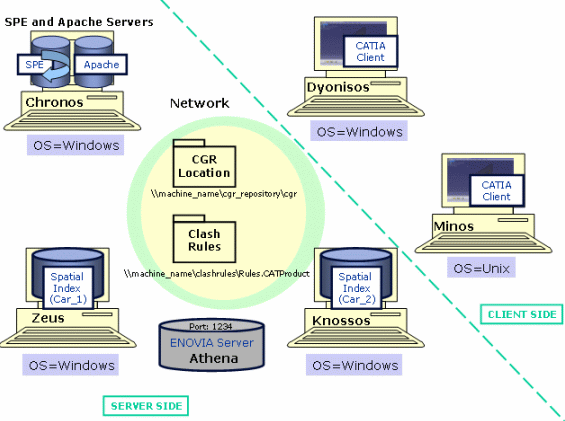
In the Enovia Server Name field, specify the Enovia server name (i.e. Athena).
-
In the Enovia Server Port field, specify the Enovia server port (i.e. 1234) of the Enovia server (Athena)
-
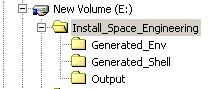
In the Output File Path, specify the path to the directory, in which SpE will create, at run time, log and results files and a sub-directory (rep) containing xml result files. (E:\Install_Space_Engineering\Output)
For this, click Browse and select the path accordingly in the Path Browser- Choose SpE Output Directory dialog box displayed.
-
When done, click Ok
Output Settings
In the Output Settings
area, customize the various paths and files as follows:
-
In the Environment File Name field, enter a name of your choice. This environment file will be created during SpE server installation (i.e. Generated_SpE_Env).
-
In the Environment File Path field, specify the path to the directory in which the environment file will be created. In our example: E:\Install_Space_Engineering\Generated_Env.
For this, click Browse and select the path accordingly in the Path Browser-Choose SpE Environment Directory dialog box displayed.
-
When done, click Ok.

Notes:
-
The Generated_SpE_Env file will be created in E:\Install_Space_Engineering\Generated_Env
-
When the installation is finished, the environment file cannot be moved without modifying the parameters of the associated executable program.
-
-
In the Enovia Customization shell Name field, specify a name of your choice for the Unix shell. This shell enables to customize the Enovia server configuration. (i.e. Generated_Shell)
-
In the Enovia Customization shell Path field, select the path to the directory in which the Unix shell will be created (using Browse-> Path Browser-Choose Enovia Shell Directory) or type it.
Notes: For more detailed information, please read Step 5:Customize Enovia Server
Matching List
In the Matching List area, configure the installation architecture as follows:
-
Specify the 'mapping list' or 'mapping table' identifying the SpI(s) location on the network.
In our example, the SpE server (Chronos) must know that SpI Car_1 is located on Zeus and SpI Car_2 is located on Knossos.
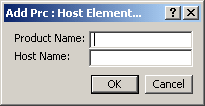
For this, click Add
-
Enter Car_1 in the Product Name field.
-
Enter Chronos in the Host Name field.
-
Repeat the operation with Car_2 (Knossos).
Note: You can remove items from your matching list using the Remove button
All you need to is select the line to be removed, the Remove button is no longer grayed out. -
-
Click Ok when done.
-
Check your result, you should obtain something like this
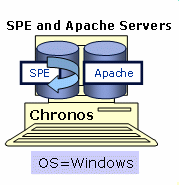
Now let's have a look at our architecture example

-
Click Save when satisfied.
-
Click Install SpE.
![]()