Roughing

This task shows you how to insert a roughing operation into the program.
Roughing is an operation which allows you to rough machine parts by horizontal planes.

To create the geometry you define:

Only the geometry is obligatory, all of the other requirements have a default value.

Either:
  • make the Manufacturing Program current in the specification tree if you want to define an operation
    and the part/area to machine at the same time,
  • or select a machining feature  or an offset group from the list if you have already defined the area to machine
    and now you want to define the operation to apply to it.

Below we are going to see how to do the first of these.

  1. Open file SurfaceMachining3.CATProduct, then select Machining > Surface Machining in the Start menu.

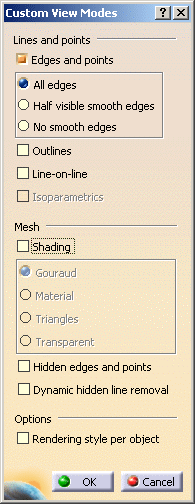
  2. Then display the model in wireframe mode using the View/Render Style/Customize View command:
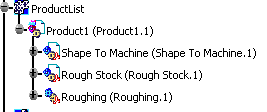
  3. Click Roughing .
    A roughing entity and a default tool area added to the program.
    The dialog box opens at the geometry tab page .
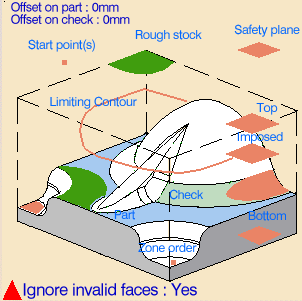
    This page includes a sensitive icon to help you specify the geometry to be machined.
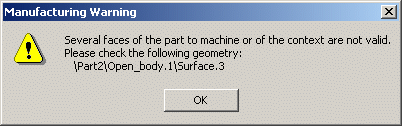
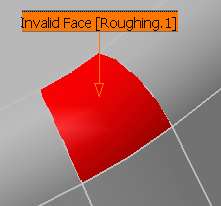
    The red area in the sensitive icon represents the part geometry.
    It is obligatory, as is the rough stock. All of the other parameters are optional.

  4. Click the red area in the sensitive icon and select the part in the viewer.
    Then double-click anywhere in the viewer to confirm your selection and redisplay the dialog box.

  5. Click the rough stock in the sensitive icon.
    Select the stock in the viewer.

  6. Click Replay to compute the operation.
    You will see that the part has been rough machined.
    A progress indicator is displayed.
    You can cancel the tool path computation at any moment before 100% completion.

  7. If you want to perform another roughing operation,
    you can use the result of the above operation as the rough stock for the next:

  8. Click the Full Video icon () and running the animation,

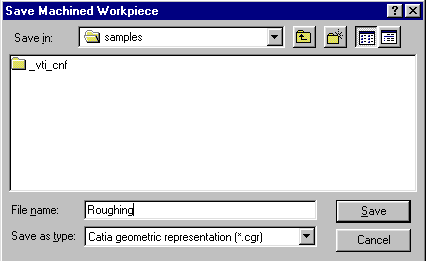
  9. Click the Save Video Result in a CATProduct icon (),

  10. Name the file Roughing and press Save.

  11. Close all of the dialog boxes.

  12. Double-click Product 1 in the tree and, using the contextual menu,
    choose Components > Existing Component ...,

  13. Browse to the right directory and choose Roughing.cgr.

  14. Double-click Part Operation in the tree.

You can now select Roughing in the tree as your rough stock for the next operation.


Invalid Face

  1. If a tool path cannot be computed because of invalid faces,
    an explicit warning message like this one will appear:

    Each invalid face is highlighted in red, with an arrow pointing on it.

    This visualization is removed when you close the main dialog box or
    when you select Remove in the contextual menu.

  2. Click OK in the Warning box to revert to the main dialog box.
    In the Geometry tab, a message Ignore invalid faces: No is displayed:

  3. You can either:

    • close the dialog box.
      When you reopen it, the Ignore invalid faces: No will not be displayed.
    • heal the defective geometry and restart the computation.
      If it is successful the message Ignore invalid faces: No will disappear.
    • ignore the invalid faces. Click the text Ignore invalid faces: No.
      It will turn to Ignore invalid faces: Yes and the computation will continue.
      The message remains displayed as a warning.
Be very careful when you choose to ignore invalid faces.
We recommend that you ignore only faces that will not affect the tool path.
Otherwise this may lead to defective tool paths.