 |
This task explains creation of openings using the sketch method. In the
example below, an opening with several contours will be created on a
longitudinal stiffener. |

|
1. |
Click the
Opening button  to
display the Opening dialog box. to
display the Opening dialog box.
 |
| |
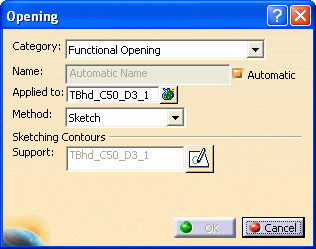
2. |
CATEGORY:
Select a category by clicking on the down arrow. The last 10 categories you
selected will be displayed. If the category you want is not visible then
select More to display the class browser and make your
selection. The categories available to you depends on what your
administrator has added. NOTE: 'Functional Opening' is a high level
function. It is best to use a more specific category, such as access hole
or lightening hole, or other categories that your administrator may have
added. |
| |
3. |
NAME: The
application can assign a name to the object you are creating using the
object naming
function if you check the Automatic checkbox. If you want to
assign your own name then uncheck the box and enter a name. |
| |
4. |
The
Applied To field shows the object to which the opening will be
applied. You can click in the field and select a different object. Openings
can be applied to plates, stiffeners, or stiffeners on free edge. |
| |
5. |
METHOD: Select
Sketch for applying the opening.
If the object on which the opening is to be placed is
planar then it will be pre-selected as the sketch support. If it is curved
then you will have to select a planar surface or plane to define the sketch
support. 2D VIEW ORIENTATION: The orientation
of the object when it opens in the Sketcher can be controlled by
settings in the file
ShipStructureMoldedConventions.xml.
|
| |
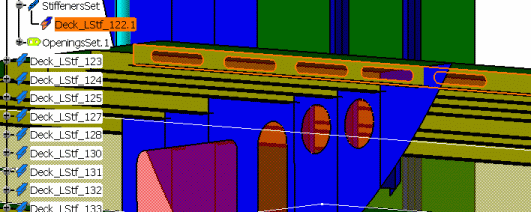
6. |
Click on the
Sketcher button to open the Sketcher and make your opening using one of the
tools.
To learn about the Sketcher you need to see Sketcher
documentation. However, as a suggestion, one method you could follow is to
place one contour on the stiffener. You can draw a contour, or place it
using the menubar command Insert - Profile - Predefined Profile.
Size the contour you have placed, then place as many
as you require. You can place several instances using the menubar command
Insert - Operation - Transformation - Translate. Or you can use
the standard Copy-Paste operation. Click the Exit Workbench
button to return to the 3D representation. You will be able to preview the
openings you have placed when you exit the Sketcher workbench. The image
below shows several openings created in a longitudinal stiffener.
Note:
- A contour must be closed.
- If you draw more than one contour while you are in
the Opening command, all sketches
will be included in one opening entry in the specifications tree. If you
want more than one opening then you must launch the command again.
|
| |
7. |
Click
OK in the Opening
dialog box to create the opening. |