|
This task
explains how to send images used for material textures in the mail or to
a directory or a diskette. |
 |
Open the
SortMaterial.CATMaterial
document. |
|

|
|
Sending in the mail
|

|
-
Select
File > Send To > Mail.
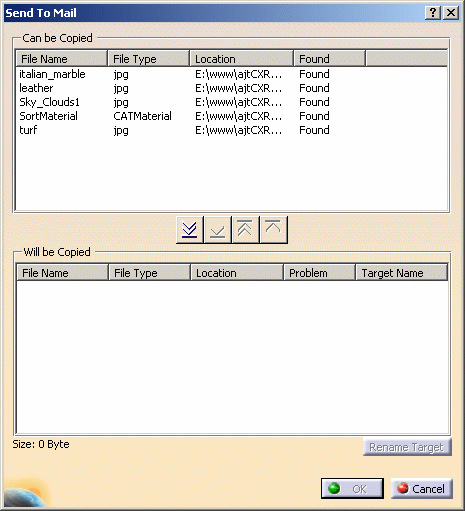
| The Send To Mail dialog box opens: |
 |
| In the upper part of the dialog box you can see a
list of all the different documents linked to the document you
selected for the send operation. The four columns provide
information about the file name, the file type, the location and
whether or not the file was found. |
-
Select the files in the upper list individually and
transfer them to the lower list using the Copy selected files
 button.
| If you want to select the files by type, place the cursor
inside the list and right-click to display the list of file types
and then select the appropriate type. (Selecting by type in this
way operates of course in the lower list as well.) OK
might be grayed out. This means that problems shown in the
Problem column have not been resolved. |
-
Click OK. You are now prompted to give the
name of your e-mail system.
For detailed information on using the Send To Directory
command, refer to
Transferring Version 5 Data To Another Directory. |
|
Copying to a directory or diskette
|
 |
-
Select File > Send To > Directory.
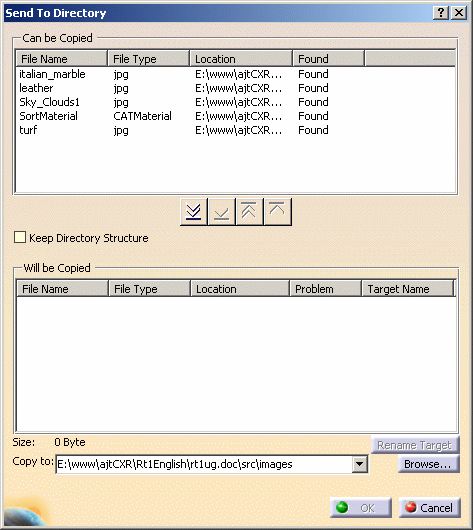
| The Send To Directory dialog box
opens: |
 |
In the upper part of the dialog box you can see a
list of all the different documents linked to the document you
selected for the copy operation.
The four columns provide information about the file name, the
file type, the location and whether or not the file was found. |
-
Select the files in the upper list individually and use
the Copy selected files
 button to transfer them to the lower list.
|
If you want to select the files by type, place
the cursor inside the list and right-click to display the list of
file types and then select the appropriate type. (Selecting by
type in this way operates of course in the lower list as well.).
|
 |
It might be useful,
especially if copying files to a diskette, to know the size of
the documents to be copied. You find this just above the
Copy to: box. |
|
OK might, as in the case shown above, be grayed out.
This means that problems shown in the Problem column
have not been resolved. |
-
Enter the path of the target directory in the Copy
to: box or click Browse if you need to browse your
file tree, then click OK.
|
This box is in fact a list and contains the nine
destinations last used. |
-
Click OK.
|
A progress bar appears as each file is copied and
when the copy has been performed, the Files Copied
dialog box appears telling you the number, size and type of the
files copied. |
|
|
For detailed information on using the Send To Mail
command, refer to
Sending Version 5 Data in the Mail.
|
|

|


