-
Open the Version 5 document you want to copy.

Before doing anything, make sure you have saved all the files you intend to send. -
Select File > Send To Mail. The Send To Mail dialog box appears:
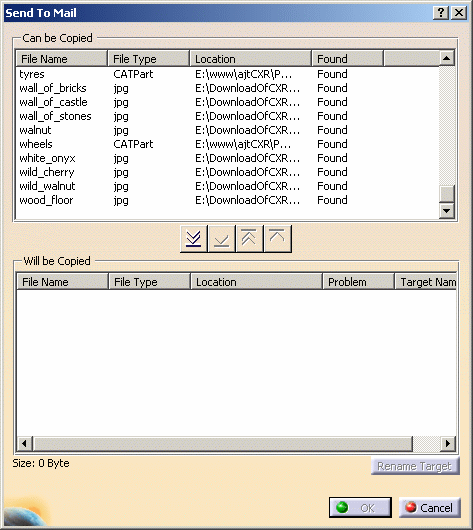
In the upper part of the dialog box you can see a list of all the different documents linked to the document you selected for the send operation. The four columns provide information about the file name, the file type, the location and whether or not the file was found. -
Click the Copy all files
 button between the two lists. The dialog box then looks something like
this:
button between the two lists. The dialog box then looks something like
this: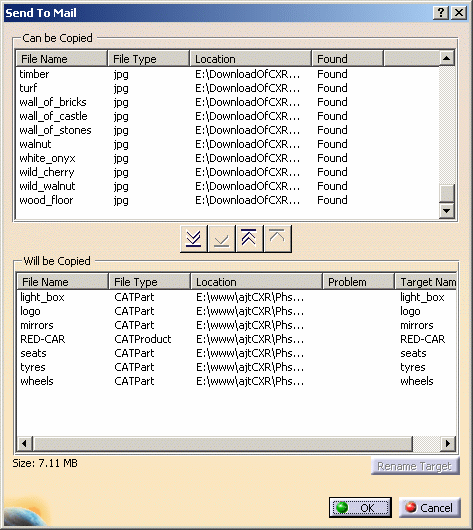
The files have now been sorted. The list in the lower part of the box shows a list of those files that will be sent.
In the upper list remain those files that were not found. This can be remedied by selecting either Tools > Options > General > Document or Edit > Links (see Linked Document Localization or Editing Document Links).If you prefer, you can select the files in the upper list individually and transfer them to the lower list by clicking the Copy selected files  button.
If you want to select the files by type, place the cursor inside the list and right-click to display the list of file types and then select the appropriate type. (Selecting by type in this way operates of course in the lower list as well.)
Before sending your documents in the mail, you may want to check the size of the documents to be sent. You will find this in the lower left-hand corner. OK may be grayed out. This means that problems shown in the Problem column have not been resolved.
As well as the information provided in the upper list, the lower list also contains a column showing potential problems such as duplicate file names. There are different ways of resolving this. You can: - select one of the identically named files and click the
Reset selected files
 button to move it to the upper list i.e. not include it in the
files to be sent
button to move it to the upper list i.e. not include it in the
files to be sent - rename one of the files using Rename Target.
- select one of the identically named files and click the
Reset selected files
-
If you want to give one of the files a different name in the target directory, select the file and click Rename Target in the lower right-hand corner of the dialog box. The dialog box opposite appears specifying the name of the file selected:
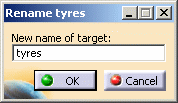
Enter the new name and click OK. To cancel the rename, select the new name just entered in the Rename dialog box, delete it and click OK. The old name is restored. You can of course move all files to the upper list at any time by clicking the Reset all files  button.
 -
Click OK. You are now prompted to give the name of your e-mail system.
If Lotus Notes has been set as your default e-mail system, an error message is displayed after clicking OK because from version 6.x onwards, Lotus Notes Client installations no longer support MAPI.
In that case, you need to specify another e-mail system in your favorite web browser. For instance, if you are working with Internet Explorer, select Tools > Internet Options > Programs then choose another system in the E-mail box.
![]()