
|
This task shows you how to
generate automatically an environment image to be used for reflection
purposes. |
 |
Open the
Lamp.CATProduct document then create an environment with wallpapers as
explained in Defining the Wallpaper. |

|
-
Right-click the environment in the specification tree then select
Save Reflection.
| The Environment Image Generator dialog
box appears: |
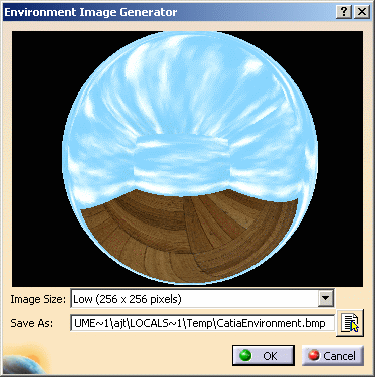 |
| The map of the environment you created in the
previous tasks is displayed in the previsualization window. This
previsualization is automatically updated whenever you modify the
point of view. |
-
Use the Image Size list to choose a size for
your environment image:
-
Lowest (128 x 128 pixels)
-
Low (256 x 256 pixels)
-
Medium (512 x 512 pixels)
-
High (1024 x 1024 pixels)
-
Highest (2048 x 2048 pixels).
|
-
Enter the name and path of the generated image in the
Save As box or click the Browse Directories
 button to open the File Selection dialog box which lets you
browse your file tree to the desired location.
button to open the File Selection dialog box which lets you
browse your file tree to the desired location.
-
Click OK to save your image.
|
| |
This image can be re-used as many times as you wish, for instance when
defining advanced reflection settings.
For detailed information, refer to
Defining Reflection Settings.
|
| |
| As this image is going to be used
for reflection purpose only, you cannot visualize environment
reflections on your object unless you set the Reflectivity
parameter to the a non-zero value (provided that the object itself
is reflecting). |
|
|
 |