-
Create a spot light source by clicking Create Spot Light
 .
.
- Only spot light sources can cast shadows between objects.
- Object shadows are supported on Windows only and that we recommend the following graphic boards: Nvidia Quadro4 750XGL, Nvidia Quadro4 900XGL, ATI Radeon 8800 or Wildcat 6110.
-
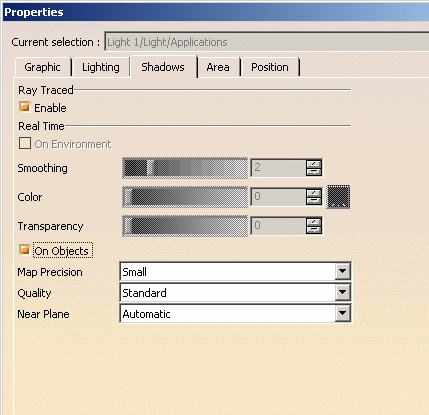
Access the lighting properties dialog box by right-clicking the light in the specification tree then selecting Properties.
-
Click the Shadows tab and select the On Objects check box to activate shadow casting between objects:
Only one light source can cast shadows at a time. As a consequence, when On Objects is activated, other light sources you may have previously created (as well as the standard light sources defined using View > Lighting) are deactivated and identified by a specific symbol in the specification tree.
In the following example, Light 3 cast shadows on objects and Light 1 and 2 are deactivated: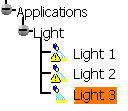
Moreover, note that creating a new light source automatically switches shadows off for the other light sources. To switch shadows from one light source to another, access the light source properties then select the On Objects check box: a warning window will appear to prompt you to confirm your choice.
When On Objects is activated, the light source angle cannot exceed 45°.
Inversely, defining a light source with an angle greater than 45° prevents you from creating shadows between objects. -
Use the Map Precision list in the Properties dialog box to define the size of the shadow map: Small, Medium or Large.
A "shadow map" identifies illuminated points in the scene with respect to a given light source. This ray-tracing technique relies on a precomputed depth map attached to the light source.
The higher the map precision, the more accurate the shadows but bear in mind that there is a price to pay in performance and allocated memory.
-
Define the shadow Quality which enables you to optimize the performance by selecting a value from the list:
- Standard:
this is the default value. In that case, the shadow map is not
recomputed at each interaction - Good: the
shadow map is recomputed at each interaction, which provides a
more accurate shadow but affects performance.

We recommend that you start with a low precision and a standard quality then, when satisfied with your lighting parameters, increase Map Precision and Quality. - Standard:
this is the default value. In that case, the shadow map is not
-
Select the Near Plane mode: either Automatic or Manual. The box is activated as soon as you move the light in the geometry area.
The near plane corresponds to the minimum distance from the light origin and is represented by a dotted rectangle in the light source symbol:
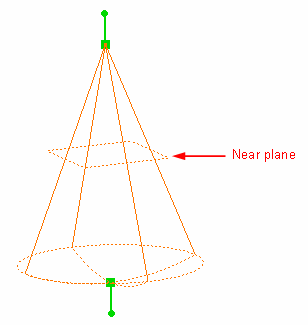
The near plane distance is used when you want to focus on a specific part of the scene as if viewed from behind the light source.
Each part of the scene positioned between the near and far distance is taken into account to compute the shadow.
Near and far plane distances have an impact on the shadow map quality: the greater the distance, the less accurate the details of the object.- Automatic:
this is the default mode which means that the near plane is
automatically adjusted according to the current viewpoint and the bounding box.
This bounding box is not the box that usually appears around the selected object but corresponds to the sum of all the bounding boxes around all the objects in the scene.

Near Plane set to Automatic mode
As you can see in the above scheme, any object located above the near plane is illuminated. - Manual: this mode lets you define the desired distance for the near plane by dragging the green arrow to manipulate the near plane. However, do not forget that the minimum distance from the light origin cannot be overridden.
Be careful not to position the light source too close to the illuminated object, otherwise the near plane is set to a minimum value and illuminated zones appear in the scene. - Automatic:
this is the default mode which means that the near plane is
-
Click OK or Apply then OK to validate.
The following are sample images showing shadows between objects On and Off: 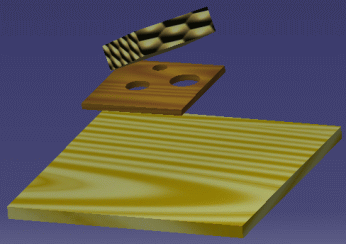
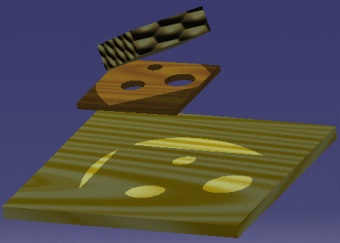
Shadows Off Shadows On
Note that when On Objects is activated, shadows are cast on the environment as well (if there is one), even though the On Environment option is cleared.
![]()