This task shows how to tune your lighting parameters and shooting quality when using global illumination. Global illumination simulates indirect illumination of objects by diffuse interreflection of light coming from diffuse surfaces. This functionality allows indirect lighting effects among which caustics (detailed in another task) and color bleeding.
Below is an example of global illumination. Just click the thumbnail to see the full-size picture:
Open the CornellBox.CATProduct document.
-
Access the light properties (by right-clicking the light item in the specification tree then selecting Properties) then access the Indirect Illumination tab:
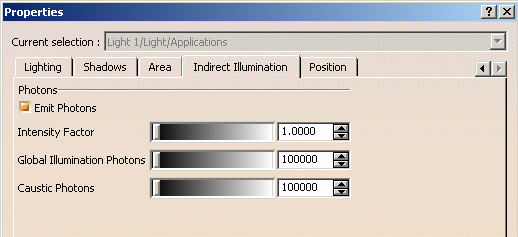
Emit Photons is already selected for the current sample document but note that it is cleared by default. What are photons?
Photons are energy particles emitted into the scene by a light source. Once emitted, these energy particles take different paths as they bounce from one object to another. A photon path can evolve in two ways: photons are either absorbed by an object they hit (through reflection or transmission) and in that case the path ends, or photons get lost in space without hitting another object and the path is infinite.
Photon emission can be compared to ray casting, the differences being that photons are emitted by a light source and not a camera as for rays and that photons have energies but rays have colors.How are photons stored?
As a photon bounces from one object to another, each rebound on a diffuse surface (and on a diffuse surface only) is stored in a three-dimensional data structure called a photon map.
Thus the photon map contains the position and the light energy of each photon hitting a diffuse surface, these data being used later to compute indirect illumination.
The only exception in the storing phase is the first reflection or transmission point which is never taken into account because it is handled by direct illumination.Let`s detail the figure below explaining how photons are emitted, absorbed and stored through two photon paths: 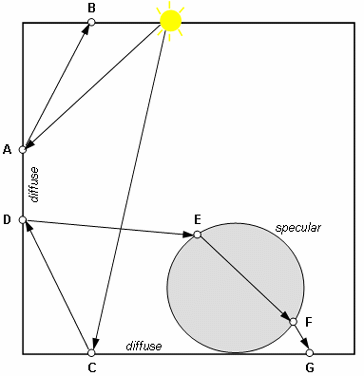
Photon paths The first photon is emitted at the light source, hits a diffuse wall and is reflected at point A but not stored (it is the first reflection), and finally hits point B where it is stored and absorbed.
The second photon is reflected at the diffuse floor (C) then reflected and stored at the wall (D), transmitted but not stored at the specular (non-diffuse) sphere surface points E and F, and finally stored and absorbed on the floor (G).A photon is said to be absorbed on a surface when it is neither reflected nor transmitted. The photon path ends where it is absorbed.
Absorption can be forced when the trace depth limit is reached. This limit is defined in the Shooting Definition dialog box where you indicate the maximum number of reflections, refractions and rebounds.Photon emission stops as soon as a specified number has been reached or as soon as a maximum number has been emitted.
However, the photon map does not affect the rendering phase since it is almost entirely independent from the scene complexity.The last phase is the rendering phase during which direct local illumination is computed as usual but, in that case, indirect global illumination is added by collecting neighbouring photons from the photon map and adding their contribution. -
In the Intensity Factor box, indicate the multiplication factor of the light intensity associated to each photon, using either the slider or the spin box.
By default, direct and indirect lighting have the same intensity so the factor is equal to 1. A good value for Intensity Factor should be close to 1, except for a particular purpose (style effect or especially dark scenes, for instance). -
In the Global Illumination Photons box, define the maximum number of photons to be stored in the photon map. This value controls the rendering quality of global illumination.
You can enter a value comprised between 10 000 and 10 000 000.Be careful when setting this parameter since the higher the value, the longer the rendering phase and the higher the quality. On the other hand, too small values may create fuzzy light "puddles". When Final Gathering is activated, setting lower number of photons is sufficient to get a satisfactory result. -
Click OK to validate your lighting parameters then click Create Shooting
 to define the shooting parameters in the Indirect Illumination
tab:
to define the shooting parameters in the Indirect Illumination
tab: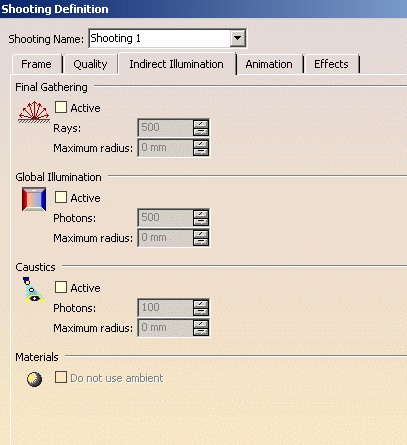
This tab lets you define global illumination parameters in order to create color bleeding, i.e. have the colors reflected from diffuse surfaces. -
In the Global Illumination area, click Active to activate global illumination and activate the two other boxes.
-
In the Photons box, indicate for each pixel the number of photons to be searched in a specified area (defined in the Maximum radius box) in order to compute the local intensity of global illumination.
The default value is 500. The higher the value, the smoother the illumination but the longer the rendering phase. A large radius gives less noise but a blurrier result. -
Enter the Maximum radius (in millimeters) to set the limits of the area in which the photons will be searched to compute globall illumination.
A null value means that the radius is computed from the scene extent. -
Click Do not use ambient in the Material area if you do not want the material ambient coefficient to be taken into account when computing indirect illumination.
Ambient coefficient corresponds to the light intensity diffused in any direction by the object, even if not lit by any light source. This parameter affects the whole object, including the shadowed area.
Note that this option can be selected only when at least one of the indirect illumination parameters is activated. -
Click OK to validate your parameters then render the shooting using Render Shooting
 (you can also right-click the Shooting item in the specification tree
then select Render Single Frame) to check the result.
(you can also right-click the Shooting item in the specification tree
then select Render Single Frame) to check the result.In case the rendered image shows artefacts, you can increase the number of photons.
Note also that increasing the radius value may also help to increase the color attenuation.
The examples below illustrate the various results you can obtain according to the values you defined (we have kept a null maximum radius and a realistic falloff for each of the four examples):
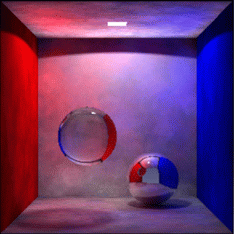
Intensity Factor = 10
Global Illumination Photons = 100 000
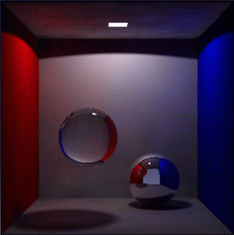
Photons = 2000Intensity Factor = 3
Global Illumination Photons = 100 000
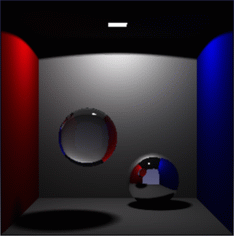
Photons = 2000Intensity Factor = 1
Global Illumination Photons = 450 000
Photons = 2000Intensity Factor = 0.20
Global Illumination Photons = 450 000
Photons = 8000