|
-
Click
Create Shooting
 to open the Shooting Definition dialog box the select
Shooting 1 from the Shooting Name list:
to open the Shooting Definition dialog box the select
Shooting 1 from the Shooting Name list:
 |
|
In the Frame tab, the
Scene area lets you specify the elements to be rendered as well as
the way of rendering them. By default, the active environment and
any other active source are rendered. |
-
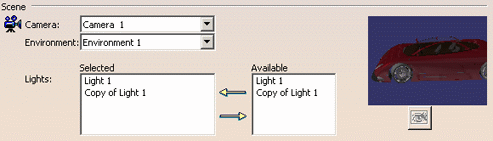
In the the appropriate boxes of the Scene area, select
the Camera, Environment and Available Lights you want to render.
| If no light is selected, a default directional
light orthogonal to the image plane is used (therefore producing
very few shadows). |
As it might
take a very long time to compute the preview when working with
large models, no preview is displayed by default.
However, you can now click the Camera View
 button to display a preview of the camera or of the current
viewpoint (depending on what you selected in the Camera
list).
button to display a preview of the camera or of the current
viewpoint (depending on what you selected in the Camera
list).
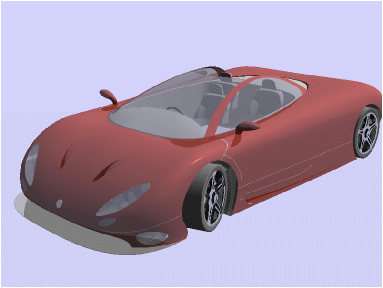
In our scenario, the result looks like this when clicking the
Camera View
button: |
 |
| Once the preview is displayed, the Camera View
button is grayed out and remains deactivated unless you
select another value in the Camera list. |
-
In the Image size area, define the size of the rendered
image using the slider or manually.
-
Indicate the ratio between the frame height and width in
the Custom box.
By default, the pixel
number is locked:  .
However, the pixel number and the ratio can be linked together so
that, whenever you change the pixel number, the ratio value is
adjusted according to this number and reciprocally. To do so, click
the Lock Size Ratio
button (which turns
green .
However, the pixel number and the ratio can be linked together so
that, whenever you change the pixel number, the ratio value is
adjusted according to this number and reciprocally. To do so, click
the Lock Size Ratio
button (which turns
green  ). ). |
 |
You can also click
Predefined to retrieve standard ratios. The
corresponding ratio and pixel number is then displayed accordingly. |
-
In the Output area, select
On disk to modify the name of the computed image. By default,
it is saved in a temporary folder under the name "CatiaRender.tif".
| The On disk option also lets you change
the default location. For more information, refer to the
Saving Pictures task in this guide. |
-
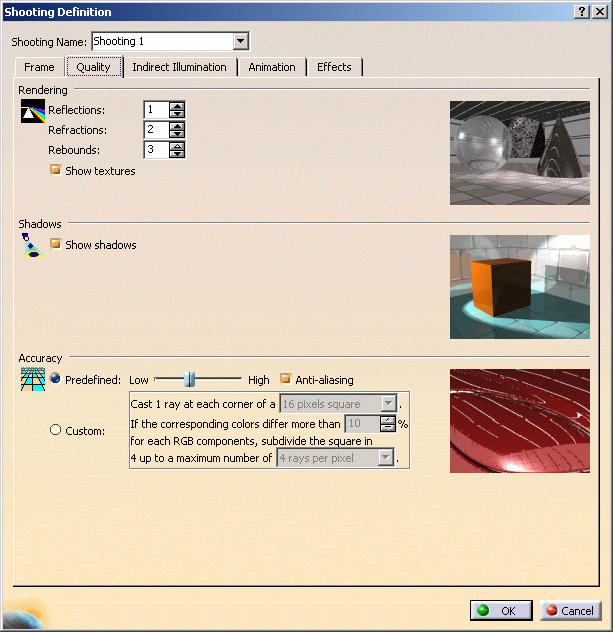
The Quality tab lets you
specify rendering, shadow and accuracy parameters, all of them impacting
the rendering computation duration.
-
Indicate the maximum number for:
- Reflections
- Refractions
- Rebounds (the maximum number of times a ray, either reflected
or refracted, can rebound onto a surface).
For instance, if you choose 2 reflections and have
two parallel mirrors in your scene, you will see the reflections of
the reflections in each mirror ; choosing 1 instead, you will not
see the secondary reflections.
Note: the number of rebounds cannot exceed
the sum (Reflections + Refractions) and cannot be lower than 1. |
 |
No texture rendering
means that only the material lighting characteristics is taken into
account for the rendering and the environment wall texture are not
rendered as well. This option can be used to speed up rendering at
early stage for example.
If you select the Show
shadows check box, only the shadows produced by the active
lights are rendered, otherwise no shadows are computed. This can be
useful to speed up rendering. |
|
Now, let's define the accuracy parameters that control the
oversampling of the final image: |
-
Select the accuracy type.
|
Predefined: sets a fixed sag value for
calculating tessellation on all objects.
-
a low value means that a very fine mesh is used
to render surfaces, but the drawback is that pre-processing and
rendering will take more time
-
a high value means that a very coarse mesh is
used, but the advantage is that pre-processing and rendering
will take less time.
Custom: these parameters are defined through
three values: a minimum number of samples, a maximum number of
samples and a threshold.
- minimum sample: specifies the minimum number of samples,
i.e. minimum number of
rays taken at each corner of a pixel square to measure the
color. In our example, we
have chosen a minimum of 1 ray at each corner of a square of 4 ×
4 pixels
- threshold: specifies the percentage over which an
oversampling is done if the contrast
in any RGB component between the currently calculated pixels
and the neighboring
pixels weighted by their sum is greater than this threshold.
The lower this value, the more oversampling and the longer the
rendering time
- maximum sample: specifies the maximum number of samples,
i.e. rays, per pixel.
In our example, we have chosen a maximum of 1 ray per pixel.
The preview area to the right shows you the effect of each
setting. |
|
|
Anti-aliasing sets a better oversampling by modifying the
appearance of lines in order to make the jagged edges look
smoother. To do so, the square pixels composing the lines are put
in shades of gray or in-between color. |
-
Click the Animation tab to define
the animation parameters. For more information on the animation, refer to
the Defining Animation Parameters task in
this guide.
-
Click OK.
| The next step is to render the shooting you have defined. |
-
Click
Render Shooting
 to open the Render dialog box.
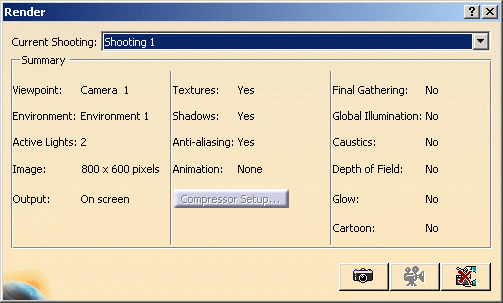
|
A summary of the selected scene characteristics
(viewpoint, number of active lights, shadows activated or not,
etc.) is displayed. |
 |
-
Select a shooting then
click the Render Single Frame
 button or the
Render Animation button or the
Render Animation
 button, depending on the type of render you want to create.
| The Rendering Output window
opens and displays the rendering result. |
|
|
You can also render an animation or a single frame
by right-clicking the desired shooting in the specification tree
then selecting Render Animation
or Render Single Frame.
The background colour of the Rendering Output window
depends on the background color set in
Tools > Options > General > Display > Visualization. |
| After
selecting an animation as the current shooting, the
Compressor Setup... button is
activated to let you set the type of compressor from the
Choose Compressor dialog box: |
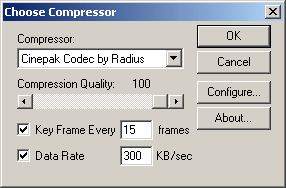 |
| This dialog box allows you to choose a
CODEC from the list of CODECs installed on your computer, then
configure it. The role of the CODEC is to compress your video
files. Installing Version 5 does NOT install CODECs on your
computer. The list of CODECs differs from one platform to another.
For information about how to configure the CODEC, refer to the
CODEC supplier's documentation.
On Windows, the Compressor list contains several options among
which "Full Frames (Uncompressed)". Selecting this option prior to
recording has the following effects:
- the resulting video file is larger (because it is not
compressed)
- but performance during the recording is enhanced (because
each frame is not compressed as soon as it is recorded).
Note that if you installed DirectShow on your computer, you will
be able to use all CODECs and compression options provided by the
DirectShow multimedia architecture. Therefore, additional CODECs
will be available in the Compressor list. |
|
|
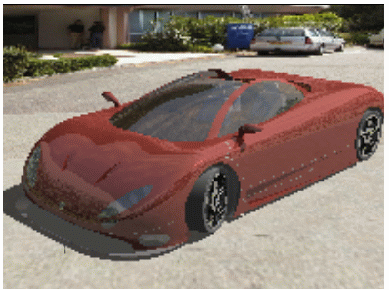
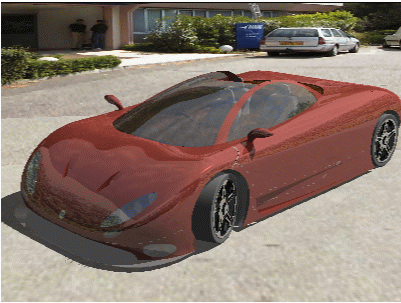
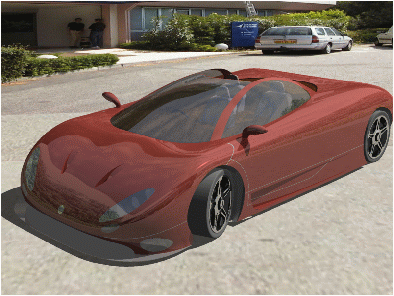
The following images illustrate different types of rendering:
 |
 |
|
Textures off, two
active lights, shadows off and an
average accuracy |
Textures on, two
active lights, shadows on,
anti-aliasing off and the lowest accuracy |
 |
 |
|
Textures on, two
active lights, shadows on
and the lowest accuracy |
Textures on, two
active lights, shadows on
and an average accuracy |
|