-
Click Split
 .
.
The Split Definition dialog box is displayed.
-
Select Surface.1 as the splitting surface. This surface intersects only one pad.
An arrow appears indicating the portion of body that will be kept. Only the intersected pad will be split.
If the arrow points in the direction that is not satisfactory, you can click it to reverse the direction.
Avoid using input elements that are tangent to each other since this may result in geometric instabilities in the tangency zone.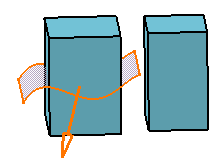
-
Click OK.
Material has been removed, but only one pad is split. The other one is unchanged because the surface did not intersect it. The specification tree indicates you performed the operation.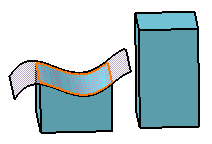
Splitting Elements
If the splitting element is:
-
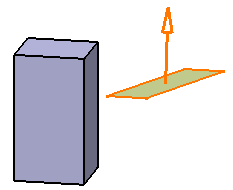
A surface or a non-planar face, it must intersect the element to be cut before being selected, otherwise the split feature will be generated but no material will be cut as shown in the example below:
The cutting element is a trimmed planar surface which does not intersect geometry. Whatever the direction pointed by the arrow, the split will be performed successfully: no error message will be issued but no material will be split. The geometry will remain unchanged.
-
A plane or a solid's planar face which does not intersect material, the operation is performed even if the result is null.
The cutting element is a plane which does not intersect geometry.
The split will be performed successfully: no error message will be issued but all material is removed. There is no more solid geometry.
If the direction is reversed, no error message will be issued and no material will be split. The geometry will remain unchanged.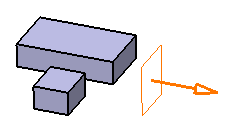
Contextual Commands
Contextual commands creating the splitting elements you need are available from the Splitting Element field:
- Create Plane: for more information, see Creating Planes
- XY Plane: the XY plane of the current coordinate system origin (0,0,0) becomes the splitting element.
- YZ Plane: the YZ plane of the current coordinate system origin (0,0,0) becomes the splitting element.
- ZX Plane: the ZX plane of the current coordinate system origin (0,0,0) becomes the splitting element.
- Create Join: joins surfaces or curves. See Joining Surfaces or Curves.
- Create Extract: See Extracting Geometry.
If you create any of these elements, the application then displays the corresponding icon next to the Splitting Element field. Clicking this icon enables you to edit the element.
Hybrid Design
When adding a surface-based feature or a surface feature modifying another surface-based feature or surface belonging to the same body, Part Design features based on that second feature then reference the new added feature. In other words, a replace operation is automatically performed. Let's take an example.
-
Double-click Split.1 and note that this feature references Extrude.1.
-
Define Extrude.1 as the current object using Define in Word Object.
-
Go into Shape Design workbench and create an Edge Fillet onto the faces of Extrude.1 using Edge Fillet
 .
. -
If required, update Split.1 (local update).
-
Double-click Split.1 and note that it now references EdgeFillet.2.
This behavior differs from what happens in a non-hybrid design environment. In a traditional environment, Split.1 would not have been affected by the insertion of EdgeFillet.2. and would still reference Extrude.1.