![]()
|
|
This task shows you how to create an area inside a boundary by clicking anywhere inside the boundary lines. The task Create Area by Size and Location contains more comprehensive information about some of these steps. | |
|
|
1. | Create a boundary. See Creating a Boundary for instructions. |
| 2. | Click the Area button |
|
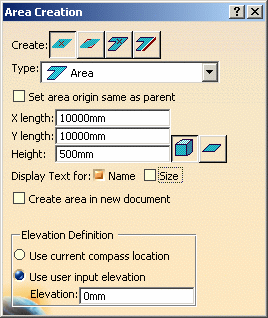
| The Area Creation dialog box
displays.
|
||
| 3. | Select the Bounded - Inside
button
|
|
| 4. | Select the Type of area you want to create. | |
| 5. | Define a height for the area. You cannot set X and Y dimensions using this option. | |
| 6. | Select other options, as needed, displayed in the Area Creation dialog box. These are explained in Create Area by Size and Location. | |
| 7. | Click anywhere inside the boundary. The area is displayed. | |
|
|
Sometimes the area will not display correctly inside the boundary - it may overlap a part of the boundary or not align with a portion correctly. In such cases delete the area and click again at a location that is different from the last location you clicked at. It may take two or three tries before you get the correct display. | |
|
|
||