Creating a Boundary

This task shows you how to create a boundary.

1. On the Path Reservation/Boundary toolbar tbpathwayhdr2.gif (1093 bytes), click the Boundary button tbboundary.gif (337 bytes).
The Boundary dialog box displays.


2. Select the Type of boundary you want to create:

3. Define the Mode for routing  

routingmodeptpt.gif (465 bytes) Point-to-Point

routingmodeortho.gif (467 bytes) Orthogonal

Edgeline

If you want to branch from the center of the segment, click the Branch at Center button. The branch will begin from the center of the segment, irrespective of the point in the segment that you route from.

In addition, if you place the compass on an object the Use Compass Origin button will display. If you click the button and start to route the route will start from the compass origin. If you are in the middle of routing, the compass origin will serve as a routing point.

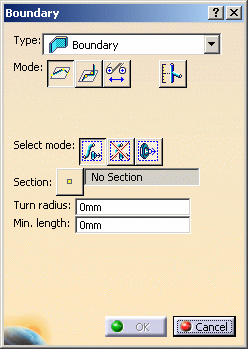
Click one of the Select Mode buttons - the default is No Filter. The Select Mode buttons allow you to define where you can start routing from.

No Filter: No filters are applied and you can route from any routable object or in space.

In Space: Routing will be in space. This is useful when you have a large object in the background, such as a ship structure, and you want to be able to route in space.

Only Part Connectors: Select this to be able to route from part or equipment connectors only.

4. Define the Section type:

sectionnosection.gif (368 bytes) No Section

sectionrectangular.gif (389 bytes) Rectangular Section

If you select Rectangular Section, define these parameters:

  • Set Point:
  • Height
  • Display:

sectiondisplaynosection.gif (433 bytes) No section 

sectiondisplaytrue.gif (460 bytes) True Size 

sectiondisplayflat.gif (410 bytes) Flat  

Instead of entering the type of boundary, the set point and the height, width or diameter in the Section dialog box,  you can select an existing boundary in your document. Once you select the boundary the Section dialog box will display the same values as the one you selected. To select, click on the Path Reservation button and then click the left mouse button once on the boundary whose values you want as the default. Make sure the entire boundary is selected, and not just one segment or node. It will be easier to select the boundary in the specifications tree.
5. Indicate a location for the endpoint of each side.

The boundary is displayed as you move the cursor.

6. Double-click to end the boundary definition.